This post describes how to use NFC in Android to write smart tags. Android smartphones are capable not only to
read NFC tags that contains data like URL, phone numbers and so on but using Android NFC Api is possible to write NFC tags. In this post, we will explore how to use Android Api to write NFC smart tags.
What is NFC technology?
Before digging into the details about how to use NFC in Android it is useful to describe a bit what is NFC technology.
Near Field Technology (NFC) is a technology that enables short range communication between two compatible devices that support this technology. NFC requires that one device behaves as transmitter and other one as receiver. NFC enabled devices can be grouped in two categories:
- Active
- Passive
Active NFC devices are capable to send and receive data and can exchange data with passive device. Passive devices can send data to other NFC enabled devices without power source. A typical passive device is NFC tag that can be used as advertising system for example.
NFC technology is available on the newest Android smartphones and NFC tags are used to active advertising, smart payment etc. It is important then to know how to write NFC tags in Android.
Getting started using NFC
The first thing an NFC enabled Android app should do is verifying if the NFC is present and if it is active:
@Override
protected void onCreate(Bundle savedInstanceState) {
   ...
   nfcMger = new NFCManager(this);
   ..
}
where
nfcManager is the class that handles NFC details and implementation using NfcAdapter:
public class NFCManager {

    private Activity activity;
    private NfcAdapter nfcAdpt;

    public NFCManager(Activity activity) {
        this.activity = activity;
    }

    public void verifyNFC() throws NFCNotSupported, NFCNotEnabled {

        nfcAdpt = NfcAdapter.getDefaultAdapter(activity);

        if (nfcAdpt == null)
            throw new NFCNotSupported();

        if (!nfcAdpt.isEnabled())
            throw new NFCNotEnabled();

    }
}
Just to recall if you have not read the getting started with NFC tutorial, it is necessary to register the android app so that it receives notification when the Android device is near the NFC tag. To enable this notification we have to use
NFC foreground dispatch:
@Override
protected void onResume() {
  super.onResume();
  try {
    nfcMger.verifyNFC();
    Intent nfcIntent = new Intent(this, getClass());
    nfcIntent.addFlags(Intent.FLAG_ACTIVITY_SINGLE_TOP);
    PendingIntent pendingIntent = PendingIntent.getActivity(this, 0, nfcIntent, 0);
    IntentFilter[] intentFiltersArray = new IntentFilter[] {};
    String[][] techList = new String[][] {
                { android.nfc.tech.Ndef.class.getName() },
                { android.nfc.tech.NdefFormatable.class.getName() }
             };
     NfcAdapter nfcAdpt = NfcAdapter.getDefaultAdapter(this);
            nfcAdpt.enableForegroundDispatch(this, pendingIntent, intentFiltersArray, techList);
     }
     catch(NFCManager.NFCNotSupported nfcnsup) {
        Snackbar.make(v, "NFC not supported", Snackbar.LENGTH_LONG).show();
     }
     catch(NFCManager.NFCNotEnabled nfcnEn) {
        Snackbar.make(v, "NFC Not enabled", Snackbar.LENGTH_LONG).show();
     }
}
How to write a NFC tag in Android
Now the Android app is ready to handle the NFC tag and when the Android smartphone gets near the NFC tag, the event is notified to the app. The next step is writing the data on the tag. The method is quite simple:
public void writeTag(Tag tag, NdefMessage message)  {
  if (tag != null) {
     try {
        Ndef ndefTag = Ndef.get(tag);
        if (ndefTag == null) {
           // Let's try to format the Tag in NDEF
           NdefFormatable nForm = NdefFormatable.get(tag);
           if (nForm != null) {
              nForm.connect();
              nForm.format(message);
              nForm.close();
            }
        }
        else {
           ndefTag.connect();
           ndefTag.writeNdefMessage(message);
           ndefTag.close();
        }
     }
     catch(Exception e) {
         e.printStackTrace();
     }
  }
}
This method accepts an abstract representation of the NFC tag we want to write and the NdefMessage containing the message to write. As the first step, the NFCManager class tries to get the Ndef tag (line 4). If the tag is null, the app tries to “format” the tag and the write the message. If the tag is already formatted, the Android app tries to connect to the tag abstract representation and write the NdefMessage.
Write URL into NFC Tag with Android app
Now it is known how to write data into NFC tag, it is time to start writing some simple information.
As first example, the Android NFC app writes an URL:
public NdefMessage createUriMessage(String content, String type) {
     NdefRecord record = NdefRecord.createUri(type + content);
     NdefMessage msg = new NdefMessage(new NdefRecord[]{record});
     return msg;
}
The code is very simple, using NdefRecord provided by Android NFC Api, the Android app creates an Uri record. As we already know, a NdefMessage is an array of record, so we create a NFC Ndef Message holding only one record: the Uri record.In this case,
type holds http value because it is a link.
If we want to write a NFC tag that holds a phone number so that when the user taps with the smartphone the tag a phone call is triggered, we have to pass as type tel:.
Write text data into NFC tag
The last example is writing text data in a NFC tag. In this case following NFC specs the code is very simple:
public NdefMessage createTextMessage(String content) {
  try {
     // Get UTF-8 byte
     byte[] lang = Locale.getDefault().getLanguage().getBytes("UTF-8");
     byte[] text = content.getBytes("UTF-8"); // Content in UTF-8

     int langSize = lang.length;
     int textLength = text.length;

     ByteArrayOutputStream payload = new ByteArrayOutputStream(1 + langSize + textLength);
     payload.write((byte) (langSize & 0x1F));
     payload.write(lang, 0, langSize);
     payload.write(text, 0, textLength);
     NdefRecord record = new NdefRecord(NdefRecord.TNF_WELL_KNOWN,
                             NdefRecord.RTD_TEXT, new byte[0],
                             payload.toByteArray());
     return new NdefMessage(new NdefRecord[]{record});
  }
  catch (Exception e) {
     e.printStackTrace();
  }

  return null;
}
Implementing the Android UI for NFC App
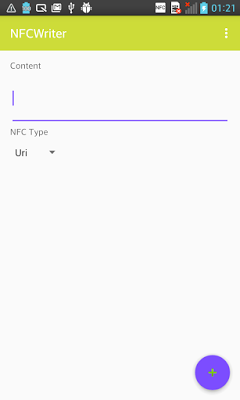
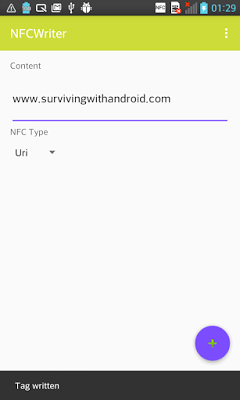
The last step is implementing the UI so that the Android app handles different NFC record type and user can insert the data to write. The app uses a spinner that holds the different record types and an EditText that holds the data to write and finally a button (a Floating Action Button) to start the operation. As soon as the user clicks on the button the app starts waiting for the NFC tag. When the user taps on the tag, the app starts writing the data.
| Reference: | How to write NFC tag in Android from our JCG partner Francesco Azzola at the Surviving w/ Android blog. |
