


PROJECTS Arduino Hardware components:
Software apps and online services:
Hand tools and fabrication machines:
Other Arduino Nano projects:
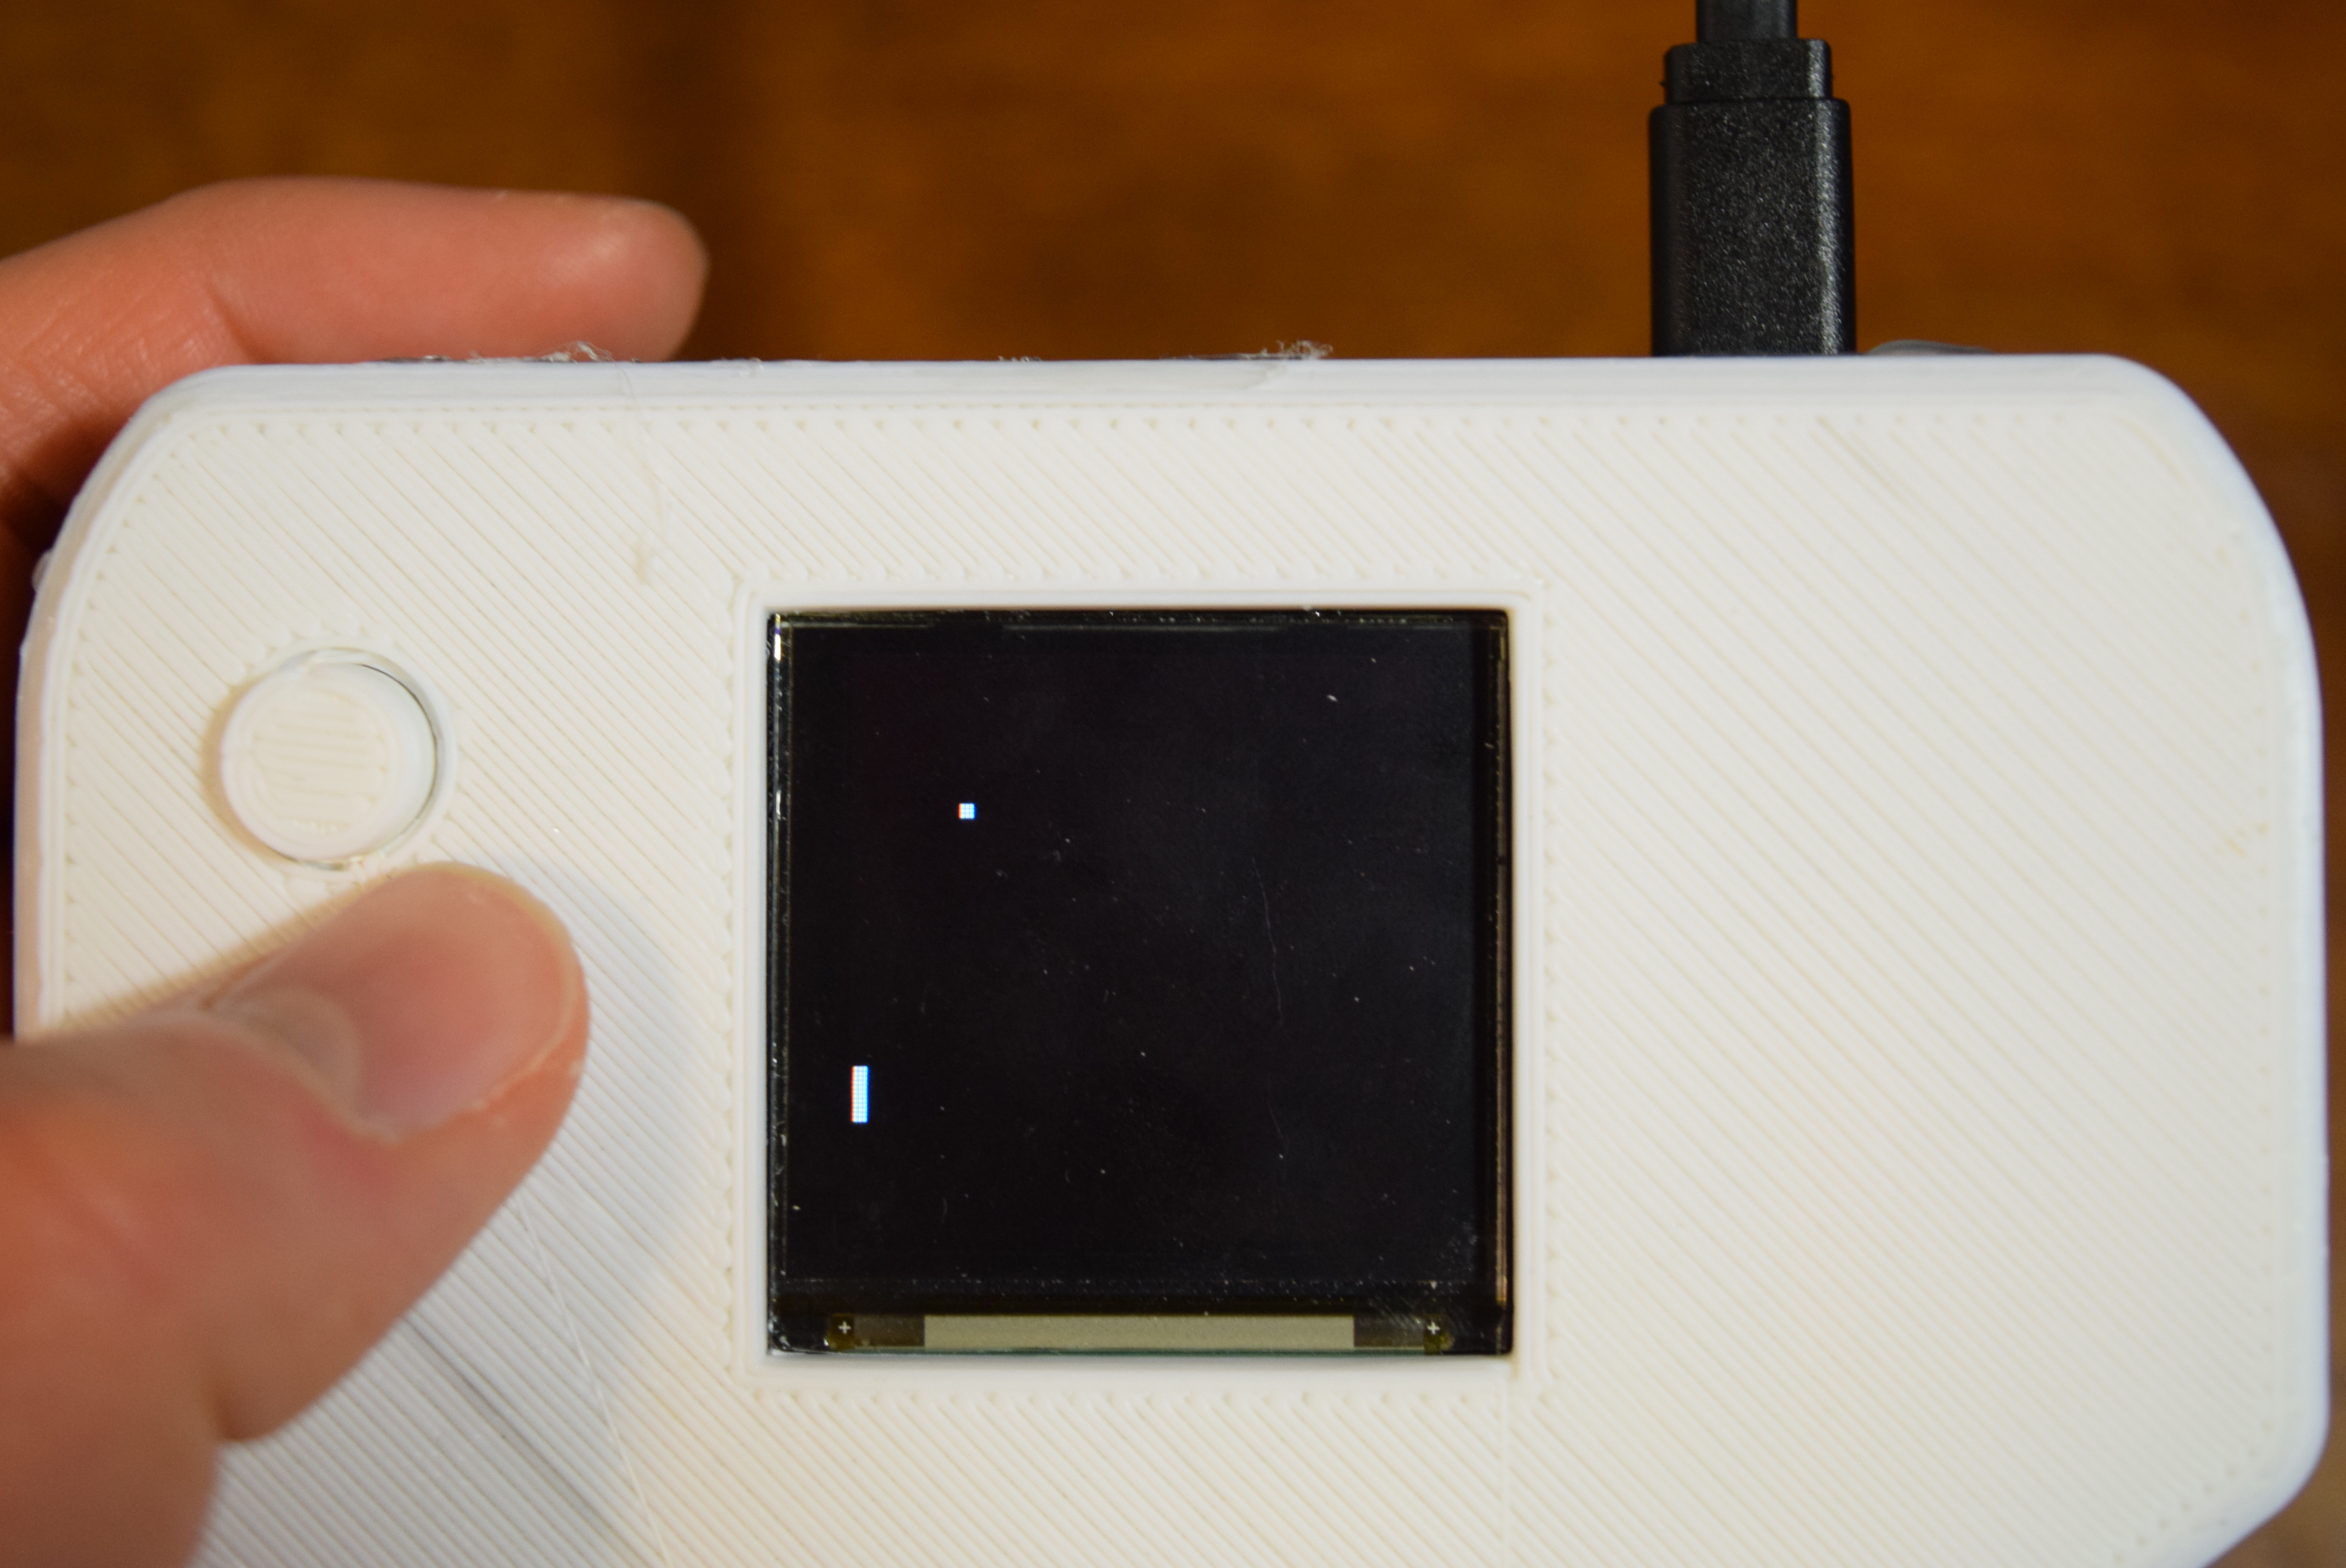
Arduino Nano Projects: Handheld Arduino Pong Console
DFRobot
Dec 11 2017 824
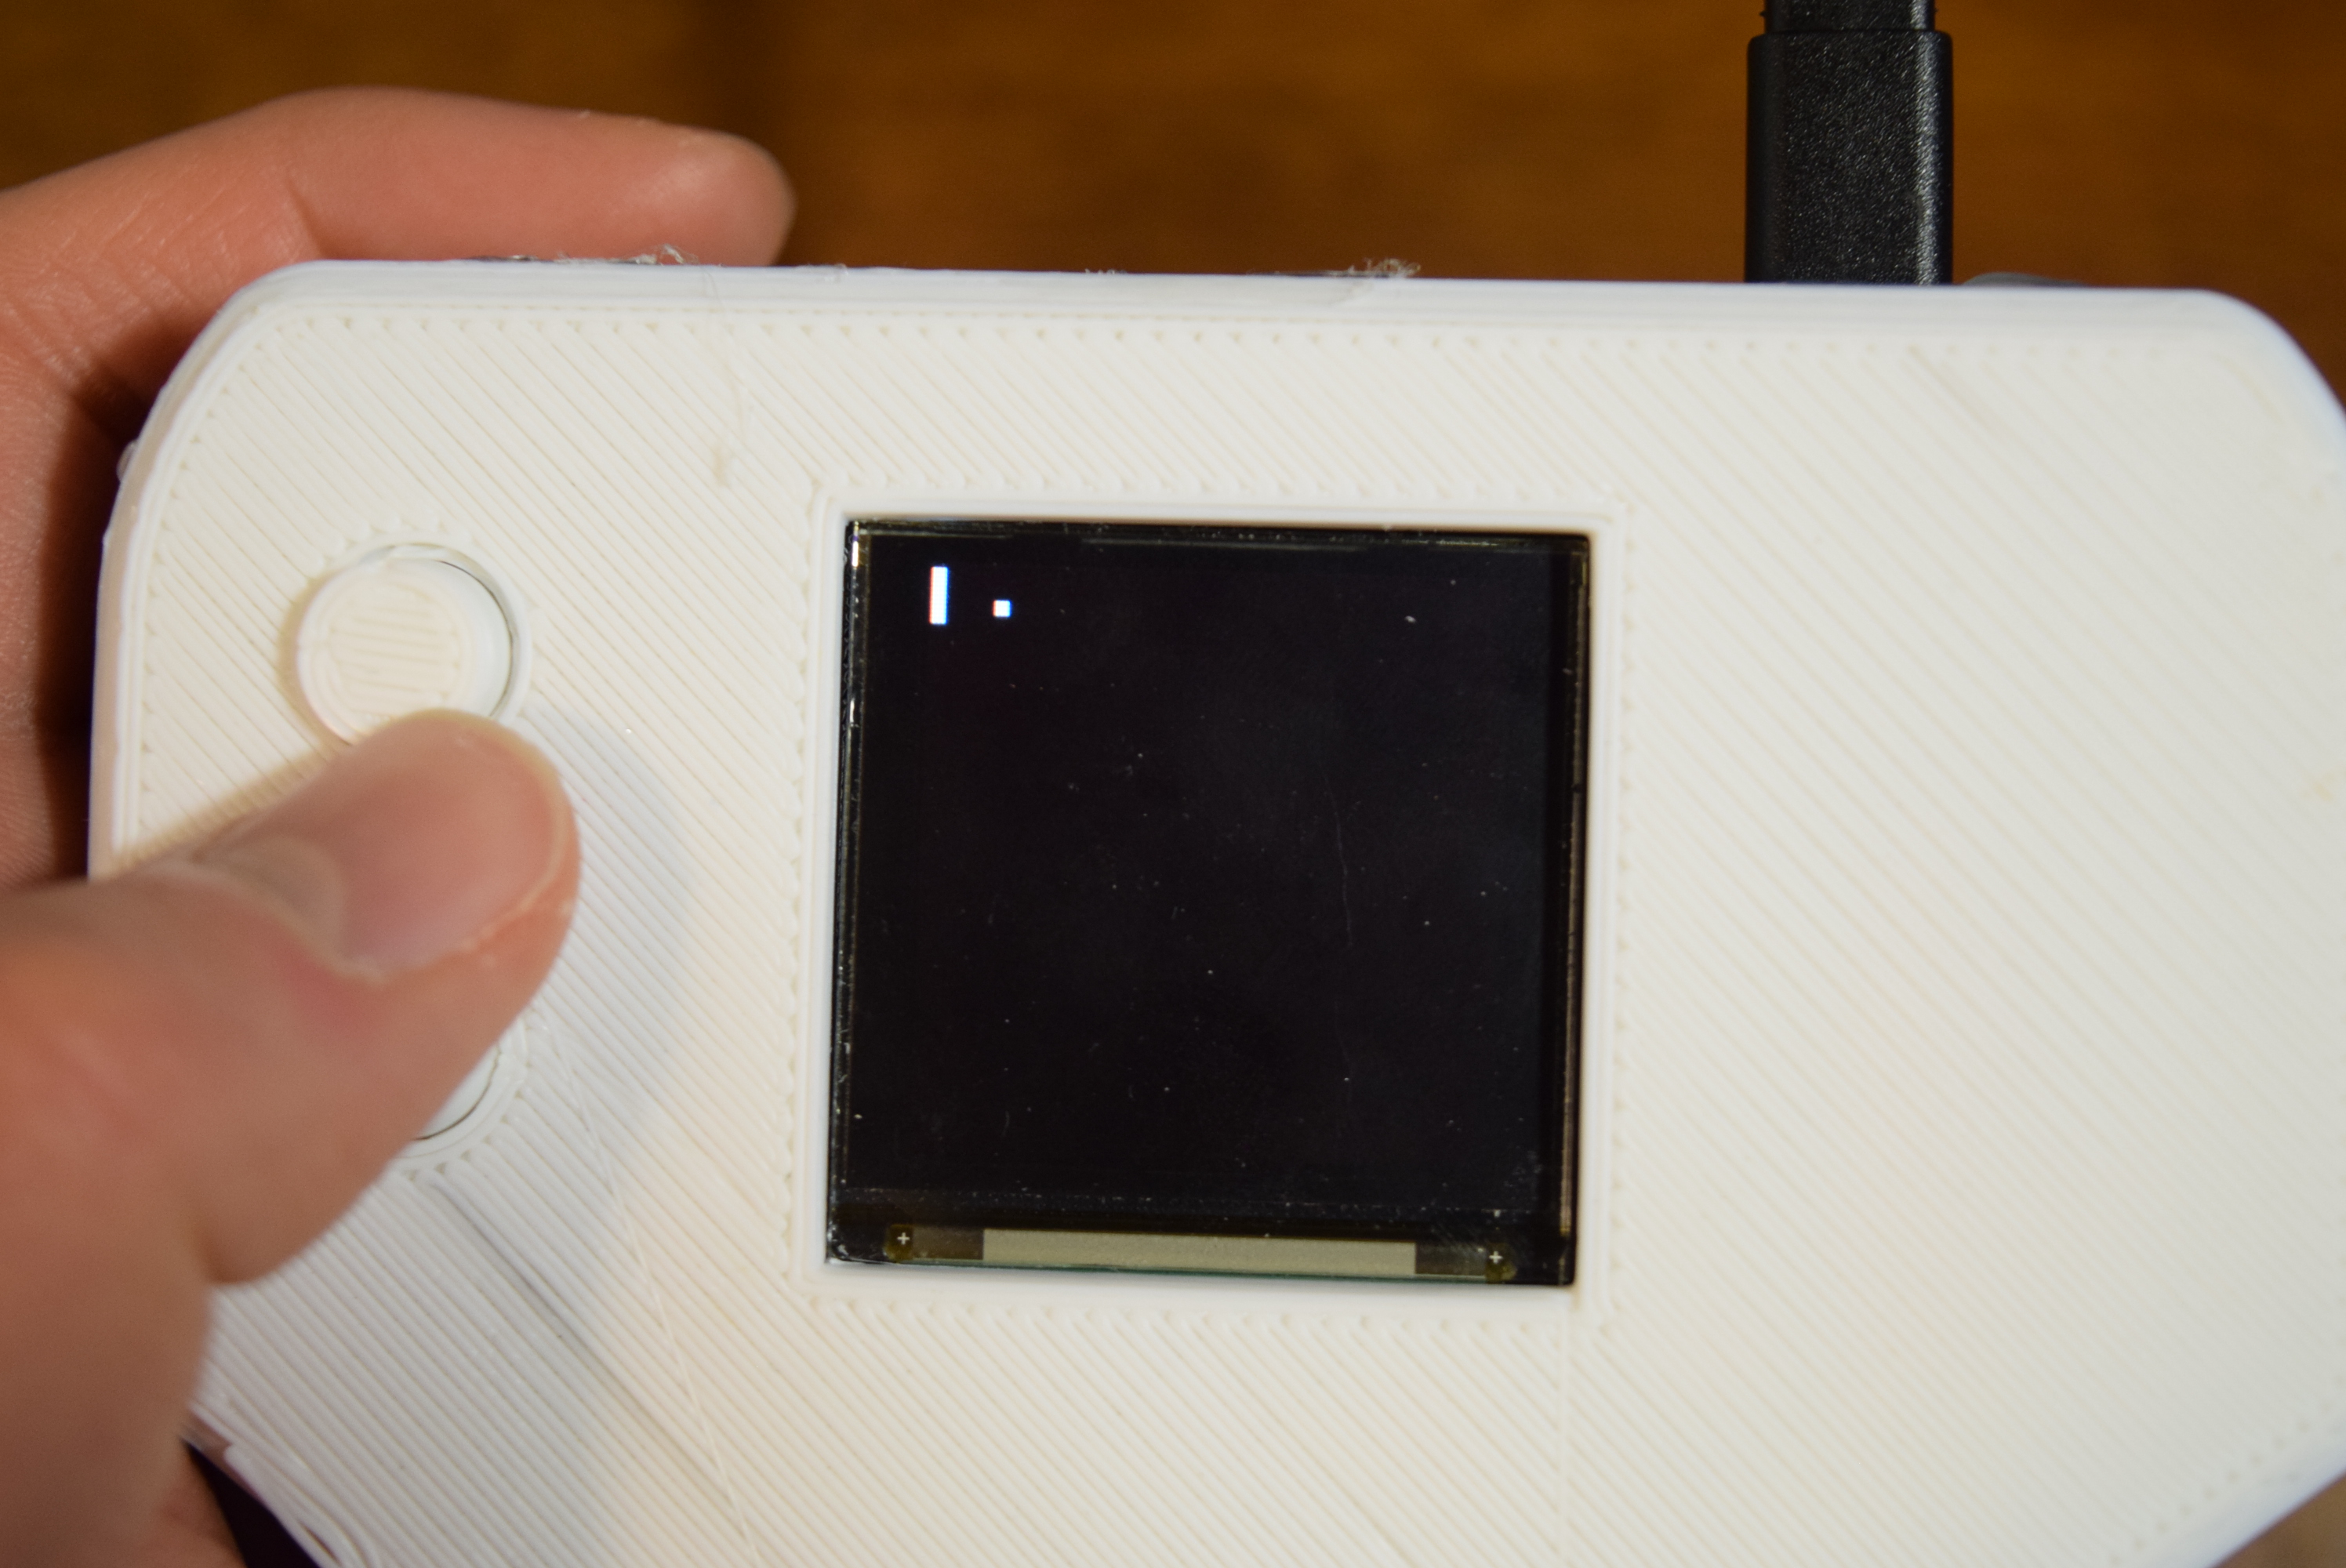
Use an OLED screen to play pong in the palm of your hand! Simply plug in a micro USB cable and you're ready to play- with sound effects!
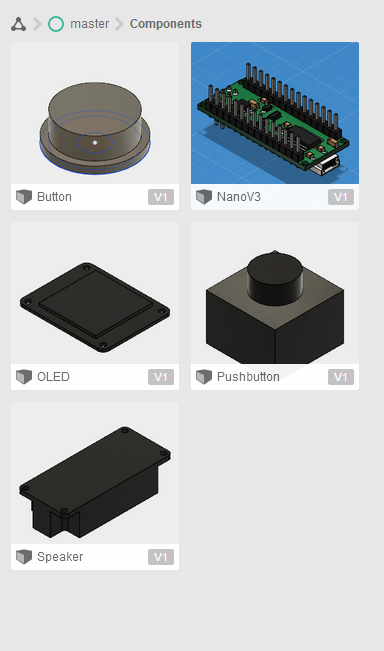
Hardware components:
6mm Tactile Switch
SparkFun microB USB Breakout
Arduino Nano
DFRobot 128x128px OLED
3W 8 Ohm Speaker
Software apps and online services:
Notepad++
Arduino IDE
Autodesk Fusion 360
Hand tools and fabrication machines:
3D Printer (generic)
Some Background
DFRobot reached out to me recently, wanting me to use their special Arduino Nano board and OLED. At first I wanted to create a smart bike, and I built it to its entirety. But unfortunately the arduino Nano was too weak to run and store the massive sketch that was needed. So I decided to revisit one of my previous projects, a Neopixel matrix that ran a Pong game. I wanted to make it portable instead, and a 1.7" OLED would make a perfect display.
Designing the Game
For this Pong game I wanted to keep it relatively simple, which meant no computer controlled paddle or fancy ball reflection algorithms. Basically, there is a single paddle that a user can move up or down, and making the ball collide with the paddle would cause its x axis vector to flip. Each time the ball gets hit there is a sound that plays.

When the game device is powered on, a screen comes up with the game title and instructions. Additionally, my mother created a small theme song that loops in the background until the top button is pressed.

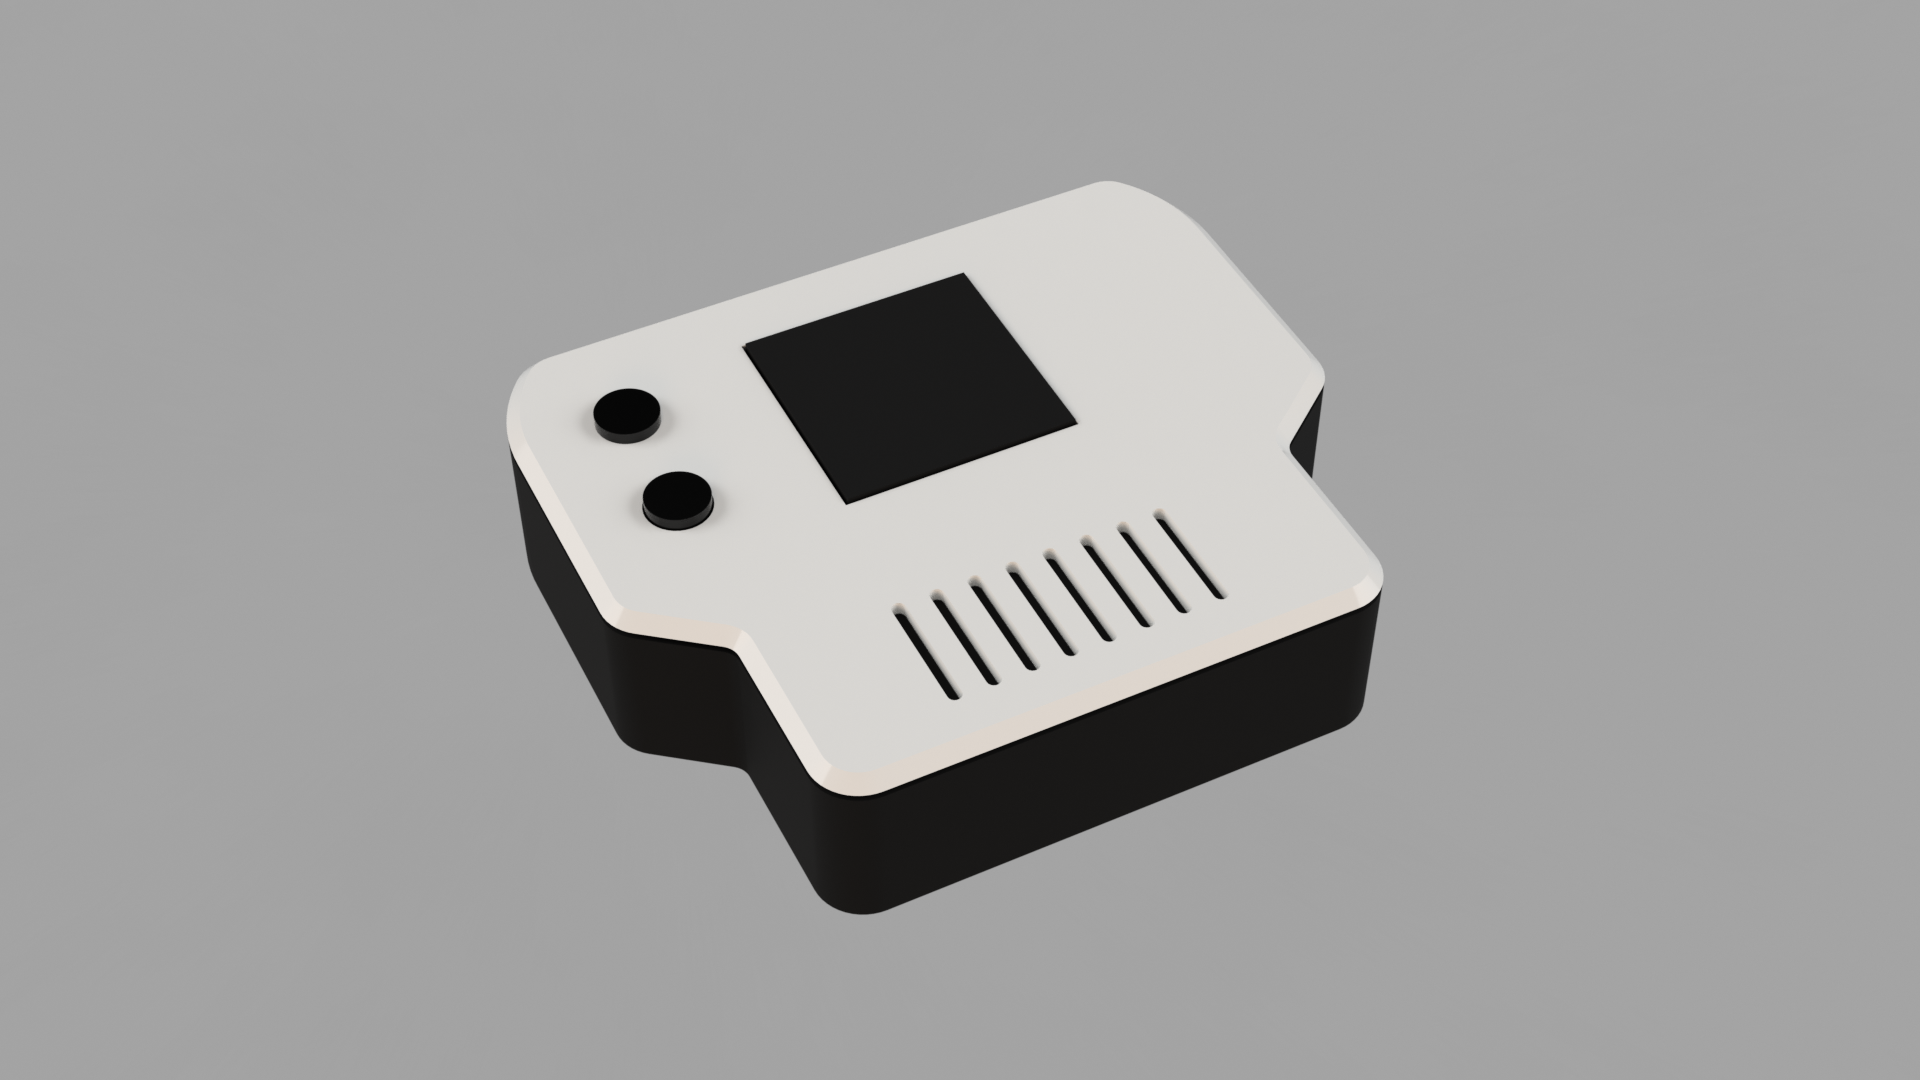
Designing the Gaming Device
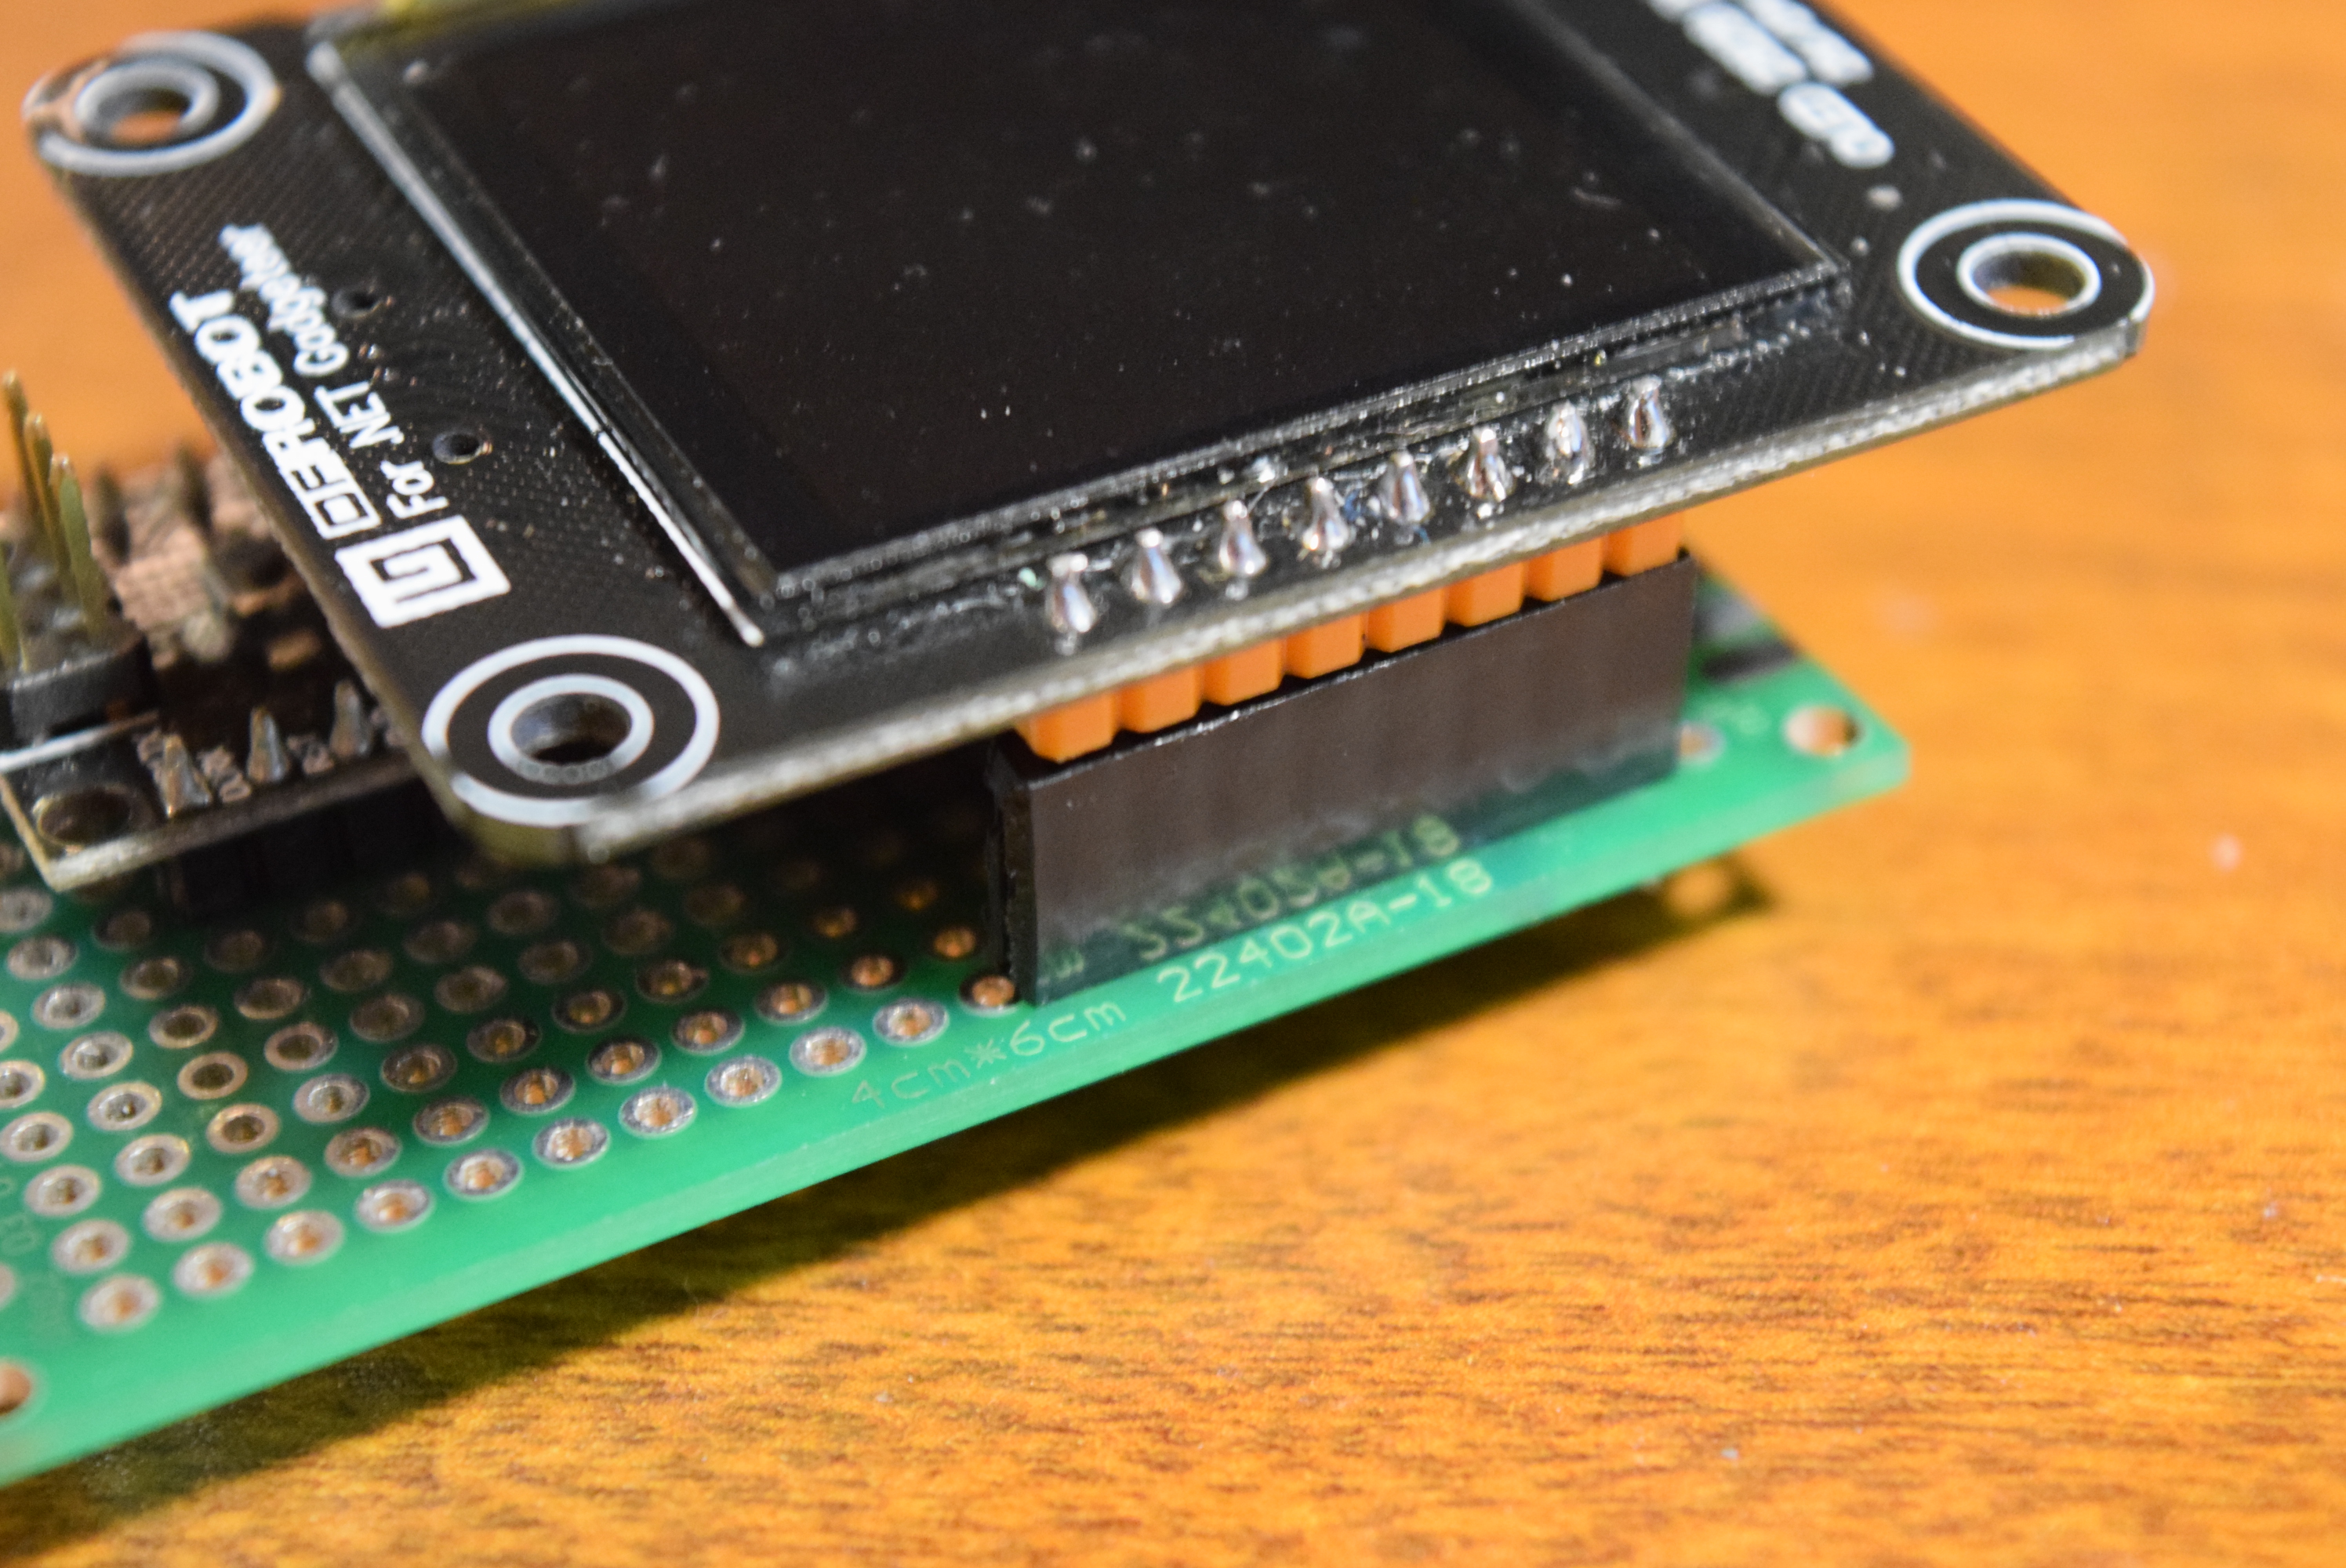
My go-to CAD program is Fusion 360, so I decided to use it to design my pong gaming device. I began by designing each component used: an OLED, Arduino Nano, and a speaker.
This way I can see exactly where and how each component should fit inside of the enclosure. I then put the Nano and PCB in the back part of the case, and the OLED on top of it.
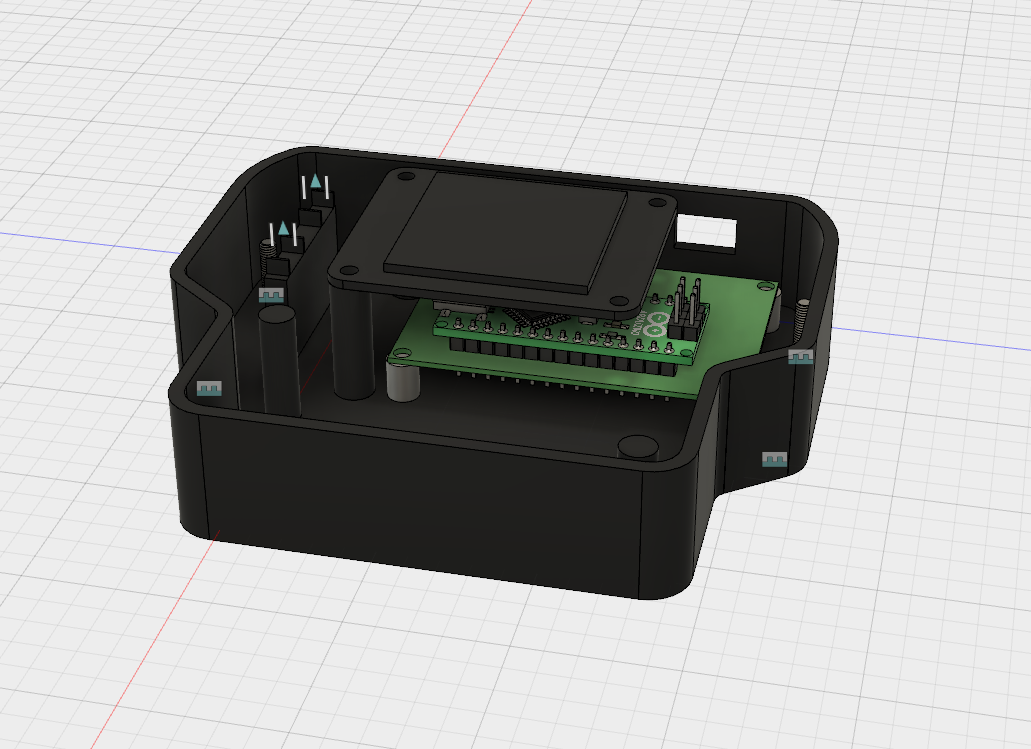
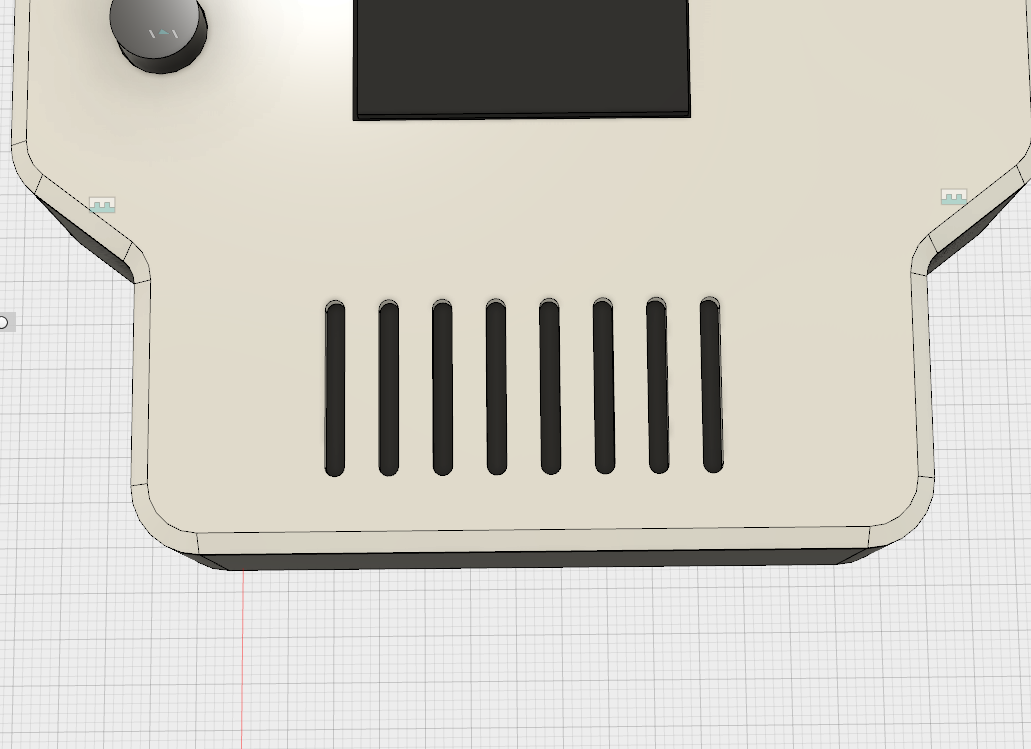
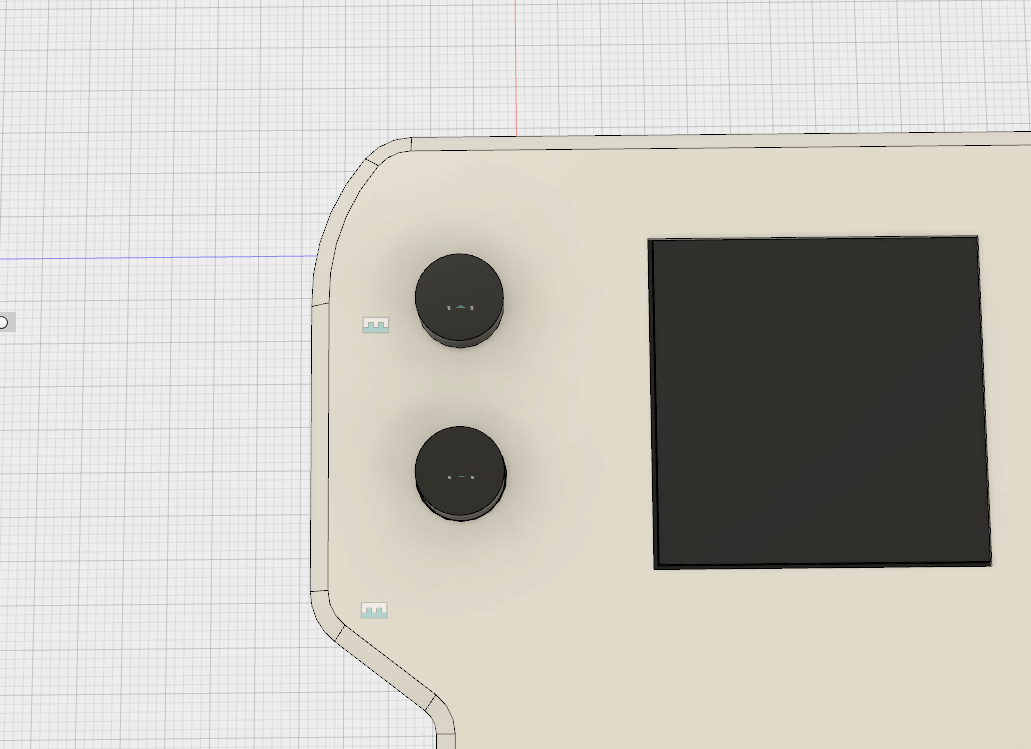
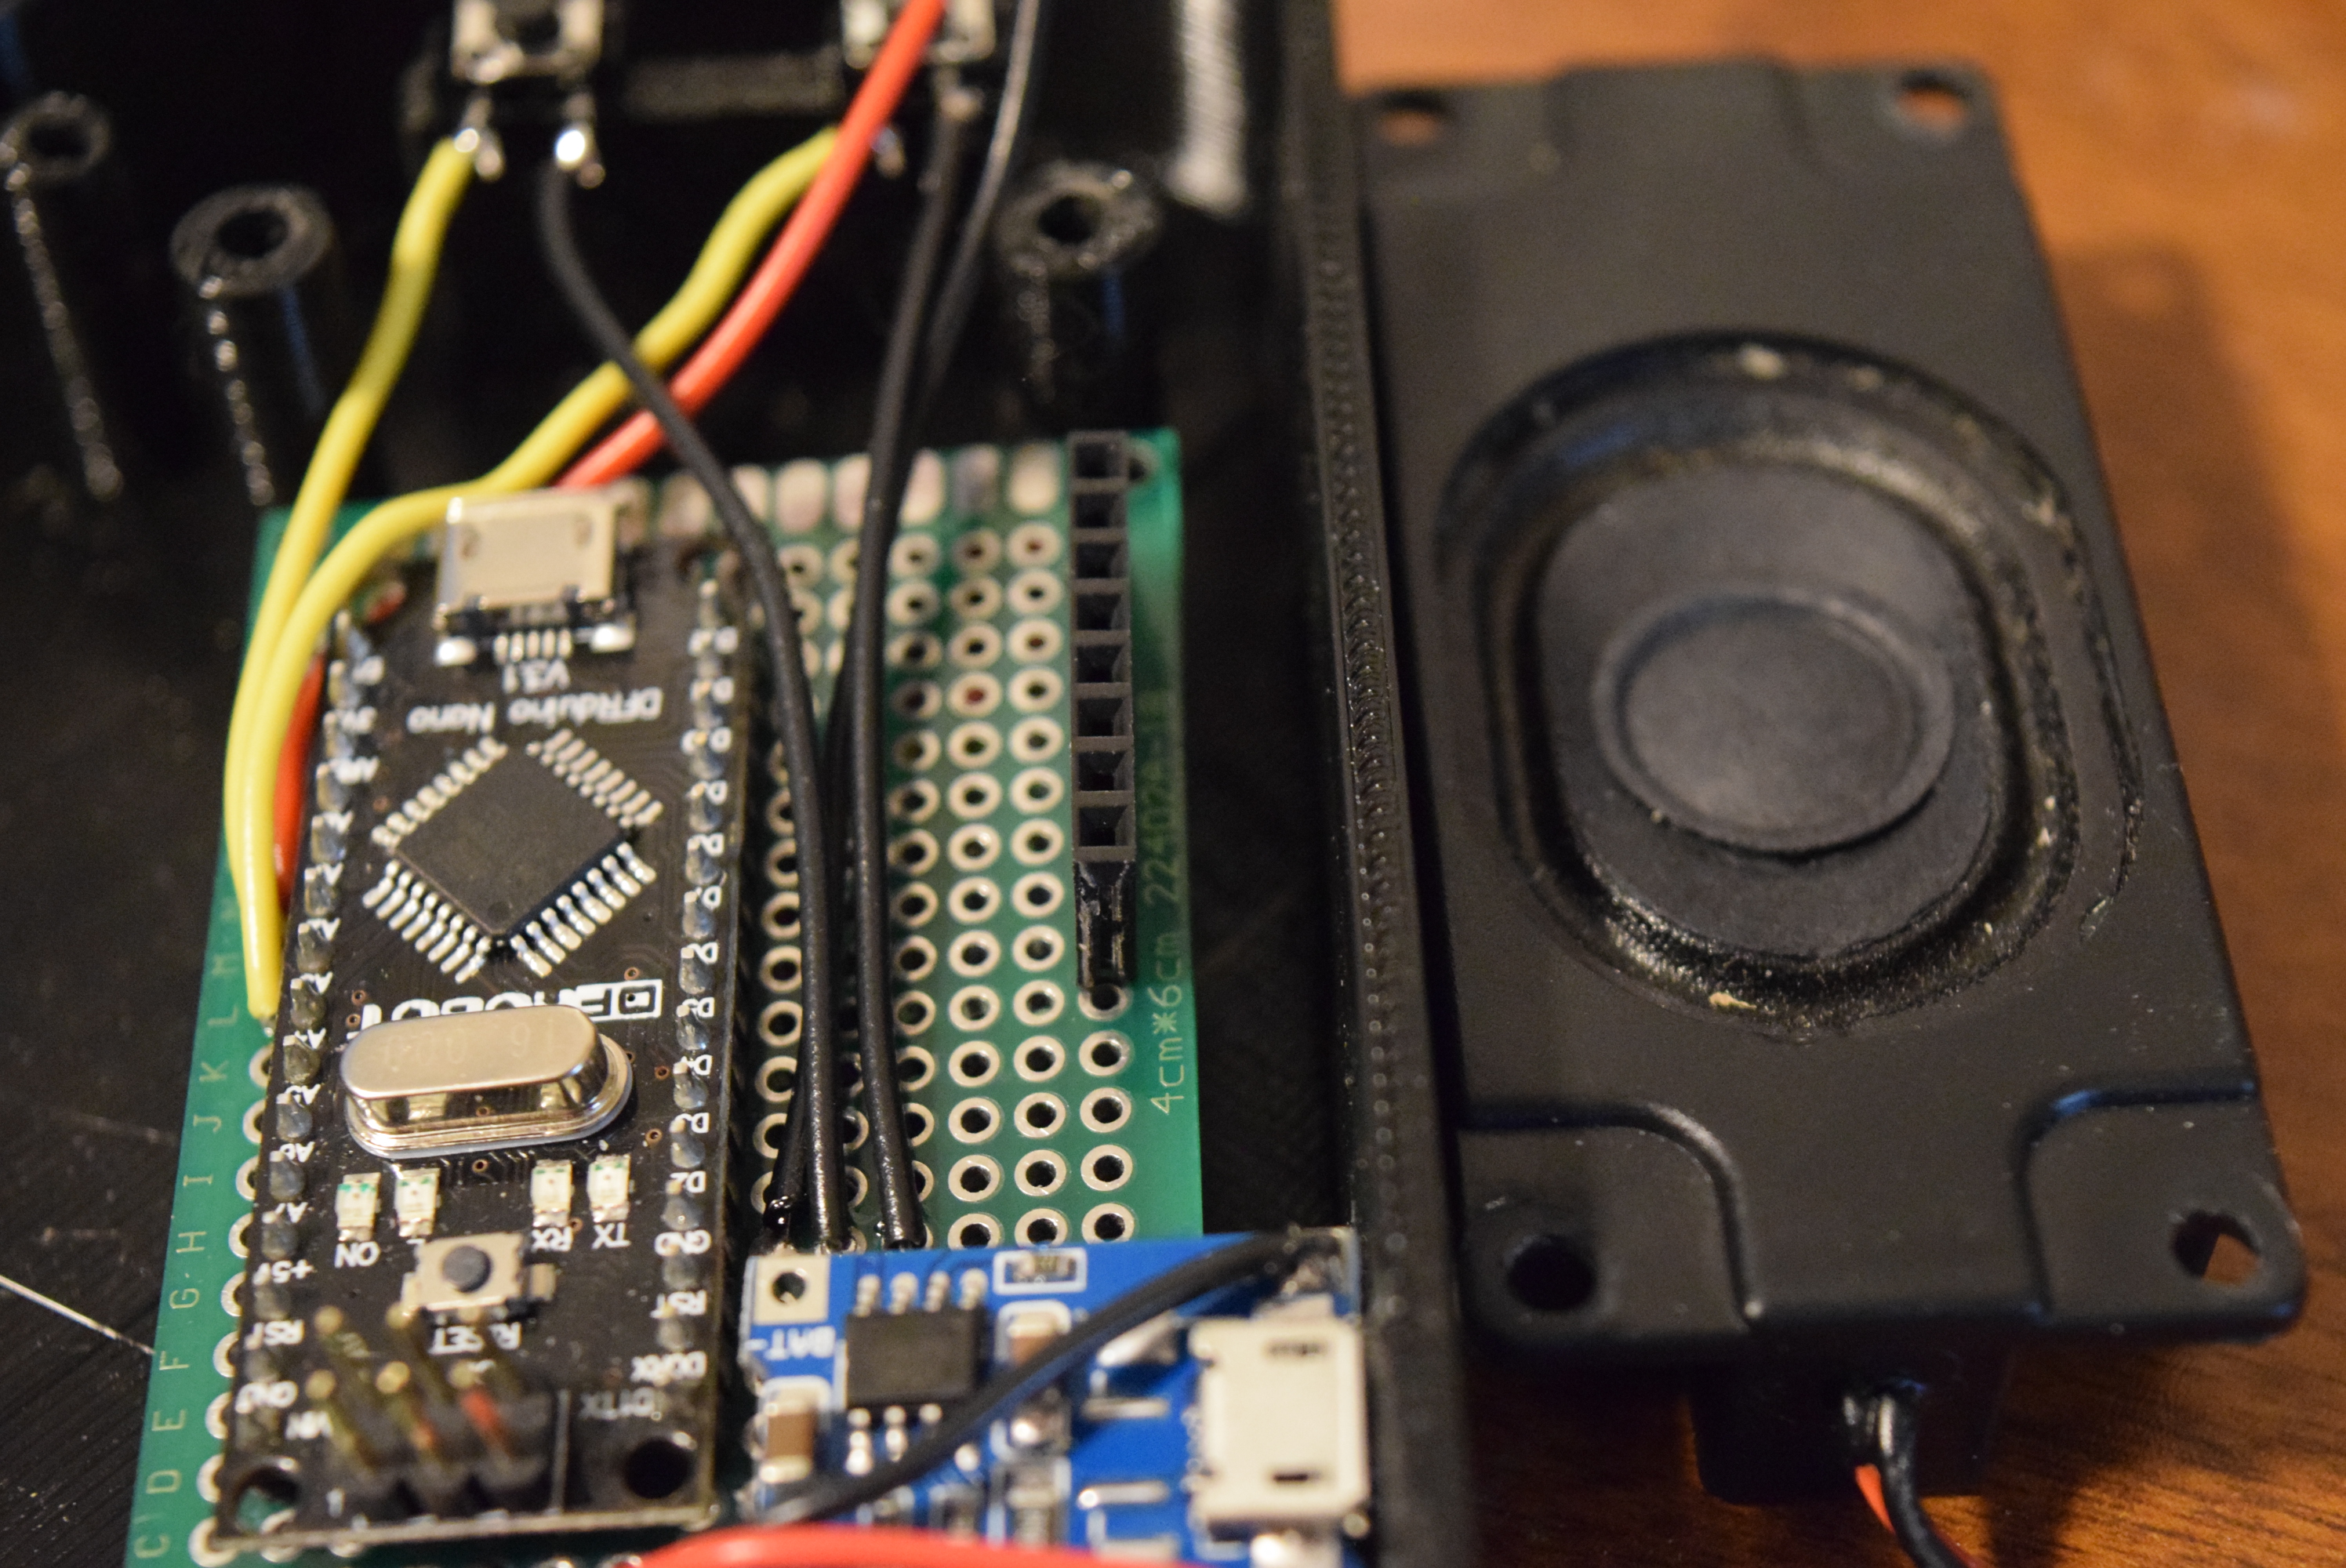
Next was the question of where to put the speaker and buttons. I decided that the 3W speaker could go just below the screen (looking at it from the top), and that also required putting a "grill" over the speaker so the sound wouldn't be muffled.
Lastly, I added two buttons on the left side to add controls.
Constructing the Device
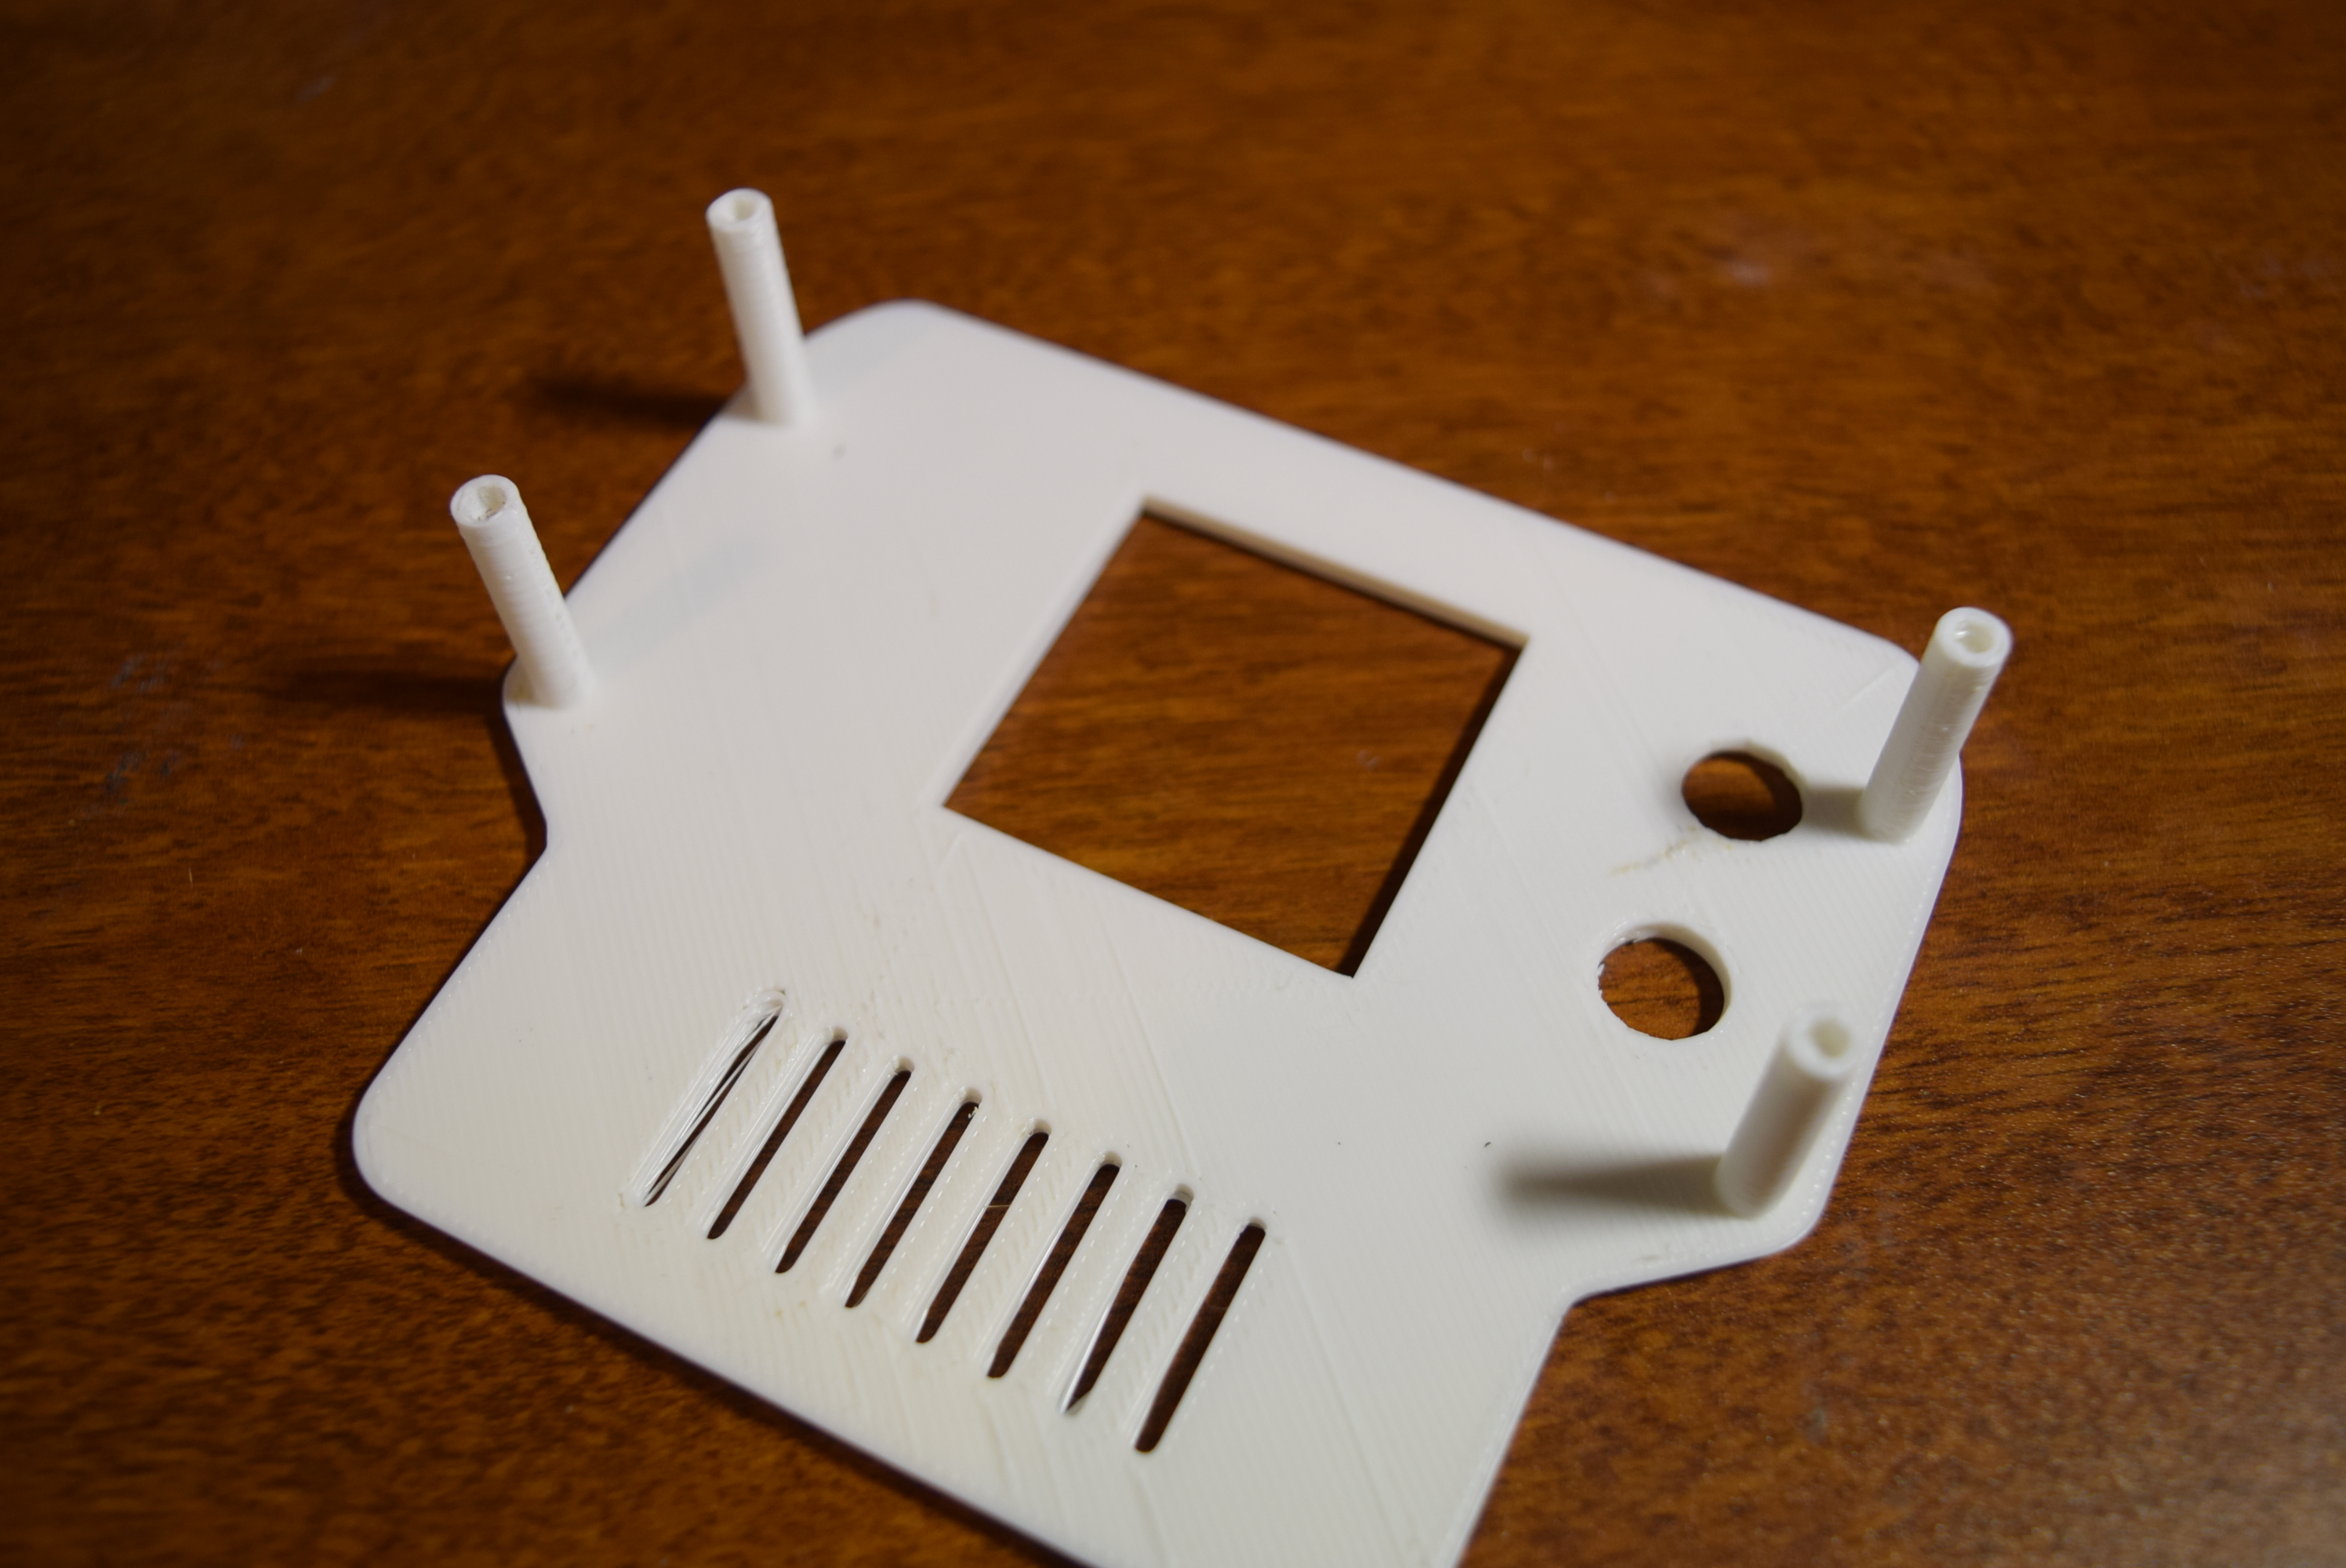
I began by 3D printing each part, consisting of the lower half, the upper half, and 2 buttons.
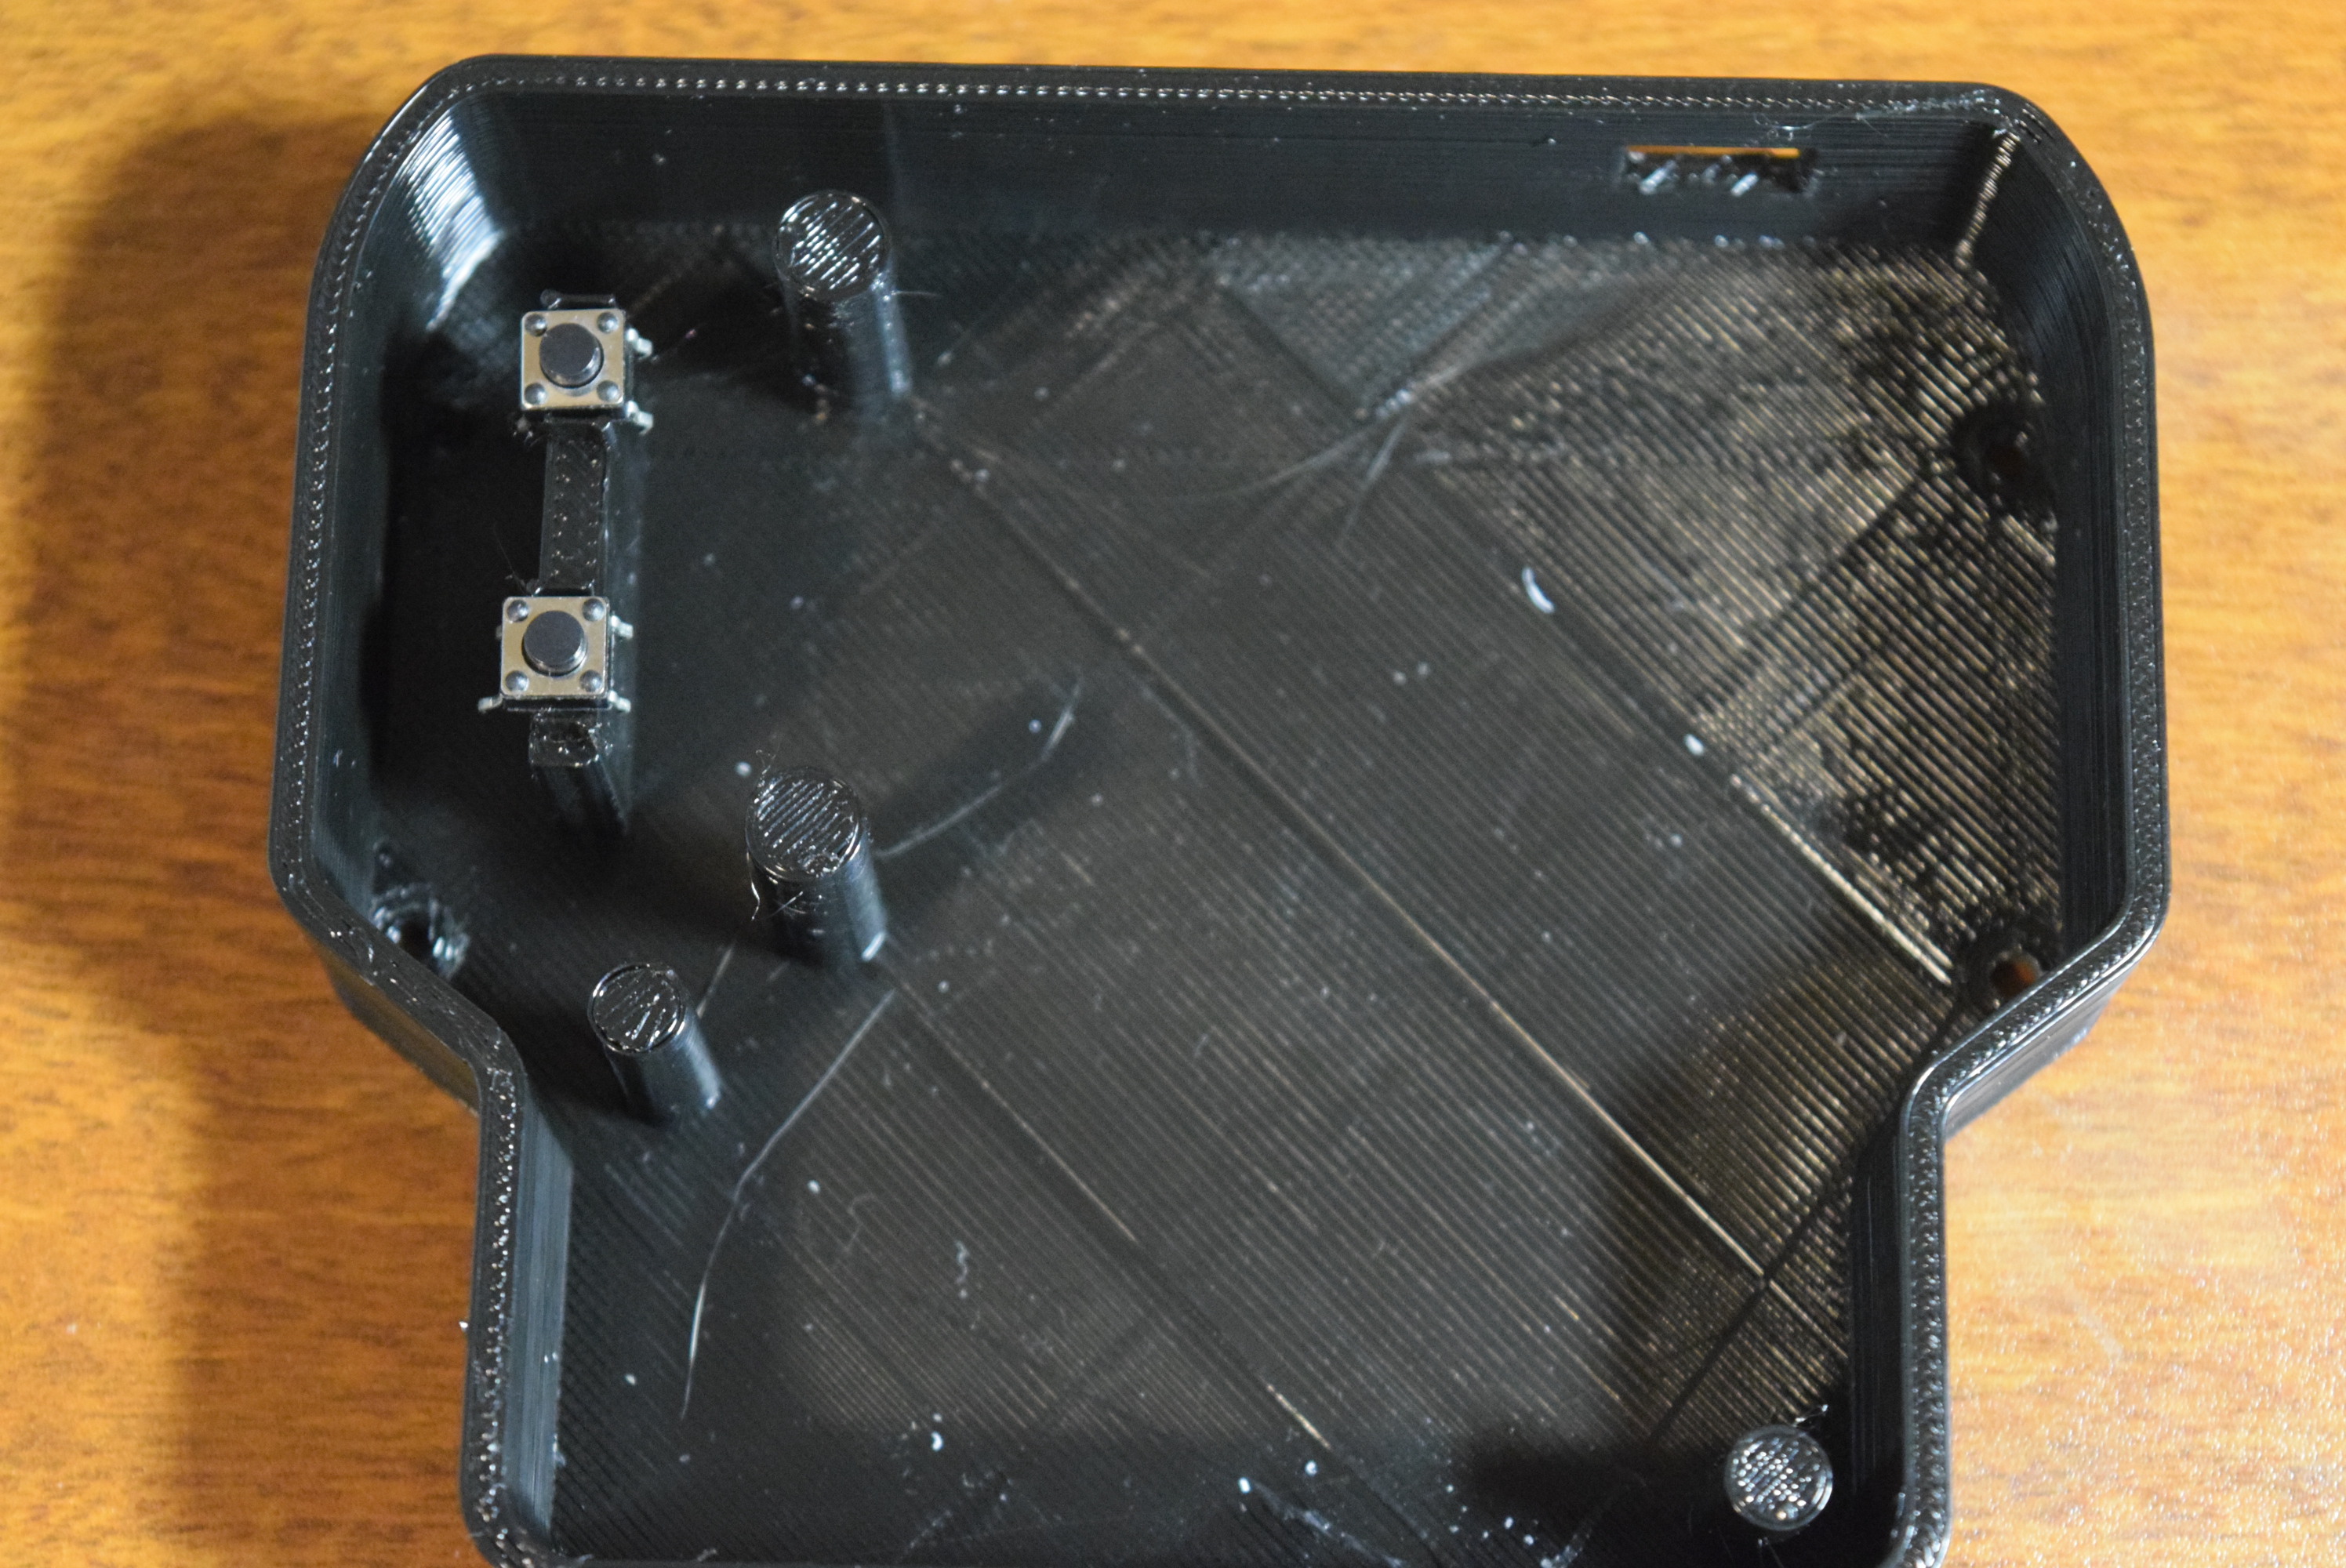
Next I soldered a female header to the 4x6cm and wired it to the Nano. This not only allows for the OLED to be easily removed, but it also elevates it above the Arduino Nano. Check the schematic for wiring information.
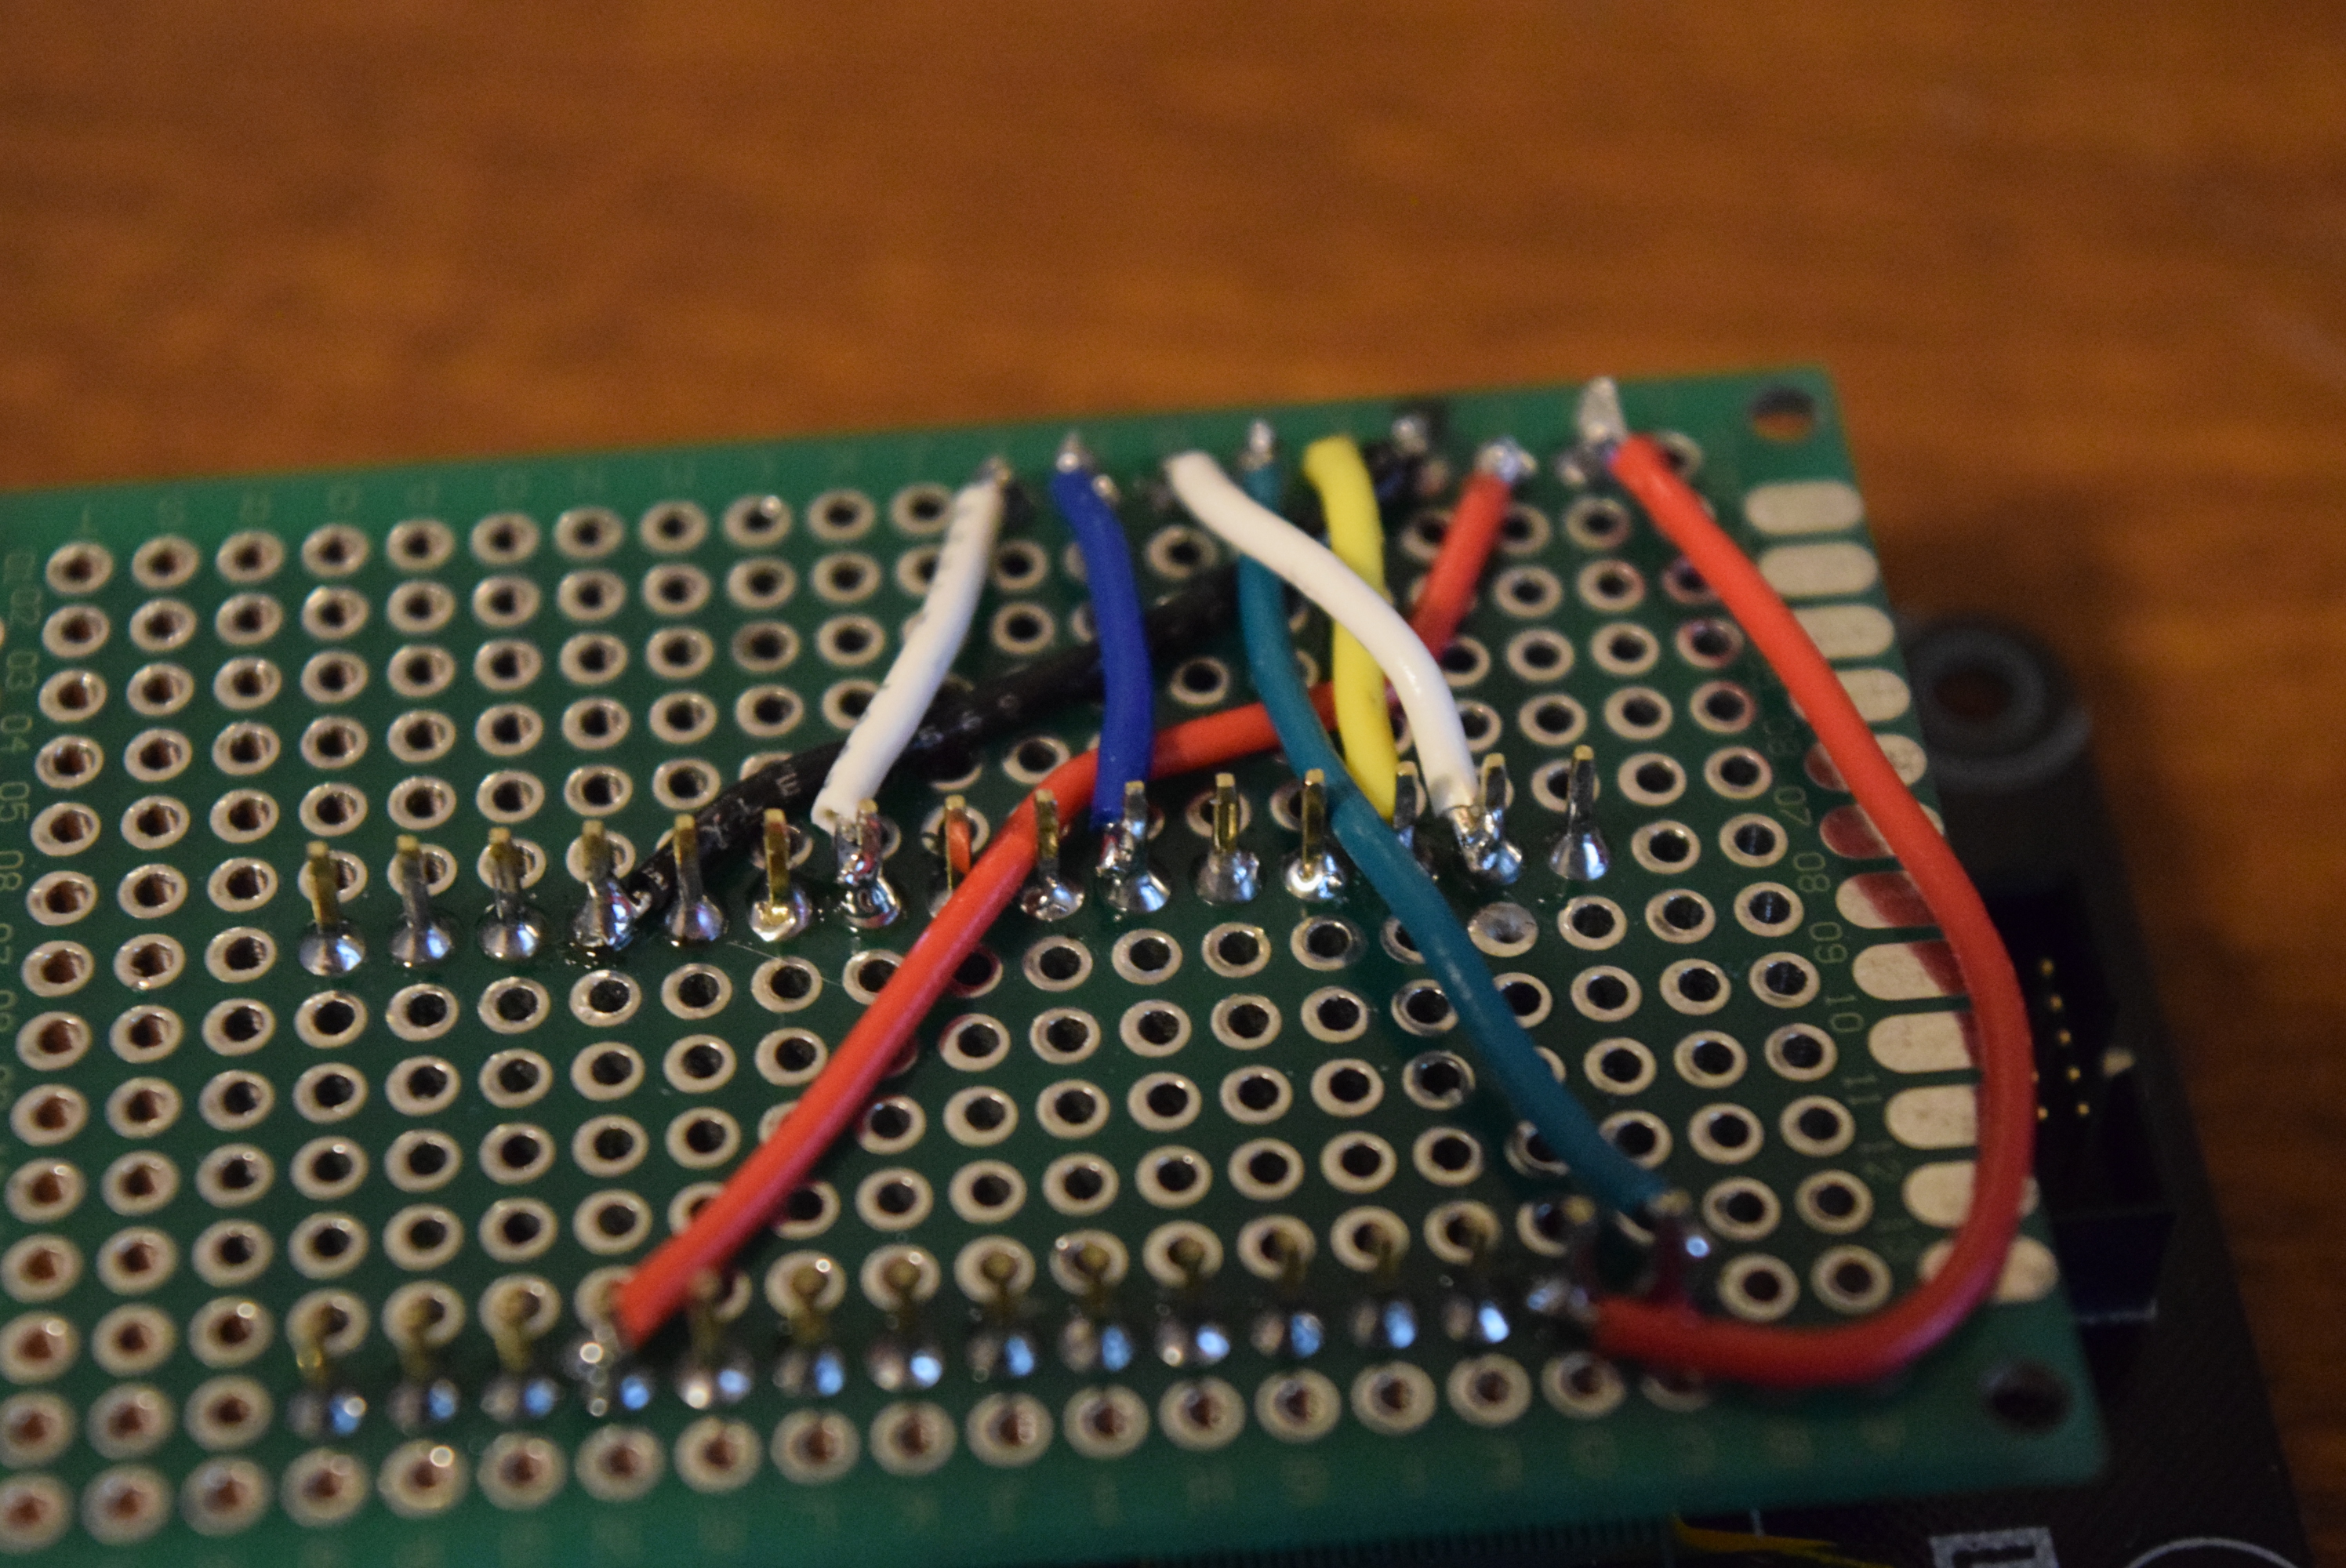
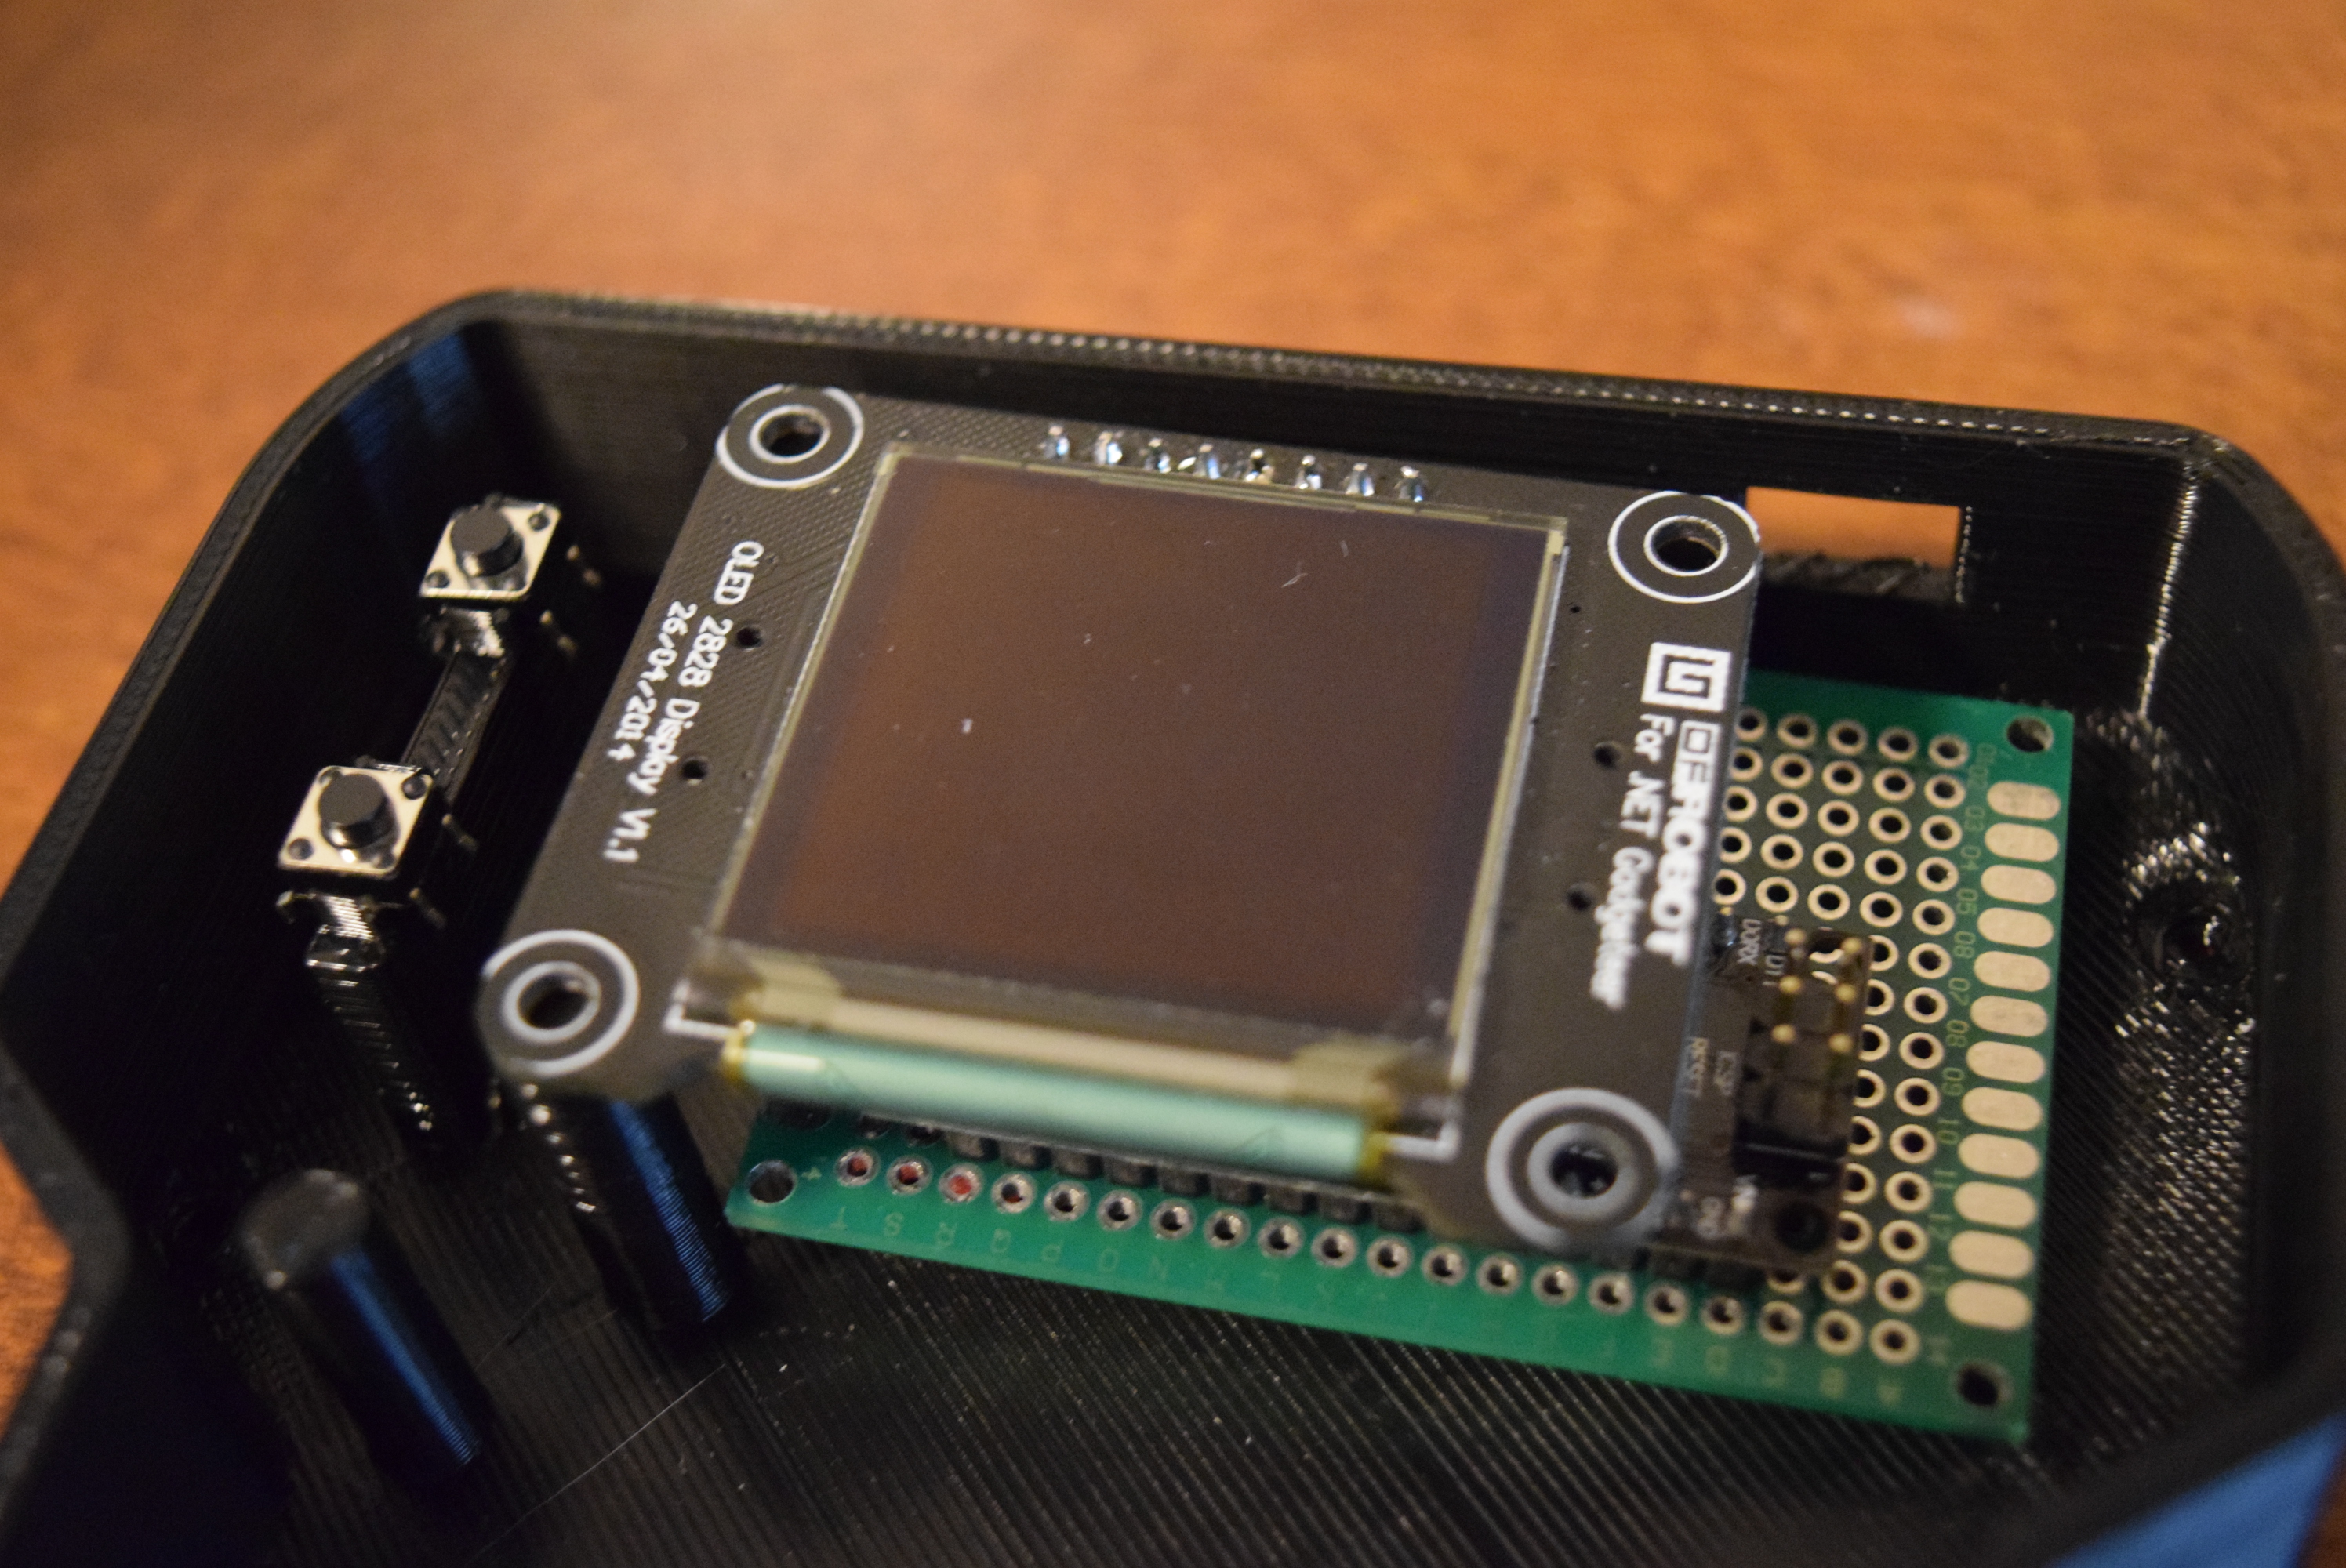
Then I wired up the two buttons, along with a simple micro USB breakout board for power. The speaker was also attached and placed it its correct position.
My Fusion 360 design allows for 3mm machine screws to hold down the OLED, speaker, and connect the two halves of the device. But, I had to make them exact, so I used my drill press to bore out 8 holes: 2 for the speaker, 2 for the screen, and 4 underneath.

Programming the Game
The use of a simple interface was vital to keeping the program small. I started by adding several libraries: Adafruit_GFX, Adafruit_SSD1351, and the Arduino Timer library. Next I defined my pins and colors, such as the OLED's pins and 16 bit color definitions. In my code there are also 4 ways to change how the game plays, such as changing the paddle dimensions and how quickly the ball moves. A section then exists where each variable is defined, including the score and various coordinates. Whenever the device is powered on an image of a ball and some text appears on the screen, along with a little theme song which is defined earlier in the code. Once the game starts two timers are created, one that updates the paddle, and the other updates the ball. Each time the ball's position updates its coordinates are checked to make sure it doesn't go past the screen border or if it's touching a paddle. Each time it bounces either its x or y axis is inverted and a small tone plays. Watch the video at the beginning of this writeup to see how the game plays.
Playing Pong!
The name of the game is to get the lowest score possible. There is no time limit, so it is very enjoyable and even trance-inducing. All that is necessary is pushing one of two buttons to move the paddle up or down. It is also possible to add a way to store the highest score using the Arduino's EEPROM.
Schematic

CODE
//Button Pins and Speaker Pin
#define UP 17 //A3
#define DOWN 16 //A2
#define TONE_PIN A1

//OLED Pins: CLK=13 and MOSI=11
#define dc 4
#define cs 7
#define rst 10

//Color definitions
#define	BLACK           0x0000
#define	BLUE            0x001F
#define	RED             0xF800
#define	GREEN           0x07E0
#define CYAN            0x07FF
#define MAGENTA         0xF81F
#define YELLOW          0xFFE0
#define WHITE           0xFFFF

#include <Adafruit_GFX.h>
#include <Adafruit_SSD1351.h>
#include <SPI.h>
#include "Timer.h"
#include "pitches.h"

#define PADDLE_HEIGHT 12
#define PADDLE_WIDTH 3
#define BALL_DELAY 40 //How quickly the ball's position updates, smaller number = more difficult to play
#define PADDLE_DELAY 5


Adafruit_SSD1351 tft = Adafruit_SSD1351(cs, dc, rst);
Timer t;

bool game_running = false;
int score=0;
int ballDIR[2] = {1,1};
int ballCoords[2] = {58,58};
int oldBallCoords[2];
int currentY = (128-PADDLE_HEIGHT) / 2;
int oldY;

#define NOTE_NUMBER 11

int melody[]={
    NOTE_CS5, NOTE_GS4, NOTE_AS4, NOTE_C5, NOTE_AS4, NOTE_GS4, NOTE_CS5, NOTE_GS4, NOTE_AS4, NOTE_GS4, NOTE_CS5
};

int noteDurations[]={
    4, 8, 8,8,16,16,16,8,8,8,8
};

void startGame();

void setup() {
  Serial.begin(9600);
  // put your setup code here, to run once:
    initPins();
    tft.begin();
    initScreen();
}

void loop() {
  // put your main code here, to run repeatedly:
    if(game_running){
        t.update();
    }
}

void initPins(){
    pinMode(TONE_PIN,OUTPUT);
    pinMode(UP, INPUT_PULLUP);
    pinMode(DOWN, INPUT_PULLUP);
}

void playTheme(){
    for(int thisNote=0;thisNote<NOTE_NUMBER;thisNote++){
        if(digitalRead(UP)==0){
          game_running=true;
        }
        if(game_running){
            break;
        }
        int noteDuration = 1000 / (noteDurations[thisNote]/2);
        tone(TONE_PIN, melody[thisNote], noteDuration);
        int pauseBetweenNotes = noteDuration * 1.3;
        delay(pauseBetweenNotes);
        noTone(TONE_PIN);
    }
}

void updatePaddle();
void updateBall();

void initScreen(){
    tft.fillScreen(BLACK);
    tft.setCursor(0,0);
    tft.setTextSize(3);
    tft.print("  PONG");
    tft.fillCircle(59,59,20,WHITE);
    tft.setTextSize(1);
    tft.setCursor(0, 100);
    tft.print("Start game by pressing the upper button");
    while(!game_running){
        playTheme();
    }
    noTone(TONE_PIN);
    detachInterrupt(UP);
    tft.fillScreen(BLACK);
    t.every(BALL_DELAY, updateBall);
    t.every(PADDLE_DELAY, updatePaddle);
}


void startGame(){
    Serial.println("Pressed");
    game_running = true;
}

void updateBall(){
    oldBallCoords[0] = ballCoords[0];
    oldBallCoords[1] = ballCoords[1];
    if(ballCoords[0]>=127){
        ballDIR[0] = -ballDIR[0];
        tone(TONE_PIN, NOTE_C4, 50);
        delay(50*1.3);
        noTone(TONE_PIN);
    }
    else if(ballCoords[0]<=0){ //You lose
        score ++;
        tft.setCursor(20, 50);
        tft.setTextSize(3);
        tft.print(score);
        delay(3000);
        tft.fillScreen(BLACK);
        ballCoords[0] = 58;
        ballCoords[1] = 58;
    }

    if(ballCoords[1]>= 127||ballCoords[1]<=0){
        ballDIR[1] = -ballDIR[1];
        tone(TONE_PIN, NOTE_C4, 50);
            delay(50*1.3);
            noTone(TONE_PIN);
    }
    if(ballCoords[0]>=1&&ballCoords[0]<=PADDLE_WIDTH+1){
        if(ballCoords[0]>=currentY&&ballCoords[0]<=currentY+(PADDLE_HEIGHT/2)){
            ballDIR[0] = -ballDIR[0];
            tone(TONE_PIN, NOTE_C4, 50);
            delay(50*1.3);
            noTone(TONE_PIN);
        }
        else if(ballCoords[0]>=currentY+6&&ballCoords[0]<=currentY+PADDLE_HEIGHT){
            ballDIR[0] = -ballDIR[0];
            ballDIR[1] = -ballDIR[1];
            tone(TONE_PIN, NOTE_C4, 50);
            delay(50*1.3);
            noTone(TONE_PIN);
        }
    }
    ballCoords[0]+=ballDIR[0];
    ballCoords[1] += ballDIR[1];
    tft.fillRect(oldBallCoords[0],oldBallCoords[1],3,3,BLACK);
    tft.fillRect(ballCoords[0],ballCoords[1],3,3,WHITE);
}

void updatePaddle(){
    oldY = currentY;
    if(digitalRead(UP)==0){
        if(currentY > 0){
            currentY-=1;
        }
    }
    else if(digitalRead(DOWN)==0){
        if(currentY<127-PADDLE_HEIGHT){
        currentY +=1;
        }
    }
    tft.fillRect(1, oldY, PADDLE_WIDTH, PADDLE_HEIGHT, BLACK);
    tft.fillRect(1, currentY, PADDLE_WIDTH, PADDLE_HEIGHT, WHITE);
}
Other Arduino Nano projects:
Arduino Nano Project 1: How to Make a Running Heart Alarm T-shirt
Arduino Nano Project 2. Arduino Project: A Good Idea to Express Your Love
Arduino Nano Project 3. How to make a Fingerprint ID Nerf Gun
Arduino Nano Project 4. How to Make Fingerprint Lock for Your Computer
REVIEW
Recent Blogs

How to Select SBC (Lattepanda/Raspberry Pi) for Local LLM (LLaMA, LLaMA2, Phi-2, Mixtral-MOE, etc.)
Discover why Lattepanda Sigma is well-suited for local large language model (LLM) operations. Explore its memory and storage capacities compared to other SBCs.
SELECTION GUIDE AI Mar 29 2024

Selection Guide of Linux Systems Compatible with RISC-V Architecture
This article will provide a detailed introduction to several versions of Linux systems, including Ubuntu, Debian, Fedora, OpenSuse, FreeBSD, and OpenBSD, and the compatibility with the RISC-V architecture.
SELECTION GUIDE Mar 27 2024

SIM Series 4G Wireless Communication Modules Selection Guide
A detailed guide to understanding and selecting from DFRobot’s range of wireless communication modules. Perfect for IoT enthusiasts and developers.
SELECTION GUIDE Mar 22 2024

 Home
Home
 Category
 Shopping Cart
 Me
Me