
Assuming you have downloaded and installed the right version of the NVIDIA CUDA Toolkit for your NVIDIA GPU card, the next step is to create your awesome C++ CUDA project. In this post, I will illustrate how to create a simple Hello World project using CMake on Ubuntu.
- In a folder, create a CUDA C++ file, e.g. hello.cu. Type in the following code as shown in the snippet below.
Note: the main function simply calls an empty CUDA mykernel consisting of 1 block and 1 thread per block function. Then it prints out a hello message.
- Next, create a CMakeLists.txt file. Type in the following code as shown.
Note: The CMakeLists.txt simply tells CMake to use C++ and CUDA languages and then defines the executable and its source.
- Create a build directory. Then change directory into the build directory and run the cmake command.
$ mkdir build
$ cd build
$ cmake ..
The processing messages appear.
- Now compile the project with the make command.
$ make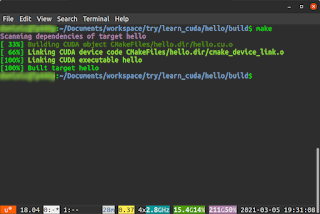
- Finally, run the hello executable.
$ ./hello
The message "Hello CUDA!" is printed to the screen.


The sample project can be downloaded from the Github repository at https://gitlab.com/dominoc925/hello-cuda-cmake

1 comment:
I couldn't find your email address, so posting this here:
For more complex use of CUDA, you might be interested in checking out this CMakeLists.txt file:
https://github.com/eyalroz/cuda-kat/blob/development/tests/CMakeLists.txt
And if you're interested in making your life easier and your code simpler when using CUDA, you may want to have a look at the Modern-C++ CUDA runtime API wrappers:
https://github.com/eyalroz/cuda-api-wrappers/issues
If you want to look at a more complex project, but which still basically only depends on CUDA, consider having a look at:
Post a Comment