
The staff at Hardkernel built a big cluster computing setup for testing the stability of Kernel 4.9. The cluster consisted of 200 ODROID-XU4’s (i.e, with a net total of 1600 CPU cores and 400GB of RAM), as shown in Figure 1.

The experience obtained with this exercise led them to the idea of building an affordable and yet powerful personal cluster, out of which was born the ODROID-MC1. ODROID-MC1 stands for My Cluster One. It consists of 4 stackable units, each with a specially designed Single Board Computer (SBC) based on the Samsung Exynos 5422 octa-core processor. It is compatible with the ODROID-XU4 series SBC, and is mounted on an aluminum case. These cases (which also incorporates an integrated heatsink) are stacked with a fan attached on the back-end, to ensure adequate cooling.
The ODROID-MC1 circuit board is a trimmed version of that used in the ODROID-HC1 (Home Cloud One) Network Attached Storage (NAS), with the SATA adapter removed. The ODROID-HC1 circuit board, in turn, is a redesigned ODROID-XU4 with the HDMI connector, eMMC connector, USB 3.0 hub, power button and, slide switch removed.
Key features of the ODROID-MC1 include:
- Samsung Exynos 5422 Cortex-A15 2Ghz and Cortex-A7 Octa core CPUs
- 2Gbyte LPDDR3 RAM PoP stacked
- Gigabit Ethernet port
- USB 2.0 Host
- UHS-1 micro-SD card slot for boot media
- Linux server OS images based on modern Kernel 4.9 LTS
The ODROID-MC1 comes assembled and ready to use as a personal cluster for learning as well as for doing useful work. In Part 1 of this series on the ODROID-MC1, I will be describing how to use it as a Docker Swarm cluster. In Part 2, I shall describe how to develop parallel programs to run on the ODROID-MC1 cluster.

To set up the MC1 cluster, you need the following in addition to the MC1 hardware:
- 1 x Gigabit switch with at least 5 ports
- 5 x Ethernet cables
- 4 x SD cards (at least 8GB in capacity)
- 4 x power adapters for the MC1 computers
Setting Up the OS on Each Computer on the Cluster
The most tedious part in setting up the ODROID-MC1 cluster is to install an Operating System (OS) and software packages needed for running and managing the docker swarm on each compute node. To expedite the process, you can download an SD card image with everything almost ready to use at https://oph.mdrjr.net/MrDreamBot/. I say “almost”,’ because there are still a few steps you have to do to make everything work. The SD card has logins ‘root’ and ‘odroid’ already set up. The password for both logins is “odroid:.
The swarm we are building consists of 1 master and 3 worker nodes. For discussion purposes, assume they use the following host names and IP addresses. Of course you can change them to suit your environment. All nodes in the swam should have static IP address like so:
xu4-master – 192.168.1.80
xu4-node1 – 192.168.1.81
xu4-node1 – 192.168.1.82
xu4-node1 – 192.168.1.83
To start the setup process, you need to connect your PC and one ODROID-MC1 node at a time to a Gigabit switch which has a connection to your home router (for access to the Internet). The image is configured to use dynamically allocated IP address using DHCP from your router. You have to login using SSH to configure each node to use a static IP address instead. There are other configuration parameters you need to change as well. The setup process assumes that you have some Linux command line knowledge to carry out the following steps:
- Write OS image to your SD card - Copy the SD card image to 4 x 8GB Class 10 SD cards. If you use bigger capacity SD cards, you have to resize the filesystem on each SD card to take up all space on your SD card. The easiest way to do this is to mount the SD card on a Linux machine and use gparted (www.gparted.com) to resize it. That is the method I used for my SD cards. Insert an SD card in one of the MC1 computers.
- Initiate an SSH session from your PC to the ODROID-MC1 node as root. Its IP address can be found in your home router. Skip the next step if you are setting up the master node.
- Change the host name by editing the /etc/hostname file, to change xu4-master to xu4-nodeX where X is either 1, 2 or 3 depending on which worker node you are setting up.
- Configure a static IP address by editing the /etc/network/interfaces, by removing the “#” in front of the highlighted section and replacing the IP address 192.168.1.80 with the IP address (in your home network subnet) to which you want to assign the node you are setting up.
- Update the /etc/hosts file such that each ODROID-MC1 node entry has the correct name and IP address.
- Test the changes - Reboot the node to see if you can SSH into it using the new IP address you assigned to it. If so, you have successfully set up that node. If not, double check the changes described above to make sure there are no typos.
- Set up the next worker node - Repeat Steps 2 through 7 until all the nodes have been set up.

For experienced Linux users, an alternate way to do the above is to mount each SD card on your Linux system and edit those files directly on the SD card. After you have set up your cluster, ssh into xu4-master as user “odroid”, password “odroid”. From the master, you can SSH to all the worker nodes without using password as the nodes in the cluster have been set up with key-based authentication. Do the same for “root” by either using the “sudo -s” command, or by using SSH to establish a connection as the root user into the xu4-master node, then using SSH to connect to all of the worker nodes.
Setting Up Docker Swarm
A node is a Docker host participating in a swarm. A manager node is where you submit a service definition and it schedules the service to run as tasks on worker nodes. Worker nodes receive and execute tasks scheduled by a manager node. A manager node, by default, is also a worker node unless explicitly configured not to execute tasks. Multiple master and worker nodes can be set up in a swarm to provide High Availability (HA).
To bring up swarm mode, issue the following command on the manager:
$ docker swarm init --advertise-addr 192.168.1.80which returns:
swarm initialized: current node
(8jw6y313hmt3vfa1fme1dinro) is now a manager
Run the following command to add a worker to this swarm on each node:
$ docker swarm join --token SWMTKN-1-1q385ckmw7owbj2zfno04dmidb62iqg2devd7yvae5wvuohc11-at5g1ad4f24fck4cutsqhnw06 192.168.1.80:2377To make the other nodes join the cluster, issue the “docker swarm join'”command above on each node. This can be done using the parallel-ssh to issue the command once from the manager and executed on each node. Figure 4 is a screenshot of running “docker ps” command using parallel-ssh.

Now we have a Docker swarm up and running.
Testing the Swarm
To help visualize what is going on in the swarm, we can use the Docker Swarm Visualizer image (visualizer-arm). To deploy it as a service, issue the following command from the manager command prompt:
$ docker service create --name=dsv --publish=8080:8080/tcp --constraint=node.role==manager --mount=type=bind,src=/var/run/docker.sock,dst=/var/run/docker.sock alexellis2/visualizer-armNote that the ODROID-XU4 is ARMv7-based, i.e., it is a 32 bit system, unlike the ODROID-C2 which is ARMv8-based, and 64 bit. Consequently, the Docker images used in the following commands are different from those used in my Docker examples for the ODROID-C2.
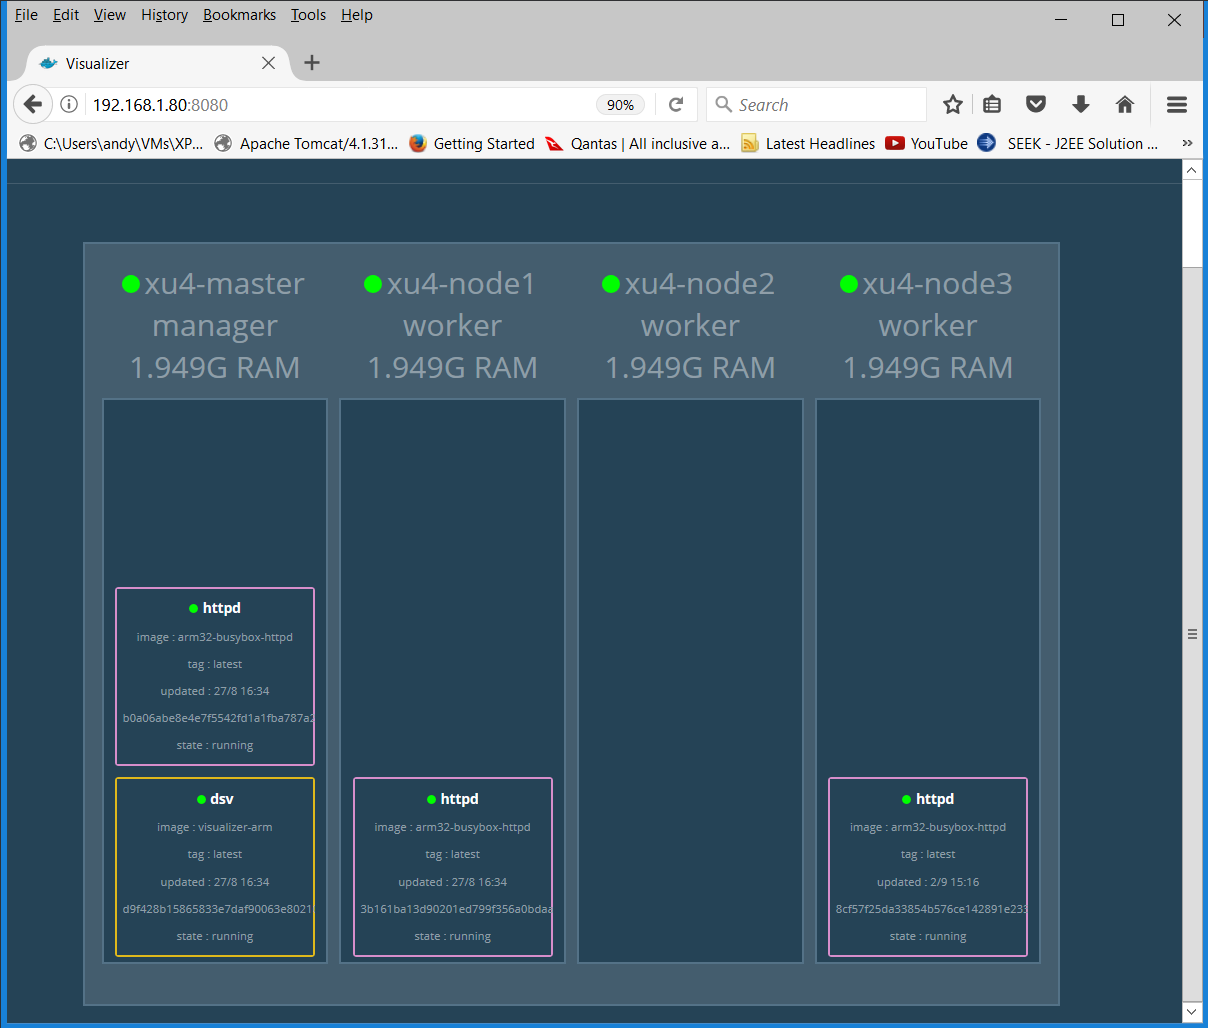
Point your browser at the master by visiting http://192.168.1.80:8080, or you can point your browser to any of the nodes in the swarm. Observe the changes reported by the visualizer when deploying the httpd service using my 32 bit httpd busybox mdreambot image at http://dockr.ly/2wWPCNP. My image is started using the command:
$ docker service create --replicas 3 --name httpd -p 80:80 mdreambot/arm32-busybox-httpdFigure 5 shows a Docker Swarm Visualizer displaying the nodes on which the service replicas are run, illustrating the declarative service model used by swarm mode.
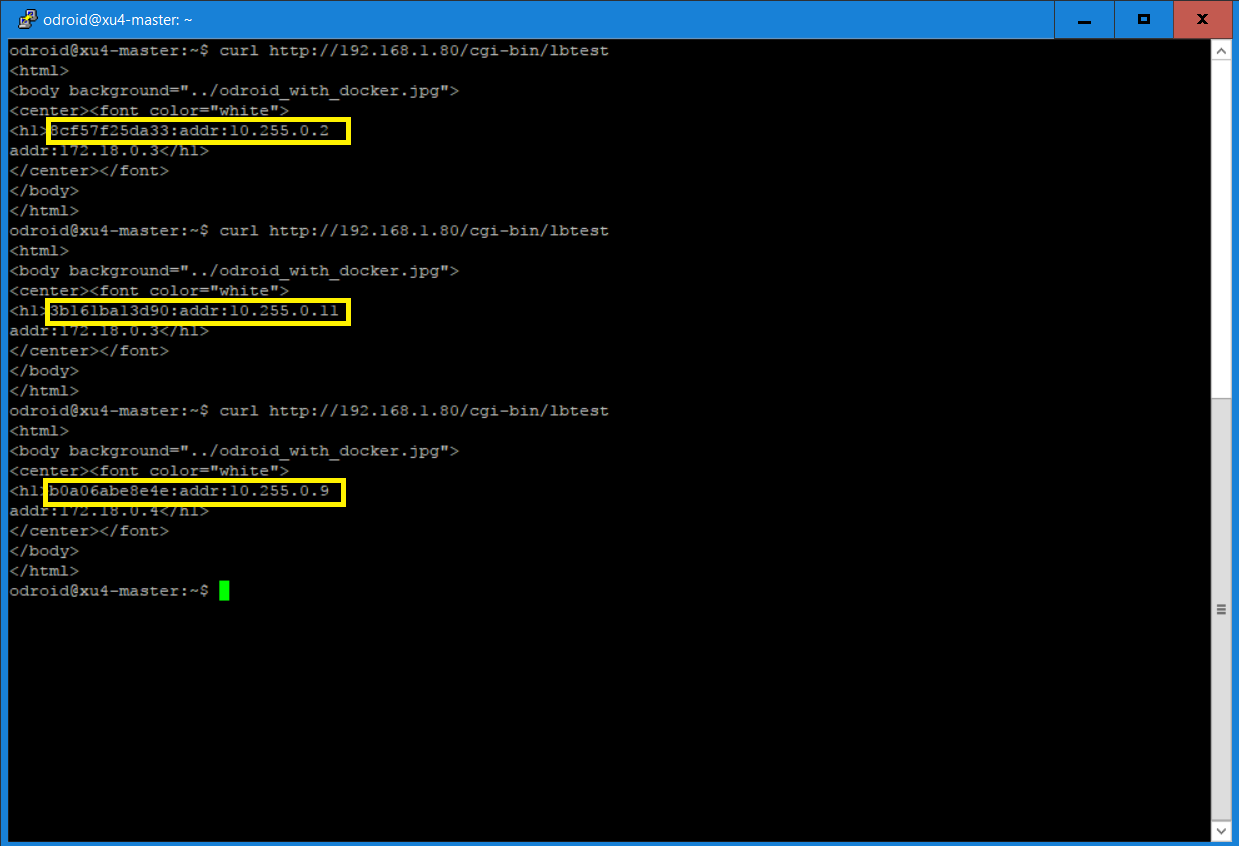
Use the following curl command to test the load balancing feature of docker swarm:
$ curl http://192.168.1.80/cgi-bin/lbtestFigure 6 is a screenshot of the curl commands output, which reconfirms that each request has been directed to a different node.
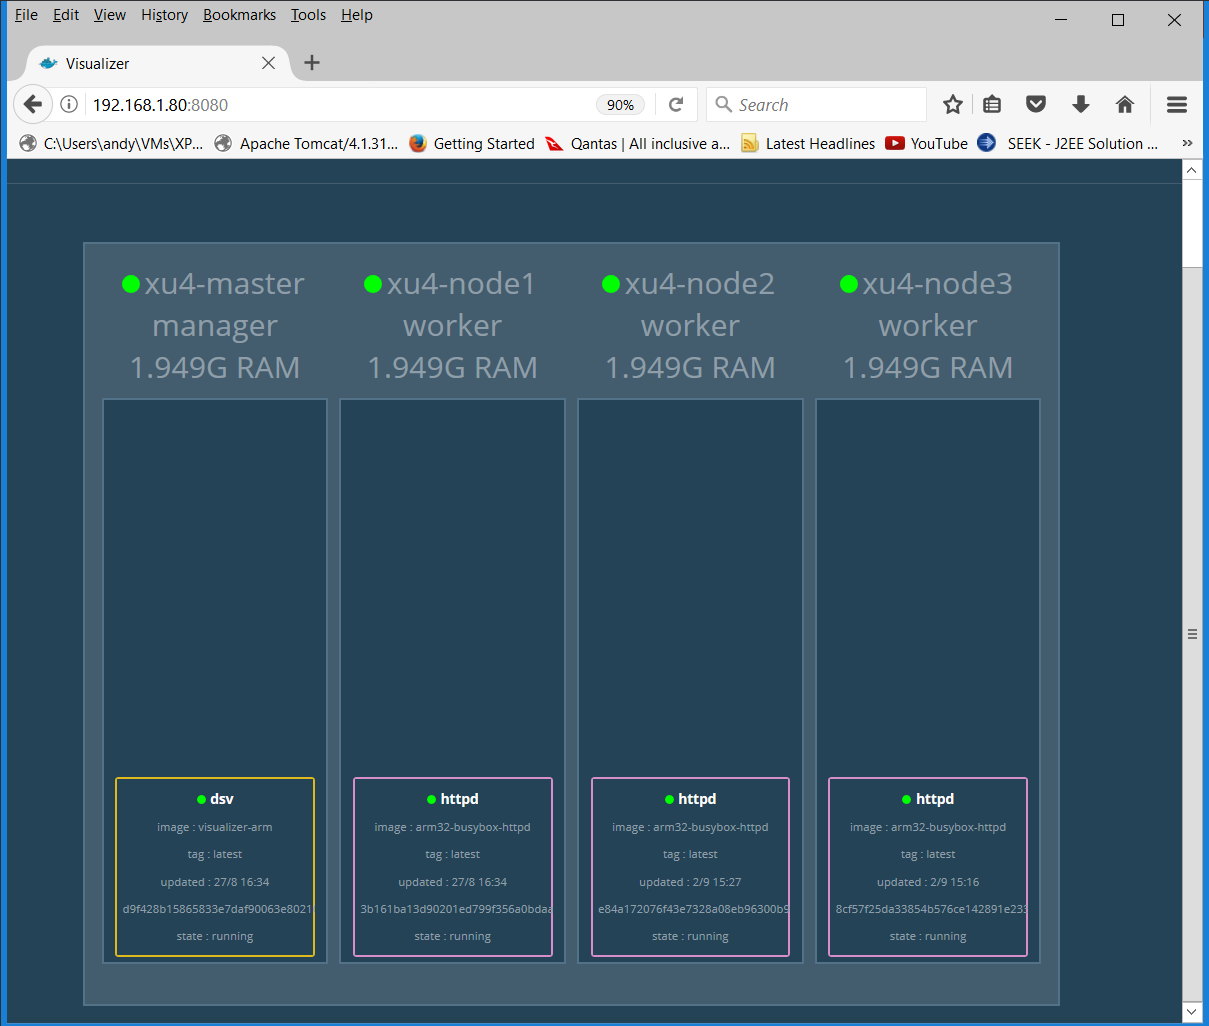
For a test of self-healing, I stopped the running httpd container on xu4-master, and another httpd container was spun up on another node to replace the one I just stopped as can be seen in the screenshot below. This is because when we started the service, we specified “replica=3” and the Docker swarm will maintain the desired number of replicas. This is called desired state reconciliation.
Conclusion
The Docker swarm mode is now fully functional on your ODROID-MC1 cluster. Feel free to experiment with it. I hope this guide achieves its objective in getting you started running docker swarm on the ODROID-MC1. For more information on Docker swarm mode, please refer to my other ODROID Magazine articles on the subject.
Be the first to comment