 My
My Shop
Shop Wholesome Yum

Free Printable: Low Carb & Keto Food List
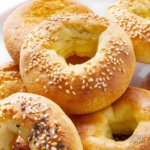
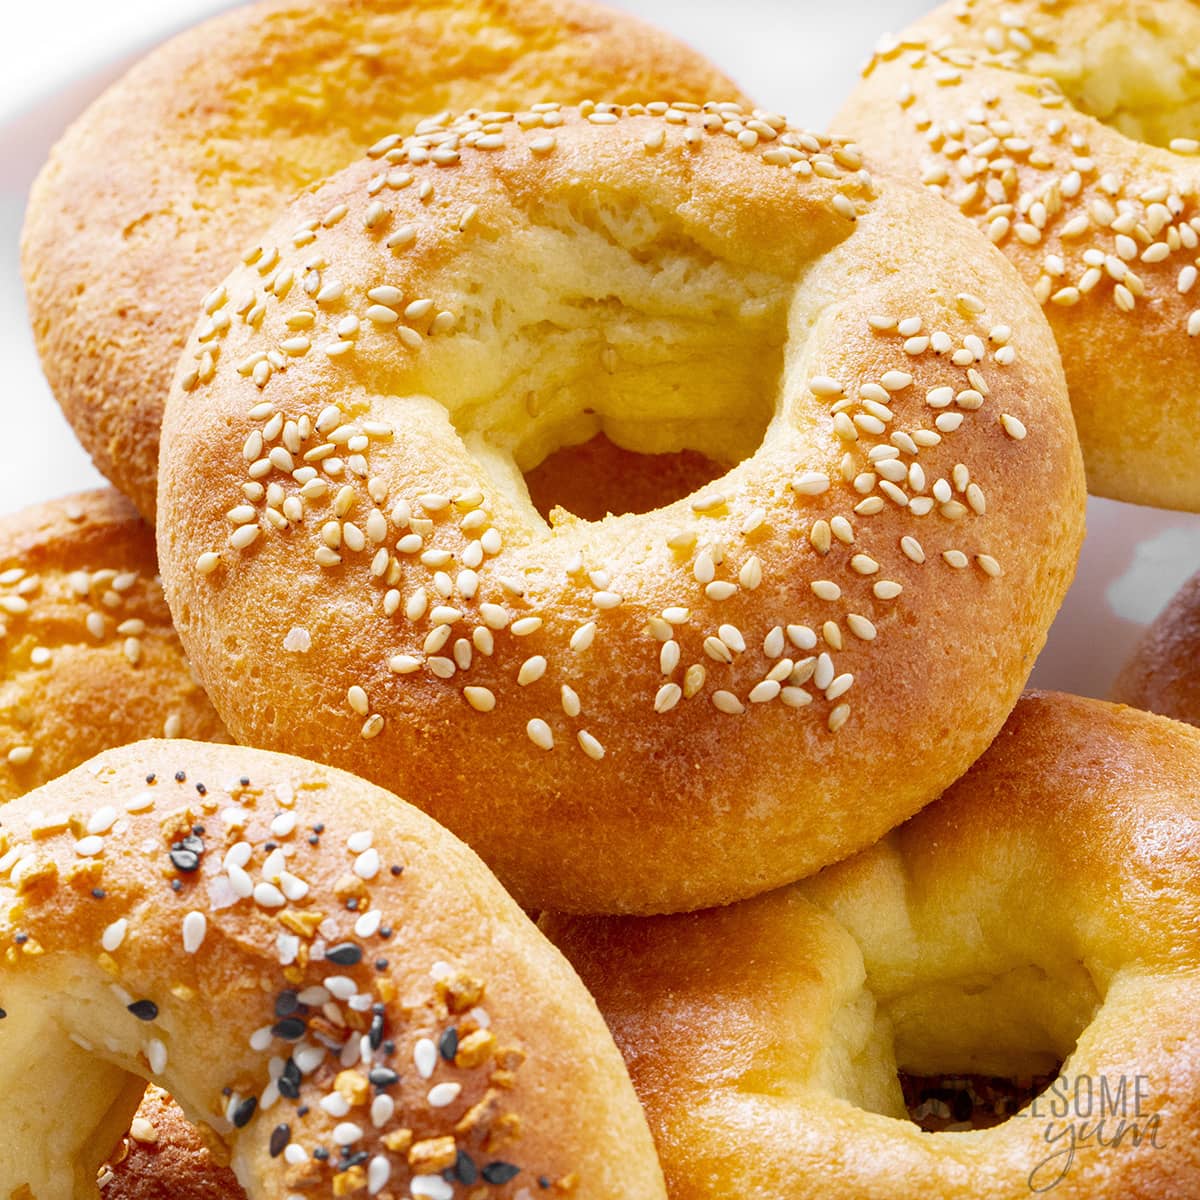
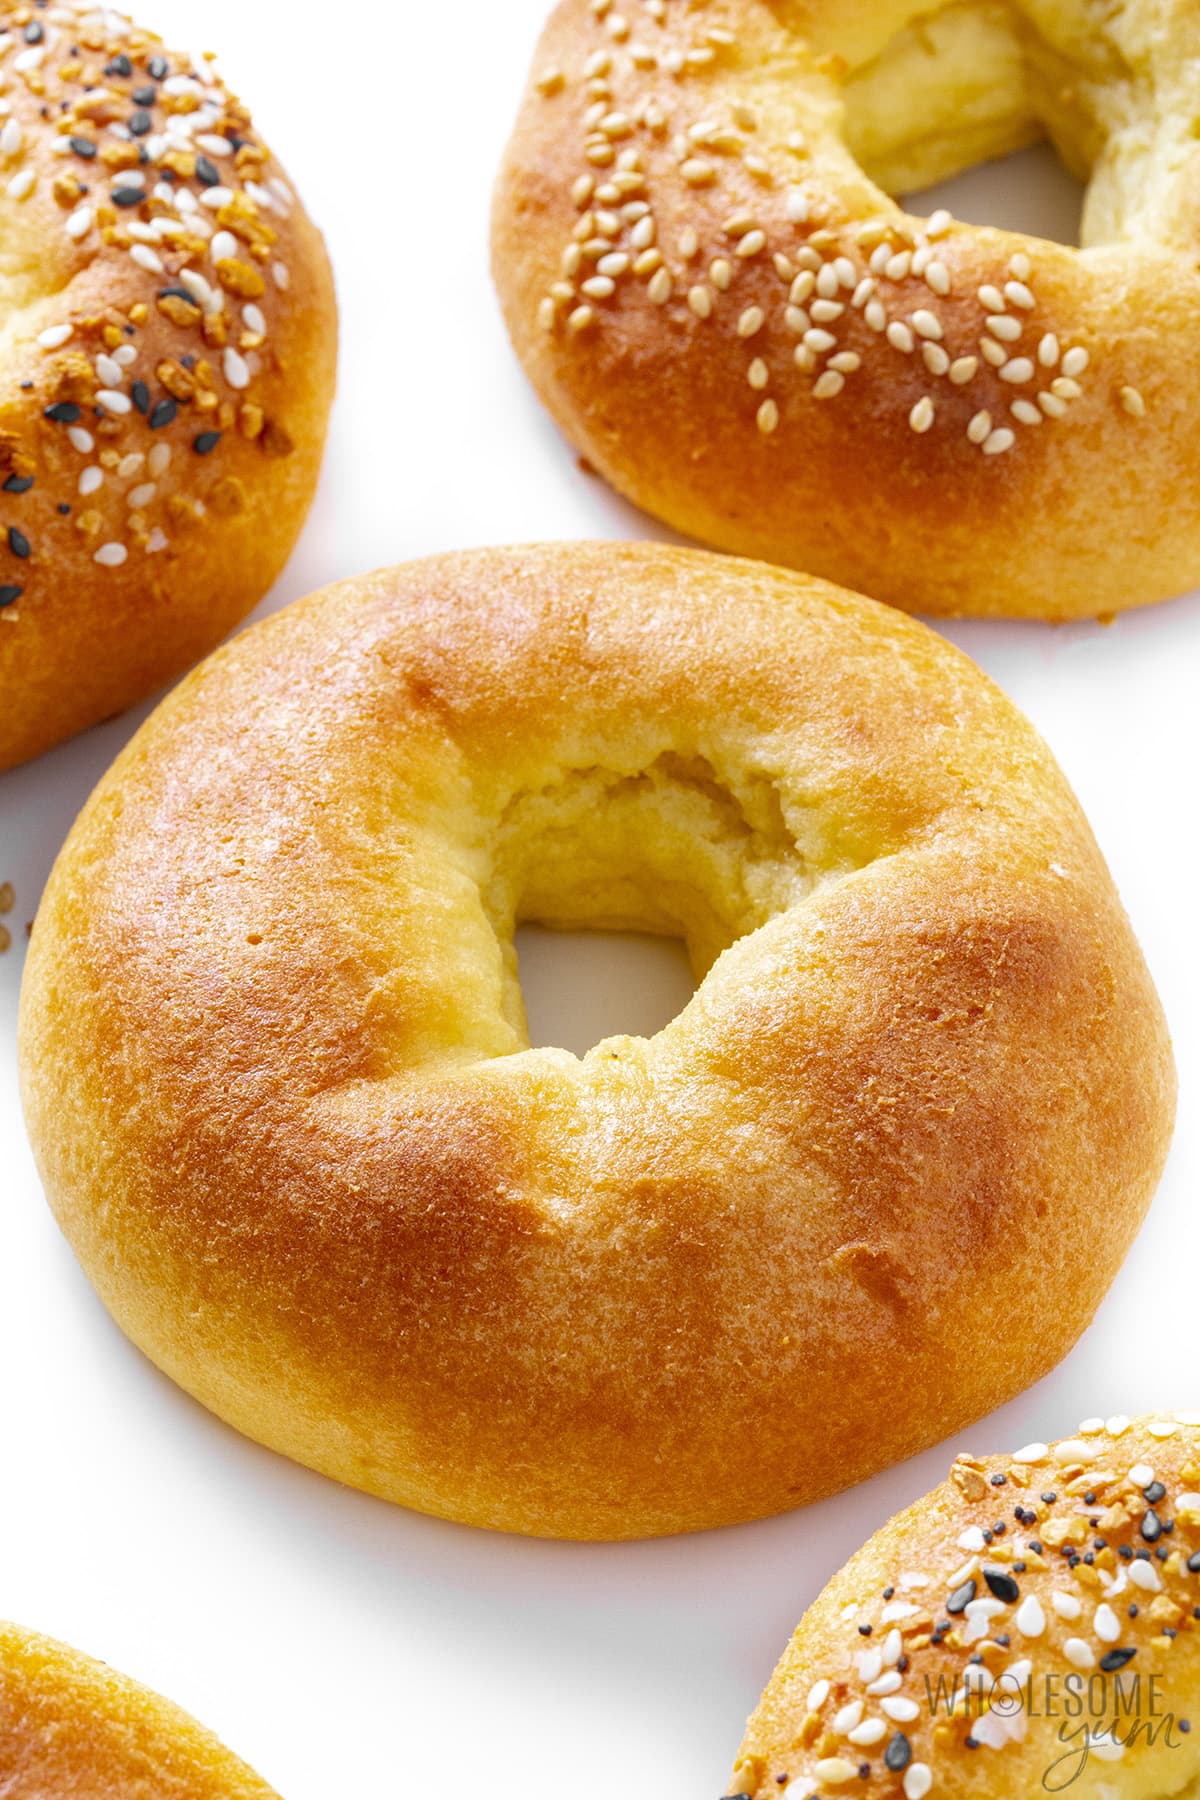
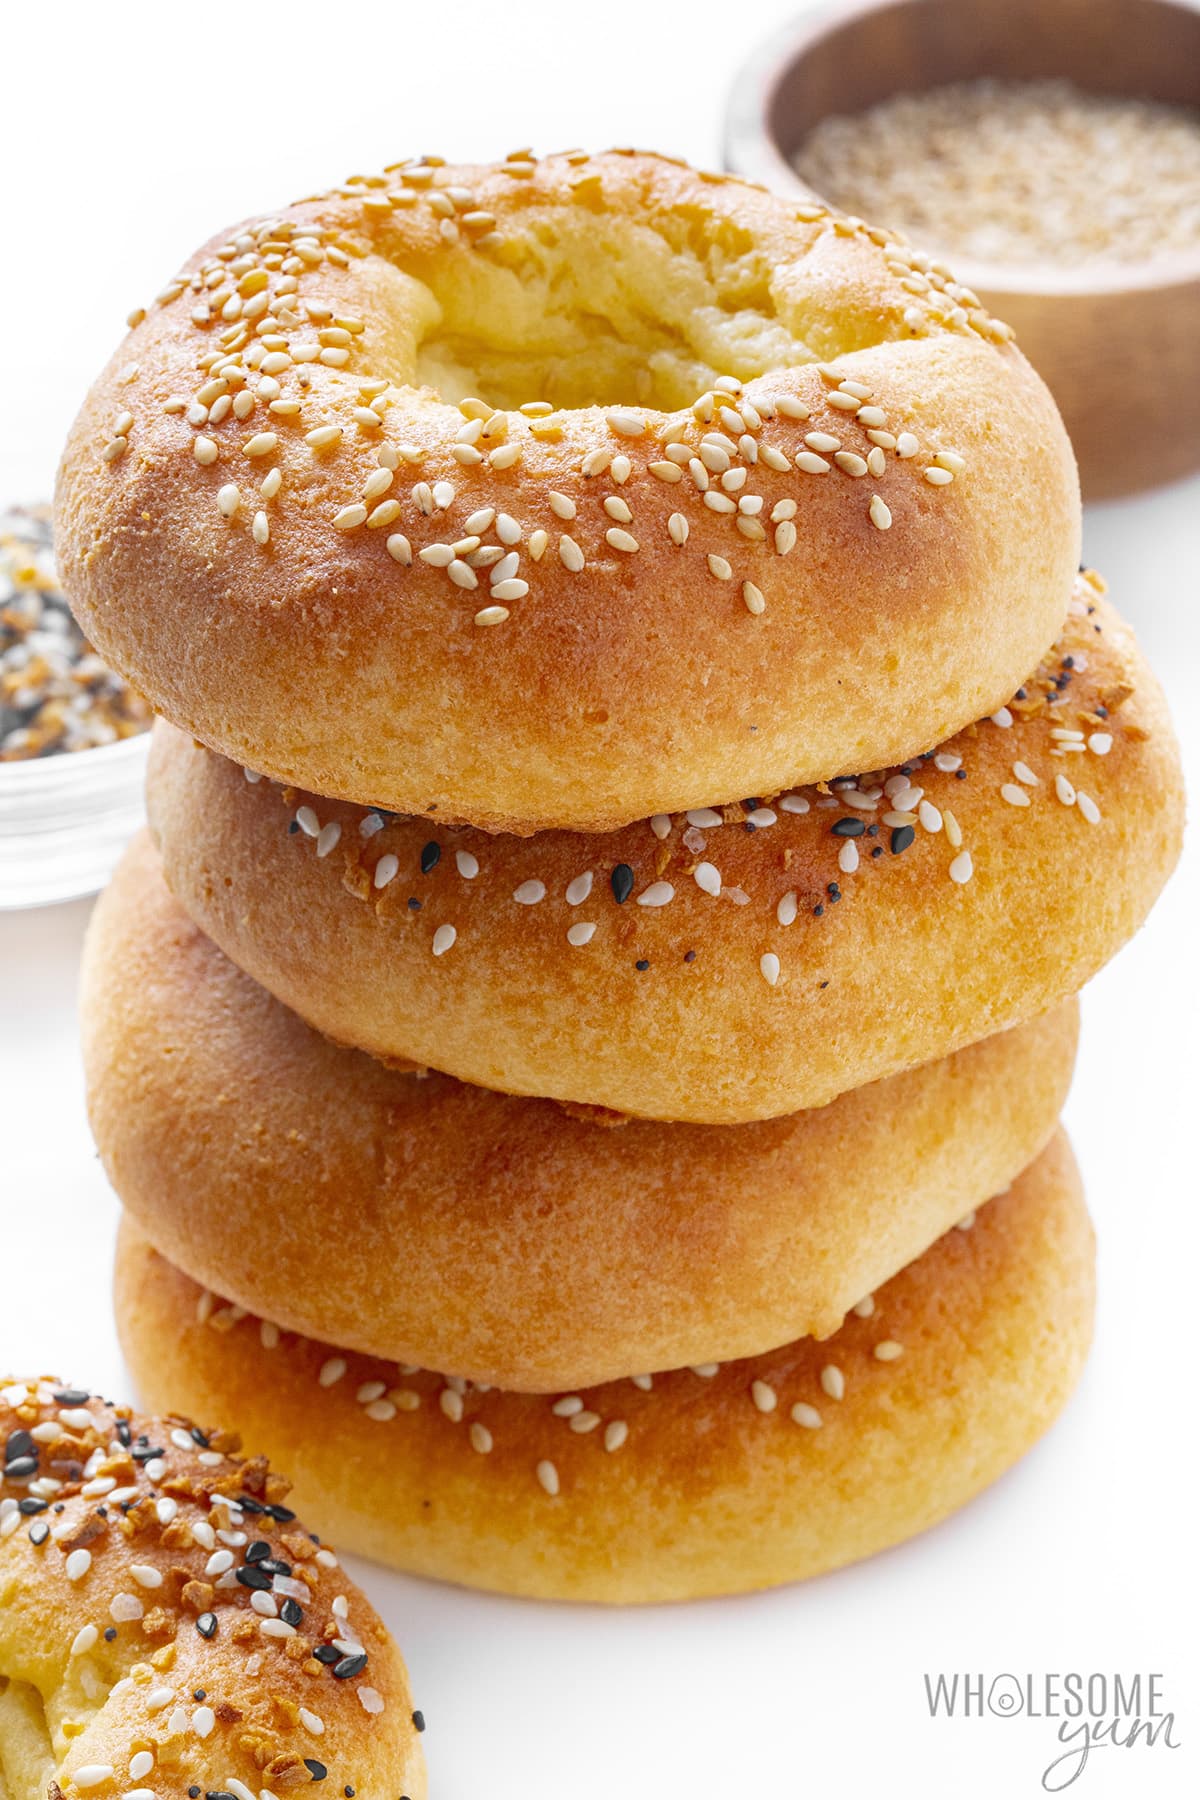
Get It NowThese bagels… these golden, beautiful keto bagels. I will make this recipe forever and ever, no matter how my eating lifestyle evolves. I love them that much, for so many reasons. Because they have only 5 (clean) ingredients. Because I can make them in 30 minutes. Because I can always keep a stash in my freezer. But the biggest reason I adore these low carb bagels is that they have all the chewy texture of real bagels — without the carbs or wheat.
Why You’ll Love My Keto Bagel Recipe

- Perfectly chewy – I’ve made many bread swaps, from keto English muffins (my first ever) and cloud bread to buttery almond flour biscuits and my most popular fluffy white keto bread. But the dense, chewy texture in these low carb bagels… Once you try them, you’ll see why I can’t stop talking about it!
- Tall and puffy – I’ve been making this keto bagel recipe for years (based on the dough from my keto pizza recipe), but sometimes they would come out kind of flat. Not anymore! Follow my tips below to make these nice and thick.
- Quick and easy – 5 ingredients. 30 minutes. My top tips to help you through it all. You got this!
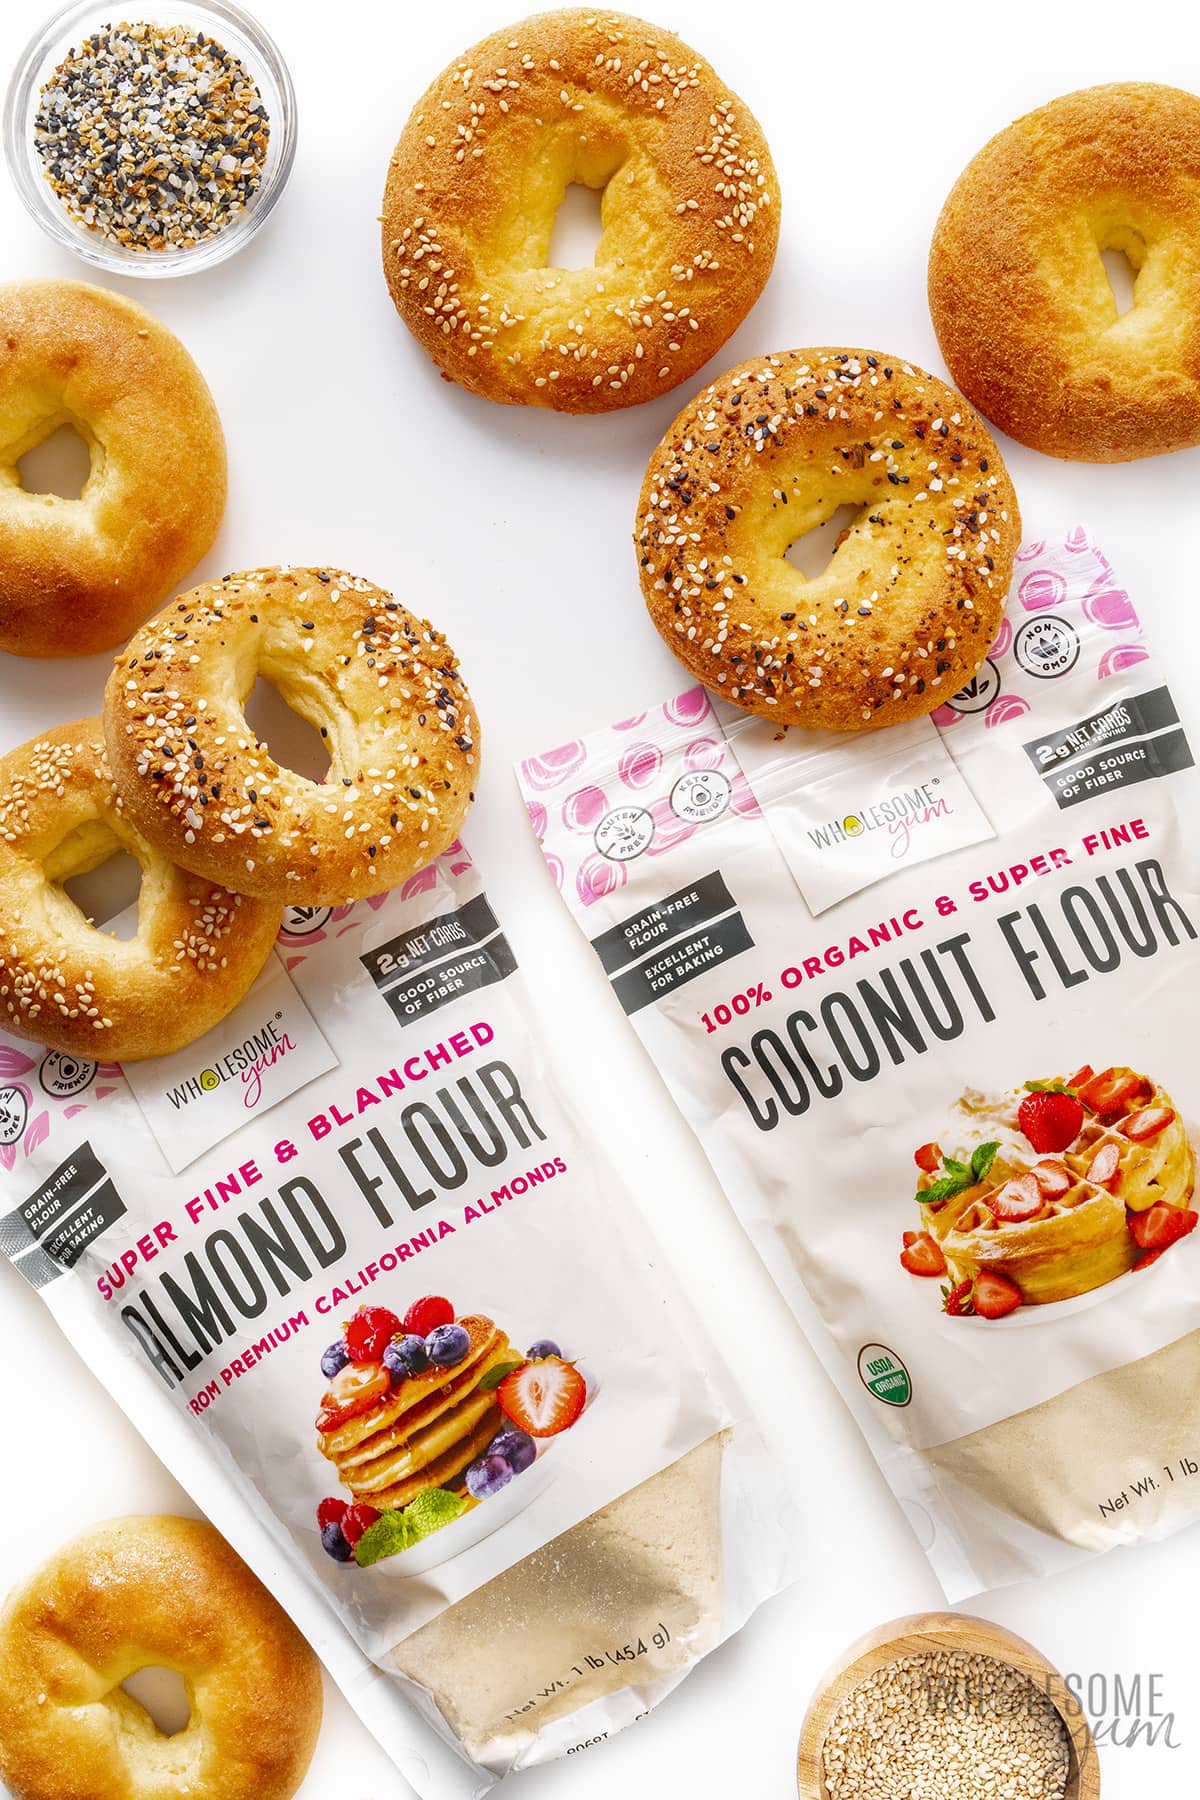
- Choose your flour – You can make these as coconut or almond flour bagels! If you don’t have a dietary restriction, check my comparison below to decide which ones to make.
- Keto friendly, low carb, and gluten-free – It goes without saying that my keto bagels are… well, keto. 😉 These have only 5g net carbs (and 8 grams total carbs) each. But they are also gluten-free, unlike the ones you might see popping up in stores!
- Go with everything – You can use these in all the same ways you would a regular bagel. Toast them. Top them. Make a sandwich. It all works.
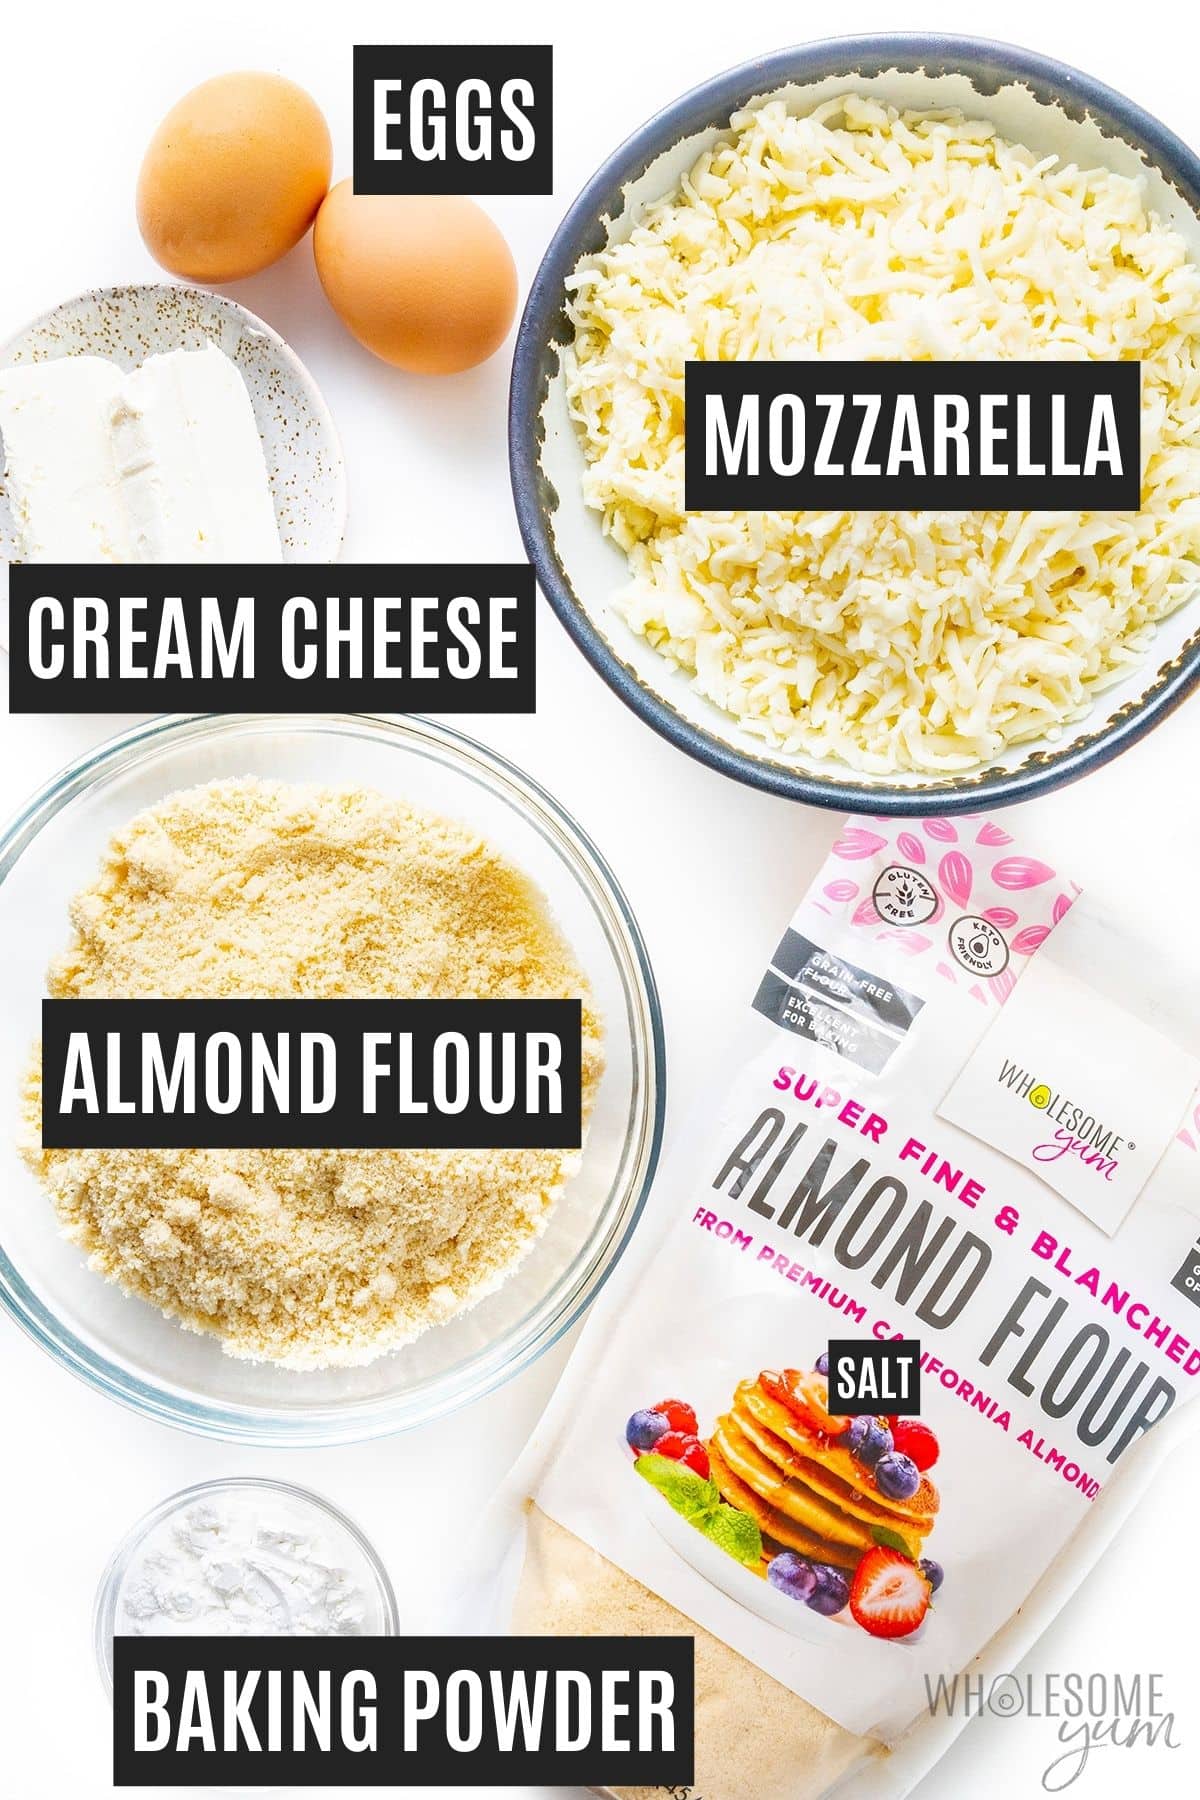
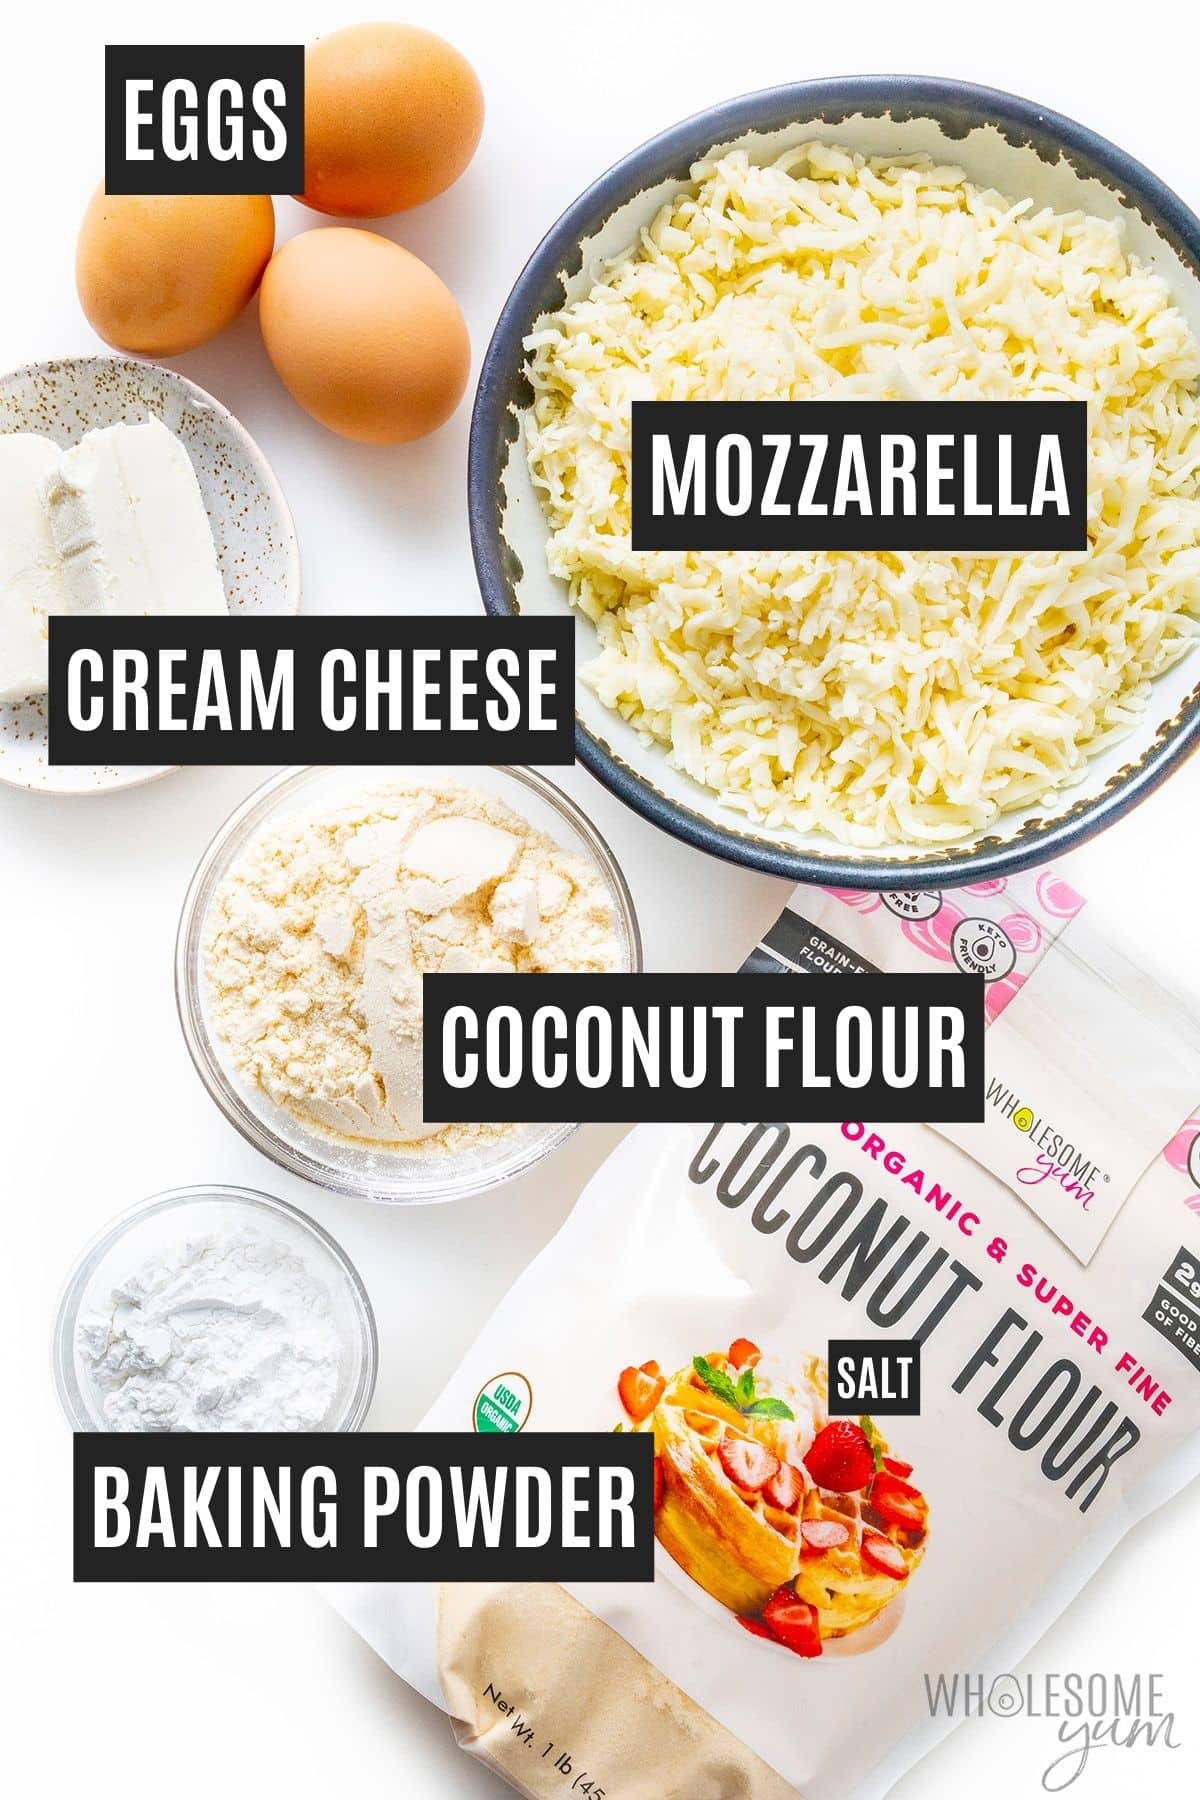
Ingredients & Substitutions
This section explains how to choose the best ingredients for my keto bagel recipe, what each one does in the recipe, and substitution options. For measurements, see the recipe card below.
- Almond Flour Or Coconut Flour – You can use either, but in different amounts. Since coconut flour absorbs more moisture, you need to use less. Keep in mind that many brands of almond flour are too coarse, leaving a grainy texture, which is why I created and recommend using my Wholesome Yum Blanched Almond Flour if you’re making these keto bagels with almond flour. I also use Wholesome Yum Coconut Flour for the coconut flour version, but this is less critical — just a way to support a blogger. 🙂
- Shredded Mozzarella Cheese – This is the key to making the bagels chewy and actually forms the bulk of the dough. Make sure to use low-moisture part-skim mozzarella, not soft fresh mozzarella, which is too wet. Other hard shredded cheeses can work, but the texture will change and the flavor will not be as neutral. Some dairy-free mozzarella substitutes are fine, too, but some kinds might not work well. If you want an extra chewy result, you can also add 1/4 teaspoon xanthan gum to the dough, but I don’t find it necessary.
- Cream Cheese – I recommend a full fat variety, but dairy-free or low-fat ones are fine, too. Cut it into small cubes, so that it melts more easily.
- Eggs – Readers have also told me they had success using flax eggs and other egg substitutes.
- Baking Powder – I like this brand, and you’ll notice that my keto bagel recipe uses a lot. This is needed to lift the heavy dough, so don’t use less! Also, don’t confuse this ingredient with baking soda, which is different.
How To Make Keto Bagels
This section shows step-by-step photos together with the instructions, to help you visualize the recipe. For full instructions, including amounts and temperatures, see the recipe card below.
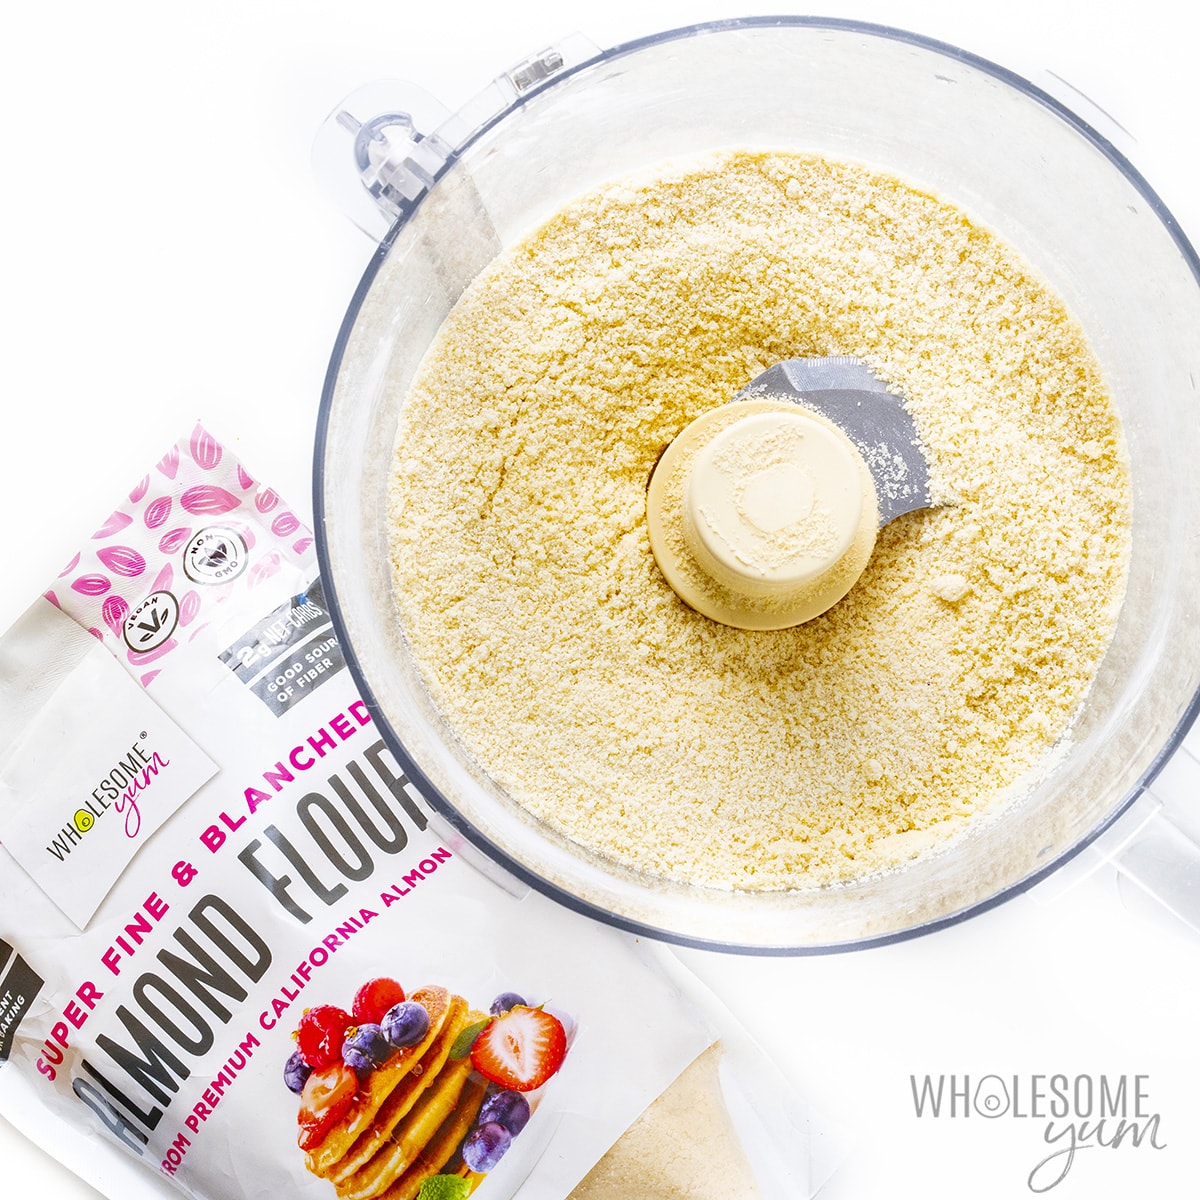
- Process the dry ingredients. In a food processor, process the almond flour (or coconut flour) and baking powder, until uniform.
- Add the eggs. Process again until uniform. Set aside.
- Melt the cheeses. In a microwave-safe bowl, combine the shredded mozzarella and cubed cream cheese. Microwave until melted and well incorporated. Stir halfway through, and again at the end. (Alternatively, you can heat the cheeses in a double boiler on the stove over low heat, stirring frequently, until completely melted and easy to stir.)
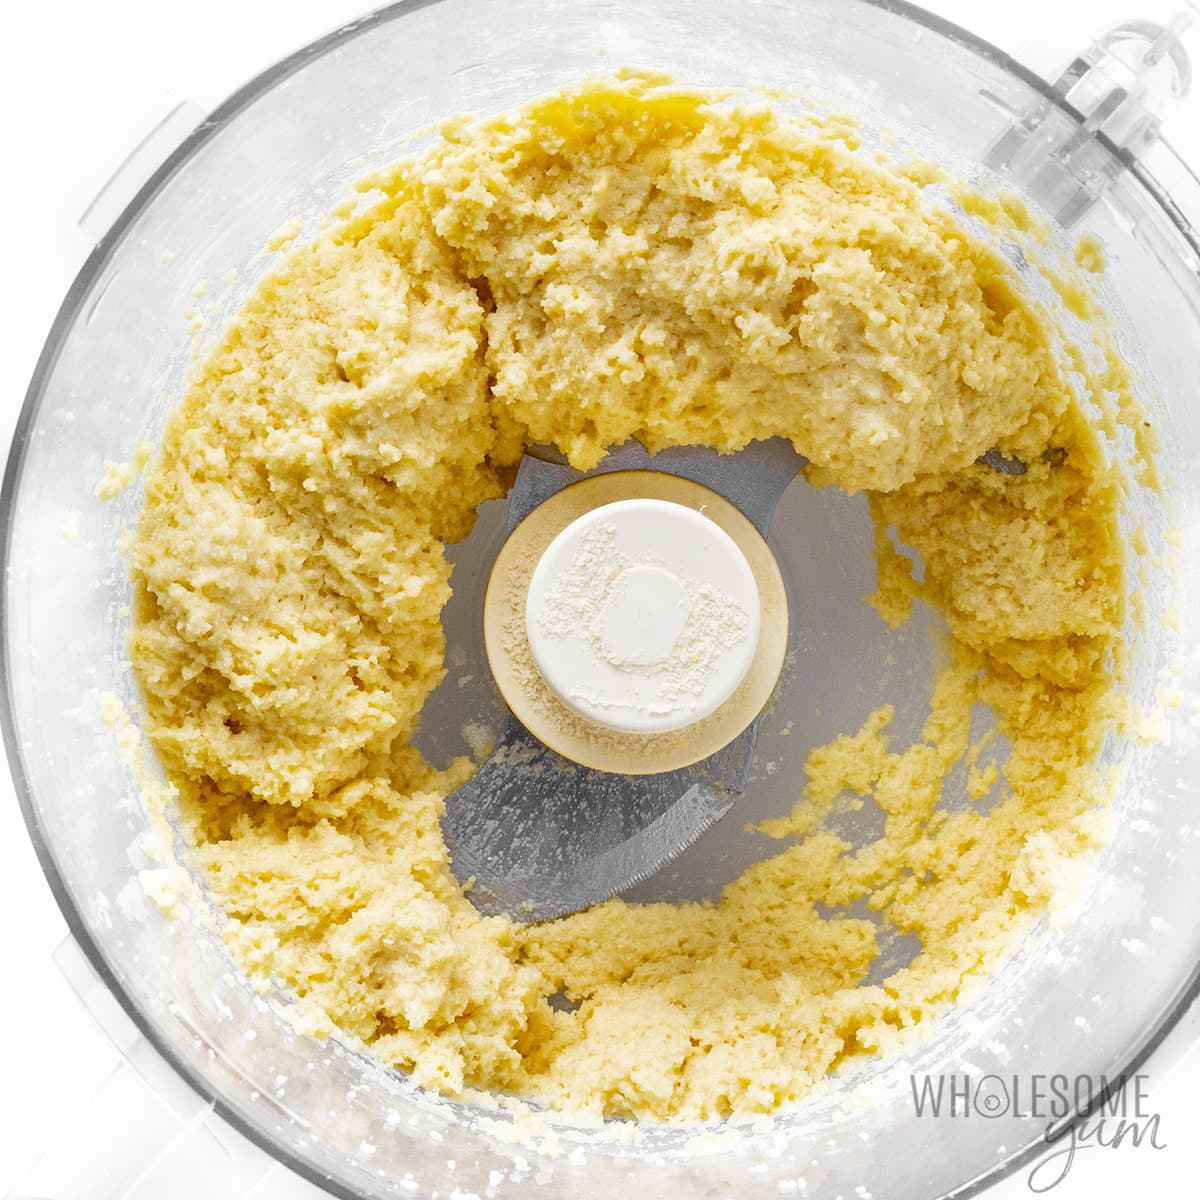
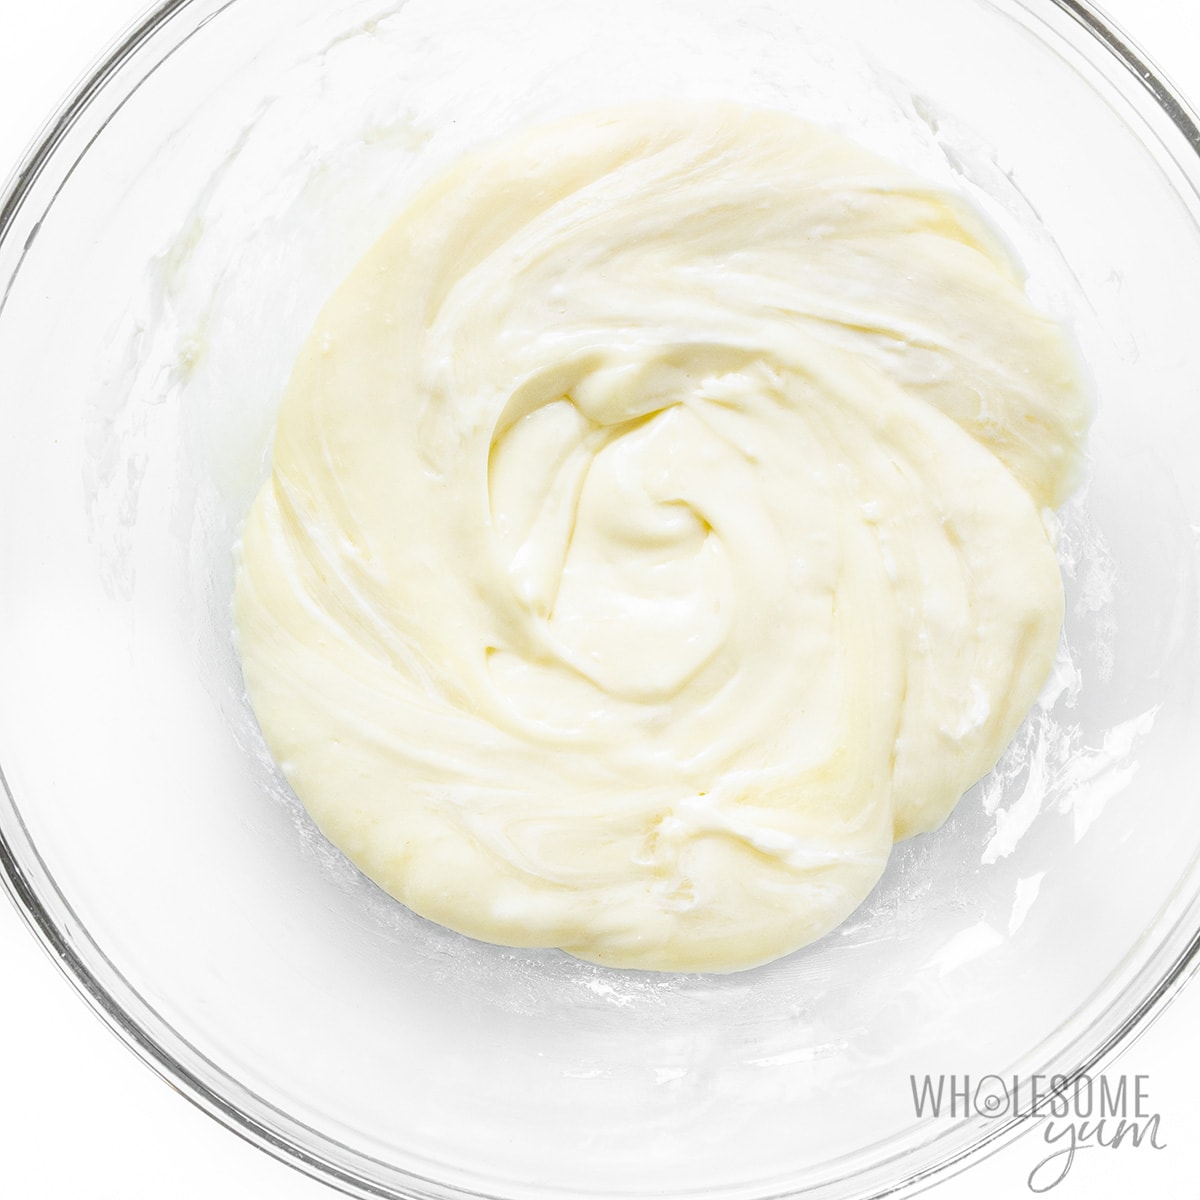
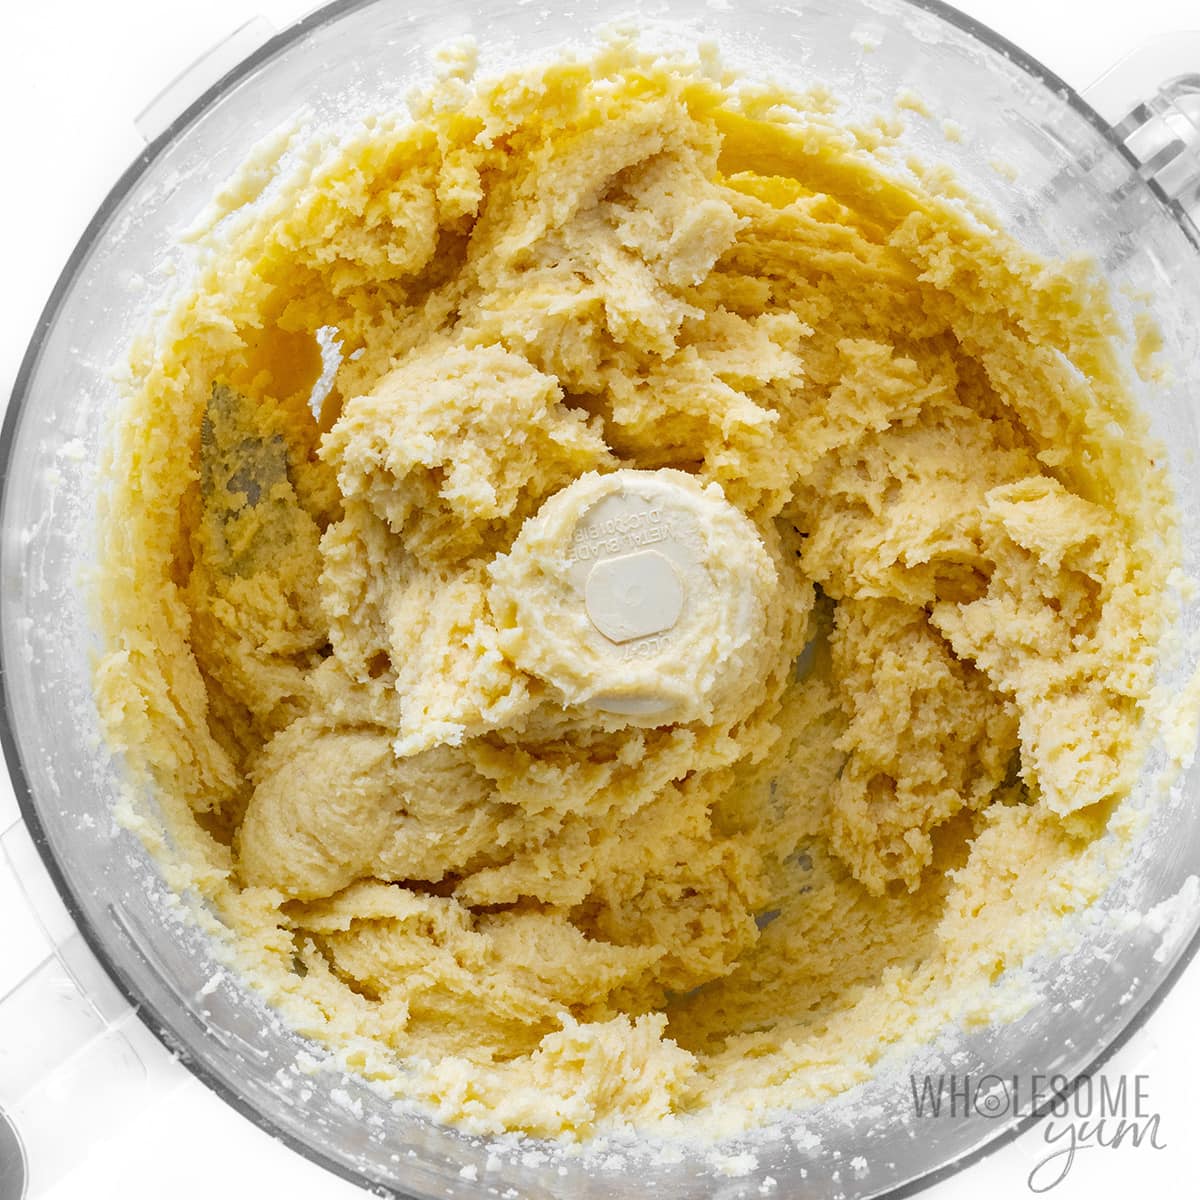
- Mix the dough. Transfer the cheese mixture into the food processor, positioning it so that the blade is sticking into the cheese. Working quickly while the cheese is hot, pulse until a uniform dough forms, with no streaks. (You can also knead with your hands instead of using a food processor, but the low carb bagels turn out taller if using the food processor — see my tips below!)
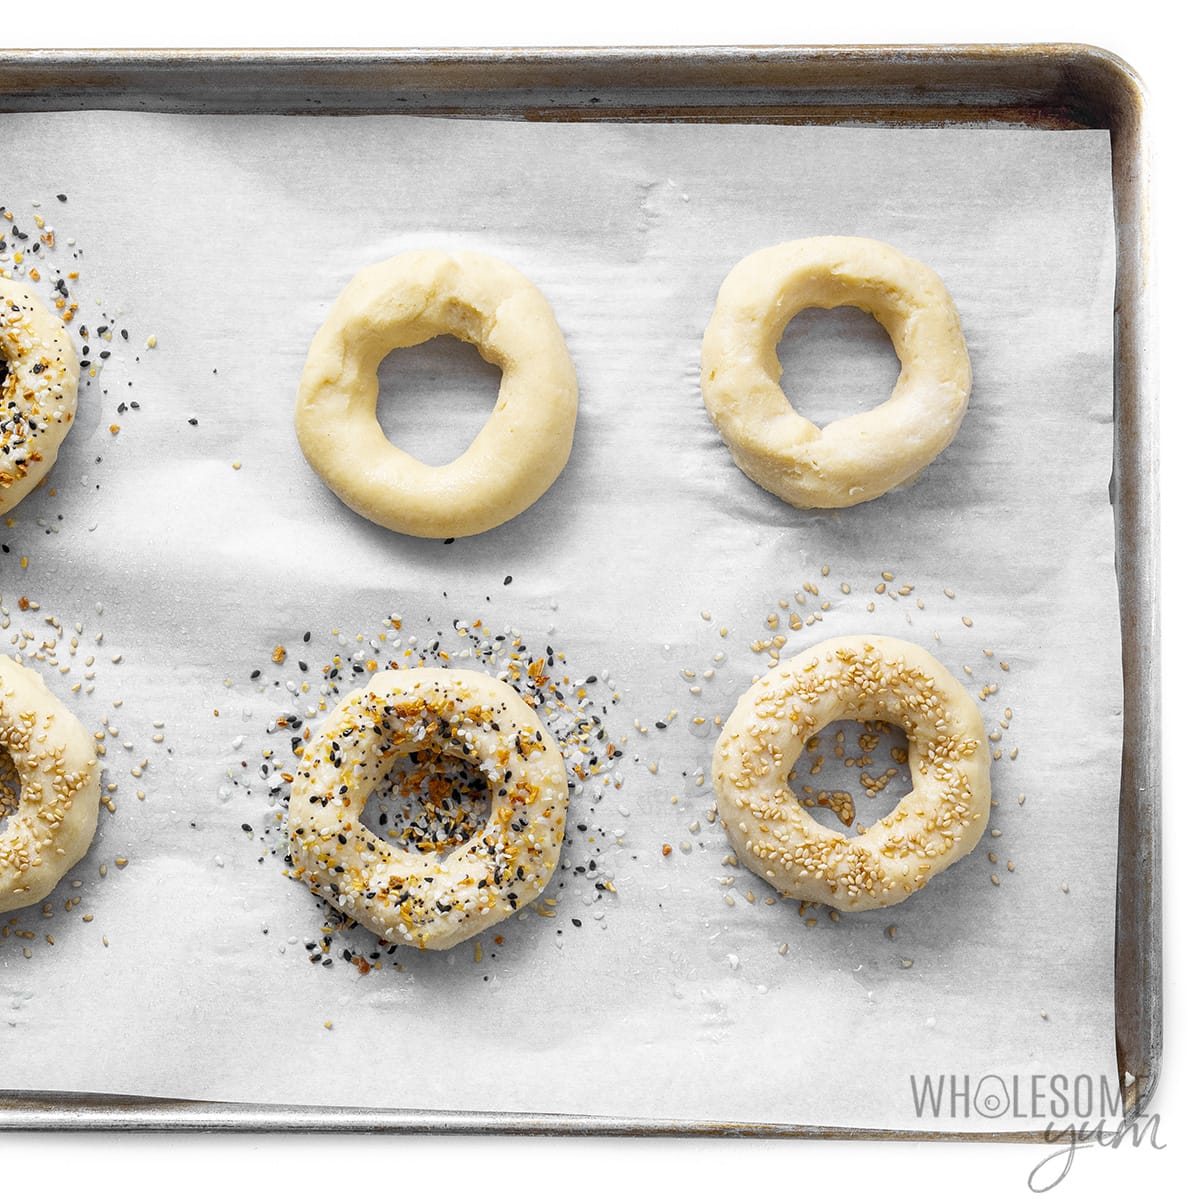
- Shape the bagels. Form the dough into a ball and divide into 6 equal portions. Form or roll a long log with each section, then press the ends together to make a bagel shape and place onto a baking sheet lined with parchment paper. Repeat with the remaining dough.
- Add (optional) toppings. If you want anything on top, spray the bagels lightly with cooking spray, or sometimes I use an egg wash for extra color. Sprinkle on your toppings and gently press into the dough.
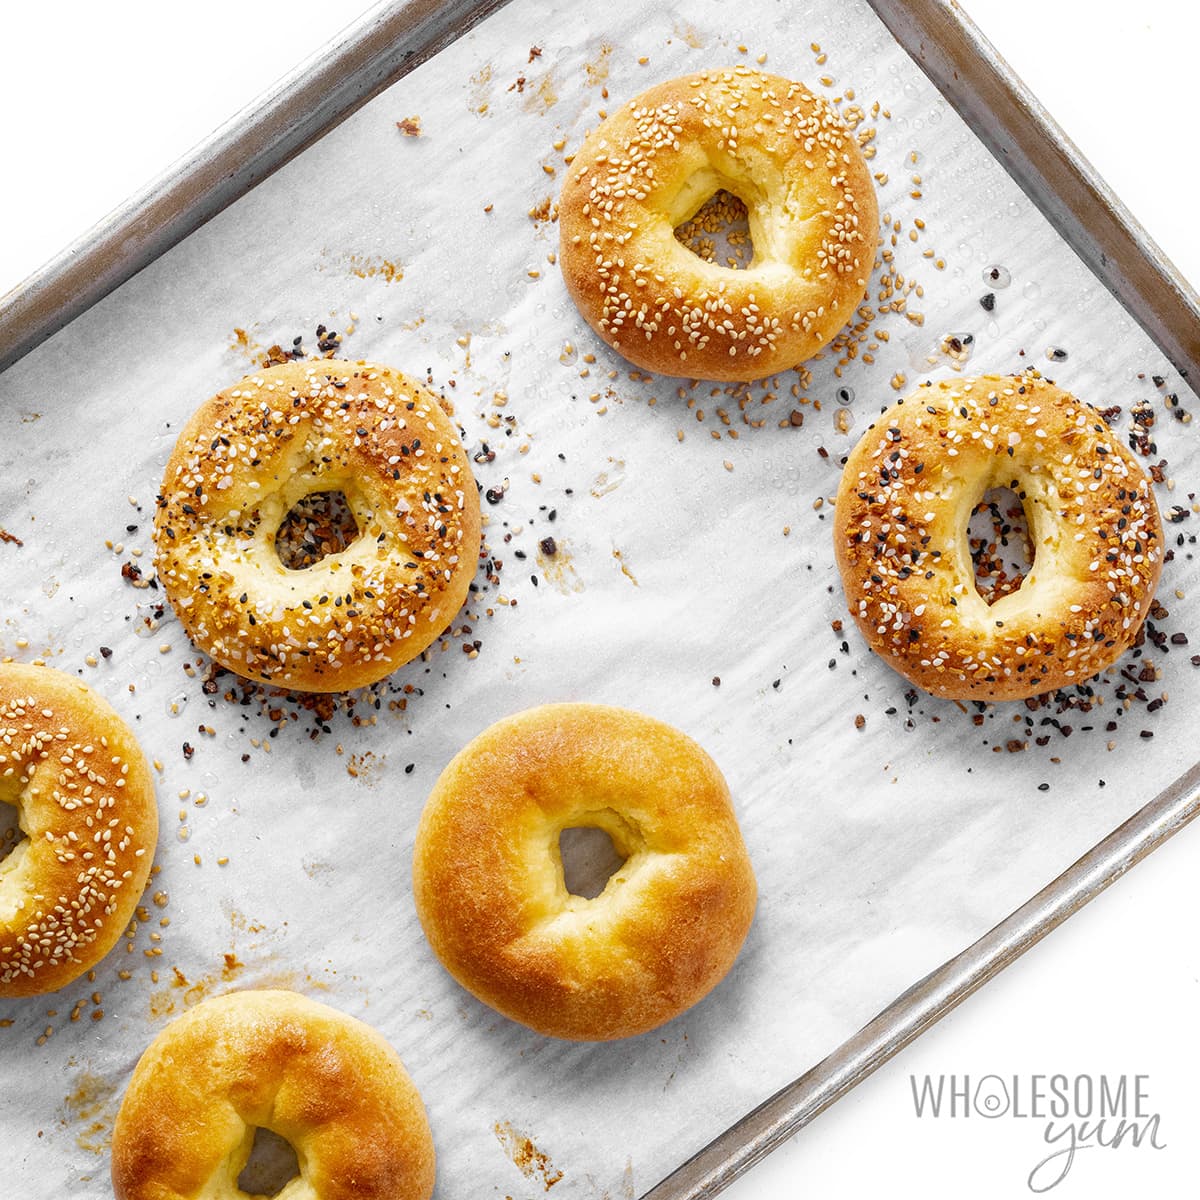
- Bake until golden. Place the keto bagels in the oven. Bake them until they are firm and golden brown.
- Let them cool. Allow your bagels to cool for at least 15 minutes on the pan to firm up. If you can, cool completely for the best inner texture.
Tips & Troubleshooting
The dough I use for these keto bagels is called fathead dough, a.k.a. the best there is for chewy textures in low carb baking! It does take some practice to get used to it. If you want a full guide, you’ll find it in my Easy Keto Cookbook (which also includes this low carb bagel recipe). But here are the 4 most important things you need to know:
Handling Sticky Dough:
This is the most common issue, and it’s most noticeable if your kitchen is warm or humid, or your hands are very warm. (My photo in the food processor above shows what sticky dough looks like!) Here’s what to do:
- Chill the dough. This is my favorite trick! Popping the dough in the fridge for 30 minutes will help a lot. The freezer for 10 minutes also works if you’re in a rush.
- Cover your hands in oil. Wash your hands first if they are already sticky, then add a little oil (I like neutral avocado oil) and you can work with the fathead dough much more easily.
- Make sure the dough is completely uniform. You shouldn’t have streaks or pieces of cheese separate from areas of flour — not only does this make the dough sticky, but it also totally ruins the texture of the bagels if you don’t fix it. If the cheese starts to solidify before the dough forms, microwave it for about 30 seconds to soften it again, so that it mixes better. (Be careful not to overheat to avoid cooking the egg.) Once it’s warmer, process again until uniform. The dough will seem sticky again when it’s warm, so just use my 2 tips above afterward.
Bagels Not Cooking Through:
If you find that the bagels brown on top but remain raw inside, here are some reasons this may happen and how to avoid it:
- Tent the top with foil. If the top browns but they still don’t feel firm, just cover with foil and continue baking. They won’t feel totally firm until they cool, but you can remove them from the oven when they no longer feel “doughy”. Which brings me to my next tip…
- Cool before slicing. Keto bagels will seem raw if you cut (or bite) into them immediately, so letting them cool is important! The bagels actually continue to “cook” a bit from the residual heat after you remove them from the oven, and the texture also changes, so wait at least 15 minutes. (You can still reheat or toast them afterward if you want them warm — I usually do!)
Bagels Coming Out Flat:
Not rising properly is the hardest issue to troubleshoot, but usually not a deal breaker. Your low carb bagels will still taste pretty amazing even if they are flat! But, here is what you can do:
- Use a food processor. I used to knead the dough for these keto bagels by hand, but my food processor (with a dough blade or S knife blade) has been a game changer! It’s way less work and introduces more air bubbles, so the bagels end up taller and puffier. A stand mixer will also work.
- Use fresh baking powder. It loses effectiveness over time.
- It depends on your flour. I find that the coconut flour version is slightly more prone to spreading than the almond flour one.
- Form the rings tall to start. I recommend making the dough shapes tall and skinny to account for some spreading.
Choosing Which Flour To Use:
If you’re not sure which to use, the main difference I notice between the 2 flours is the texture. You can decide based on my comparison:
- Almond flour bagels tend to be taller, denser, and more chewy. They also hold together better and are less likely to crumble. I prefer my keto bagels made with this flour!
- Coconut flour bagels are lighter and fluffier. They have a slightly sweet flavor that goes well with sweet spreads. However, they can be a bit more fragile.
Variations & Toppings
I usually just make these keto bagels plain or with sesame seeds, as they are more versatile that way. But you can also change it up!
Try different add-ins, like fresh blueberries, sugar-free dried cranberries, nuts, caramelized onions, minced garlic, cinnamon with a few tablespoons of sweetener, or just top with everything bagel seasoning (my favorite savory flavor) or poppy seeds.
Keep in mind that adding sweetener does make the dough more sticky, so you’ll definitely need to chill it if you add any. (See my tips above for details.)
Storage Instructions
- Store: Keep them in an airtight container in the refrigerator for up to 1 week.
- Freeze: I always just meal prep a double (or triple) batch of these keto bagels at once and freeze them — they last 6 months in the freezer! Let them cool first, then freeze in zip lock bags with parchment paper between them to prevent sticking together.
- Reheat: Use the toaster for the fastest, easiest method. I use the bagel setting on mine, along with the frozen setting if they’re right out of the freezer. You can also microwave them, but they come out very soft. (My daughter prefers this way.)

Serving Suggestions
Need ideas? Here are some of my favorite spreads and sandwiches to go with these low carb bagels:
- Spreads – Cream cheese is the obvious choice, but you can also use butter, peanut butter, or even my sugar free Nutella or sugar free jelly. My personal fave is a layer of mascarpone topped with my sugar free strawberry jam!
- Bagel & Lox – One of my go-to lunches is a keto bagel with a smear of cream cheese, smoked salmon (or my lox recipe), and cucumbers, red onions, or capers. So good!
- Breakfast Sandwich – Stuff eggs, sausage or bacon, and cheese between your bagel slices, and heat. You can also replace the pancake layers in my keto breakfast sandwich with layers of these bagels.
- Lunch Sandwich – Try my keto chicken salad, tuna egg salad, or even a keto BLT. Or keep it simple with some sliced turkey, lettuce, and homemade mayo.
More Keto Breakfast Recipes
Breakfast is my favorite meal of the day, so I have lots of low carb breakfast recipes! Try some of these — they feel like they’re full of carbs, but they’re not:

My Tools For This Recipe
- Baking Sheet – My favorite that you might notice in many of my recipe photos. Their non-stick surface lasts and lasts!
- Food Processor – For taller, fluffier keto bagels! Mine will even fit a double batch of the dough.
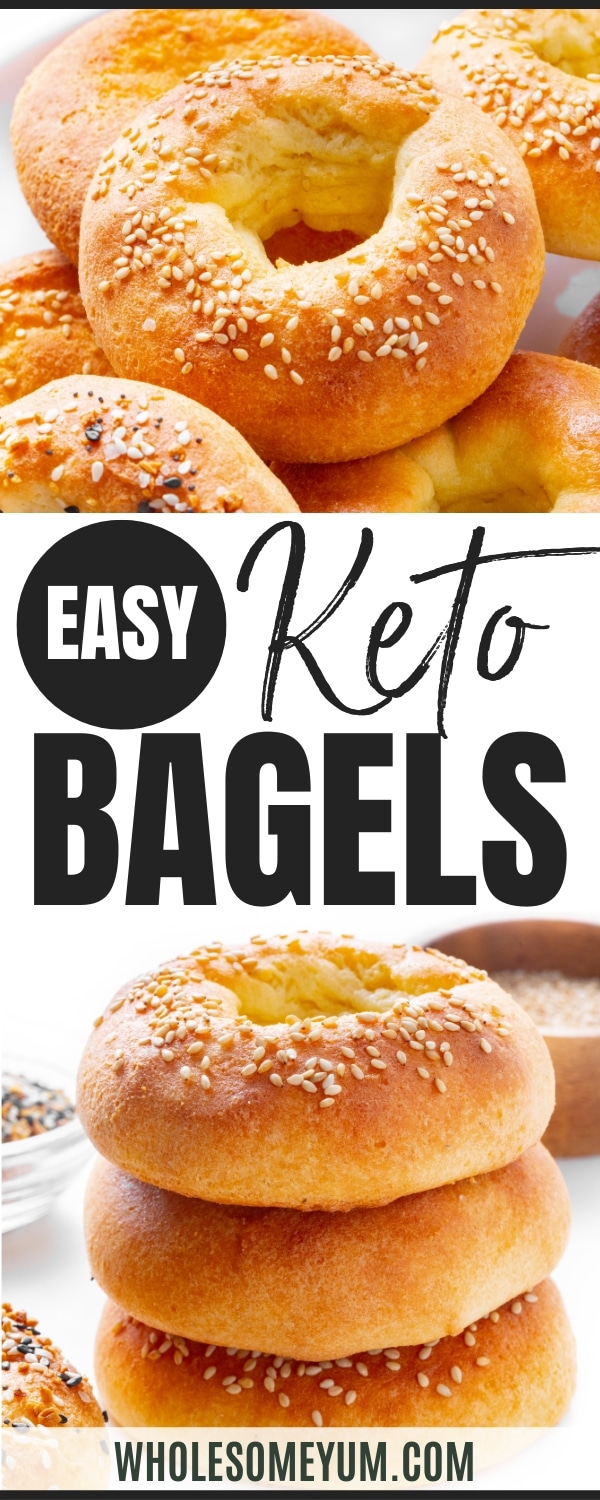
Keto Bagels (Low Carb, Chewy, Easy!)
These keto bagels are chewy, thick, and just 5g net carbs! Make them with almond flour or coconut flour — just 5 low carb ingredients total.

Ingredients
Tap underlined ingredients to see the ones I use.
Almond Flour Version:
Coconut Flour Version:
Optional:
Instructions
Tap on the times in the instructions to start a kitchen timer.
-
Preheat the oven to 375 degrees F (190 degrees C). Line a baking sheet with parchment paper.
-
In a food processor, process the almond flour (or coconut flour) and baking powder, until uniform. (Alternatively, you can mix them together in a bowl if you want to make the bagels by hand, without a food processor. However, you’ll get taller, fluffier bagels using the food processor method.)
-
Add the eggs to the food processor. Process until uniform. Set aside.
-
In a large bowl, combine the shredded mozzarella and cubed cream cheese. Microwave for 2 minutes, stirring halfway through. Stir again at the end until well incorporated. (If you don't want to use the microwave, heat the cheeses in a double boiler on the stove over low heat, stirring frequently, until completely melted and easy to stir.)
-
Transfer the cheeses into the food processor, positioning them so that the blade is sticking into the cheese. Working quickly while the cheese is hot, pulse until a uniform dough forms.
(Alternatively, you can knead with your hands if not using a food processor. The dough will be very sticky, but keep kneading and squeezing through your fingers for a few minutes. If the dough becomes hard before fully mixed, is too difficult to mix, or is still sticky after a couple minutes, you can microwave/reheat for 15-20 seconds to soften it. In that case, wash your hands and knead again.)
No matter what method you use, it's very important for the dough to be completely uniform before proceeding to the next step. You shouldn't have pieces of cheese separate from areas of flour. (See tips in the post above if you have trouble with sticky dough.)
-
Form the dough into a ball and divide it into 6 parts. Form or roll a long log with each part, then press the parts together to make a bagel shape and place onto the lined baking sheet. Repeat with the remaining dough.
-
If you want to add toppings, such as sesame seeds or everything seasoning, spray the bagels lightly with cooking spray first. Then, sprinkle the toppings over the bagels and gently press into the dough.
-
Bake keto bagels for about 15 minutes, until firm and golden brown.
-
Let the bagels cool for at least 15 minutes, or preferably completely, to improve their inner texture.
Did You Like It?
Leave a rating to help other readers (this also helps me continue to provide free recipes on my site), or get the recipe sent to your inbox.
Try More Of My Recipes


Recipe Notes
Serving size: 1 bagel
Recipe is from my Easy Keto Cookbook. The book includes my complete guide to working with this dough, as well as 100 easy low carb recipes with 10 ingredients or less! I also have more tips about it in my keto pizza post.
I provide nutrition facts as a courtesy. Have questions about calculations or why you got a different result? Please see my nutrition policy.
© Copyright Maya Krampf for Wholesome Yum. Please DO NOT SCREENSHOT OR COPY/PASTE recipes to social media or websites. We’d LOVE for you to share a link with photo instead.
Keto Bagels


1,890 Comments
Crystal Clark
1This went together so smoothly and I was pleased with how easy the dough was to work with! I do not have a food processor so I tried it in my Blendtech, it did not work well, lol. So I transferred it to my stand mixer instead with the dough hook and it worked perfectly! Next time I’m going to start in the mixer instead. 🙂 My 7 year old and I made them together and he enjoyed the process, too! We made mini bagels so they’re snack sized instead!
Lorraine
1I used an ice cream scoop to make uniform balls, stuffed them with about a 1/2″ of mozzarella cheese, and then baked them in a silicone muffin pan. I did top them with everything bagel seasoning after spraying with avocado oil spray. They were amazing! Thanks so much for this recipe!
Kaarn S
1Wow! This was really a good bagel recipe and had a great texture. Very, very much like bread. I topped mine with a little egg wash and then sprinkled Italian seasoning, garlic and onion powder when baking. Popped it in the toaster and threw a little butter on top. My husband, who is a skeptic of recipes he never has tried, really liked this. He even MADE me save it in my Pinterest box.
Missy Softich
1Ok, these bagels looked so good and I have been craving bagels like crazy, so I decided to go for it. Unfortunately, I didn’t have any shredded mozzarella, but I did have a package of smoked string cheese. Let me tell you, WOW!!!! I shredded those sticks and added everything bagel seasoning, and these are probably the best bagels I’ve ever put in my mouth! My whole family devoured them before they even cooled! I can’t wait to grab some more smoked string cheese and make them again. Definitely going to become a staple in our house! Thank you for the recipe!
Lenore
1Amazing!! Followed directions exactly. Used unsweetened cranberries and walnuts in the final mix. Thank you. I will be making these again. All your tips are so helpful and appreciated.
Msmoo
1Yum just made half a recipe, but will definitely make a full batch. To mix my flour egg and cheese I used a rubber scraper/spatula to really work the mix together. Made balls and made a hole, then flattened a little. SO…easy to make.
Pamela
1I have made the bagels and they are amazing. You have the best almond flour around and your instructions are the best. A little of your raspberry jam from your book and I’m set.
Allie
0These were awesome!!!! Definitely use oil to form balls because the dough is super sticky. Wondering what the best way to store them is though.
Yolanda
0Very messy recipe, but I’m happy with the end result.
I used almond flour for mine, but may try coconut flour someday if I want to make a sweet dessert bagel. I didn’t see salt as an ingredient, so I added a half a teaspoon. I also added the same amount of garlic powder (because I was craving a garlic bagel). You can easily mix and knead the ingredients, like I did, in a bowl with a spatula. Saves a lot of time and mess. To shape it, I had to use (a lot) oil on my hands so that the dough doesn’t stick so much. Every time I formed one, I oiled my hands again, and repeat. After I formed the balls, they were put in the freezer for 15 minutes (in the metal pan that I used to bake them in). Removed them from the freezer and they were much easier to form and shape them into a bagel. I did let them cook for 15 minutes, but it wasn’t fully brown to me so I stuck them in for another 5. The texture is not bagel firm. It’s soft, so trying to cut them and half to toast them would be a crumbly mess. I can see making them flat and then treat it like toasted bread down the road.
Maya | Wholesome Yum
0Hi Yolanda, Glad you’re happy with them! I covered in the post above that I don’t add salt because the cheeses are already salty, but it’s fine to add if you want your bagels saltier. I do cut these in half and toast literally multiple times a week, so not sure why they would be crumbly. I actually sliced them in my video above as well. Did yours look different?
Diane
0I made the coconut flour bagels. Being dairy free I had to use the VioLife coconut oil mozzerella & cream cheese. My bagle dough turned out quite sloppy, even after refrigerating for 30 + minutes, could not form a ball. Had to pour dough into silicone donut forms & baked that way. But they came out like cake. Looking for some help with this, should I have added more coconut flour because of the coconut oil in the cheeses? I would love to try them again if you can offer some help for me
Maya | Wholesome Yum
0Hi Diane, Sorry to hear that happened! I’ve never used that type of dairy-free cheese, so I suspect those don’t work the same way as regular. I have had many readers tell me they made these keto bagels successfully using dairy-free subs, but haven’t had anyone mention that kind in particular, so I guess that one must not work well. I updated the post to clarify that not all dairy-free substitutes may work. Unfortunately it’s impossible for me to test every single type/brand.
James K
0I was never able to get the dough to not be sticky. I’m very good with following recipes and this just never turned into a dough that was manageable. I literally had more of this stuff everywhere else in my kitchen than on the pan.
Maya | Wholesome Yum
0Hi James, Sorry to hear that. I have detailed information in the post above on how to avoid this.
Jennifer
0I don’t have a food processor, so making these was an exercise in kneading, kneading, kneading! I like them, and would make them again, but if I ever buy a food processor I believe this would become my daily breakfast! As it is, this is probably a once-a-month indulgence.