Heading out the door? Read this article on the new Outside+ app available now on iOS devices for members! Download the app.
Do you practice yoga regularly but still feel “stuck” in certain spots? Senior Yoga Medicine teacher Allison Candelaria created this muscle- and fascia-freeing flow to tune up the whole front side of your body.
The front side of the body takes on a lot of stress holding us upright every day and accommodating our less-than-optimal postural habits in daily life. As a result it ends up tight and/or weak from top to bottom.
With stress and anxiety, we may not even realize how much tension and clenching we do in the jaw, for example. Releasing this area can help alleviate stress in other areas of the head and neck, as well as the rest of the body as a whole. Slouching, driving, and texting also tend to make us over-round our upper backs, which leaves the pectoral muscles tight and challenging to open. Sitting, standing, and walking keeps the hip flexors constantly working, creating tightness in this area that can affect the health of our hips and spine. Together, the psoas major, which starts at the lumbar spine, and the iliacus, which begins at the front of the hip, create the hip flexor that attaches at the upper leg. This very important muscle works hard as the only muscle connecting the upper and lower halves of our bodies. Another taxed area on the front side of our bodies is the quadriceps, one of which crosses the hip. These muscles quickly get tight holding us up all day and are tricky to release.
By focusing on releasing the fascia, this flow will tackle these common areas of tension one area at a time, then retrain the muscles to lengthen, strengthen and fire more efficiently. Since the tissues are all connected via the fascial system, working on any part of this front line of muscles will affect the rest of the chain. Not only can this flow reduce pain and increase range of motion, but with a consistent practice we can teach our muscles how to move more efficiently. Post-myofascial release, we will test our range of motion to see the instant results of the work. I recommend using this sequence as needed (daily for more limitation or few times a week for less), holding each trigger point area for 30–60 seconds.
See also Fascia: The Flexibility Factor You’re Probably Missing on the Mat
12 Poses for the Fascia of Your Front Body
YOU WILL NEED Two tennis balls, two blocks and a towel to help target the deeper fascial tissues of the muscles on the front side of the body.
KEEP IN MIND These tissues hold lots of nerve endings. It’s important to recognize a good kind of pain like a dull toothache sensation and to back off if there is an acute injury, sharp pain, shooting pain or numbness. Staying relaxed is helpful while working through the points in this flow. You can soften the insertion areas by placing a blanket or towel between body and balls if needed.
1. Pec Release
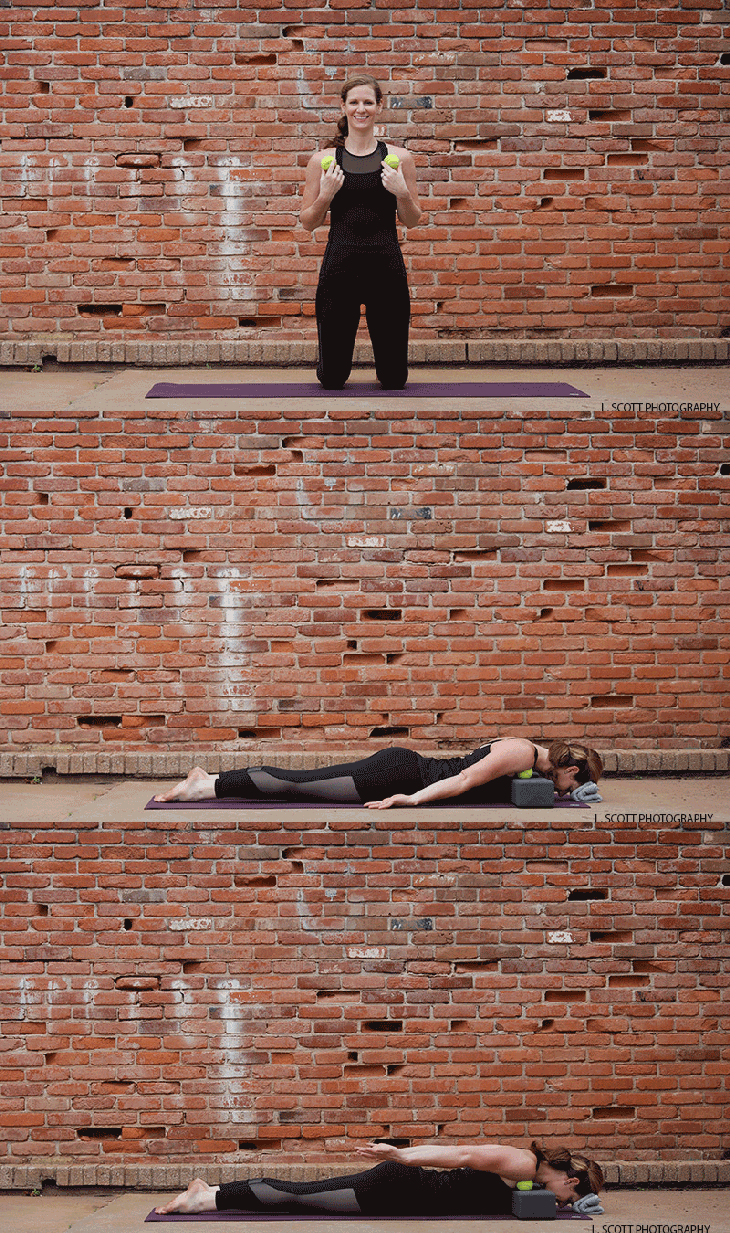
Place two tennis balls on top of two blocks. Then lie facedown, positioning the tennis balls right at the crease between the chest and the shoulders and rest your forehead on the floor or a folded towel with your arms reaching back. Breathe into the tennis balls compressing for 60 seconds. Begin to pin and stretch by lifting the arms toward the celling on the inhale and slowly lowering on the exhale.
See also Free Your Back Body Like Never Before: A Flow for Your Fascia
2. Crescent Lunge with Interlace
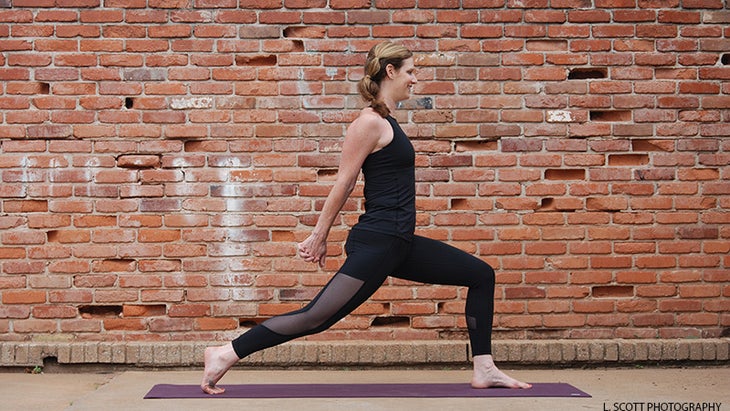
Press back into Child’s Pose, making your way to stand up in Crescent Lunge. Draw your tailbone down while hugging in around the waist and stacking shoulders over hips. Interlace your hands behind your back creating space between the front of the shoulders and opening the chest. The key here is to think of broadening the clavicles to target the chest. Stay for 3–5 breaths then repeat with opposite leg in front and opposite thumb on top while interlacing.
See also 5 Common Myths About Athletes’ Tight Hips
3. Plank Pose
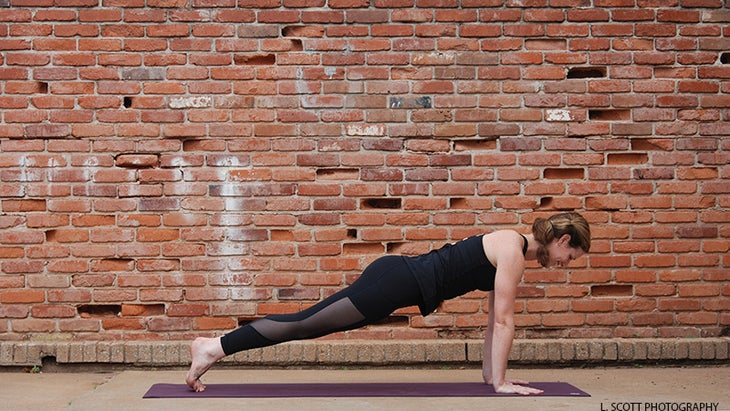
Step back into Plank Pose, placing hands shoulder-width apart and stacking shoulders over wrists. Draw in around the waist, keep your hips in line with your shoulders, and activate the legs. Stay for 3–5 breaths to re-integrate the effects on the chest in a more active posture.
See also Beyond Foam Rolling: 4 Self-Myofascial Release Practices for Tension
4. Psoas Release
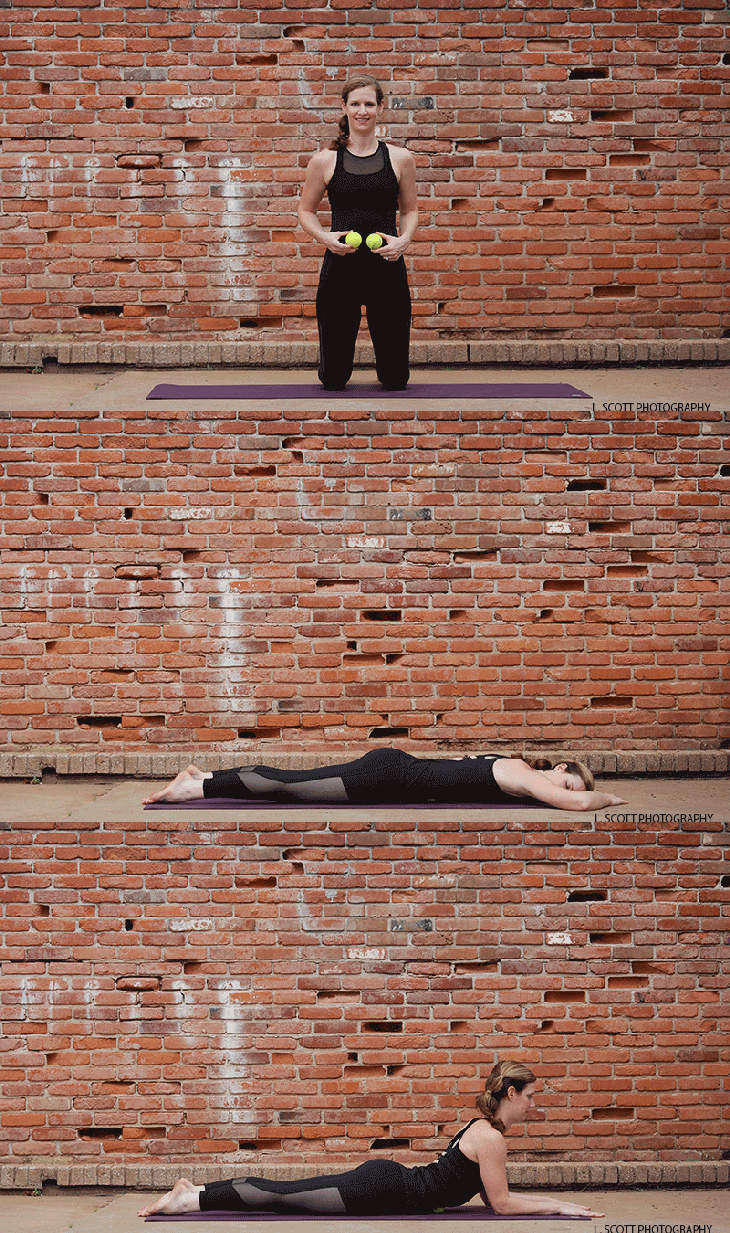
Lower to a prone position and place two tennis balls on either side of the belly button while laying on top of them. Relax as much as possible to allow the tennis balls to sink in deeper. Stay for 60 seconds. To intensify the release, place your forearms on the floor and stack your shoulders over your elbows in Sphinx Pose while continuing to relax. Stay for an additional 60 seconds.
See also Ease Lower Back + Shoulder Tension with Fascial Work
5. Iliacus Release
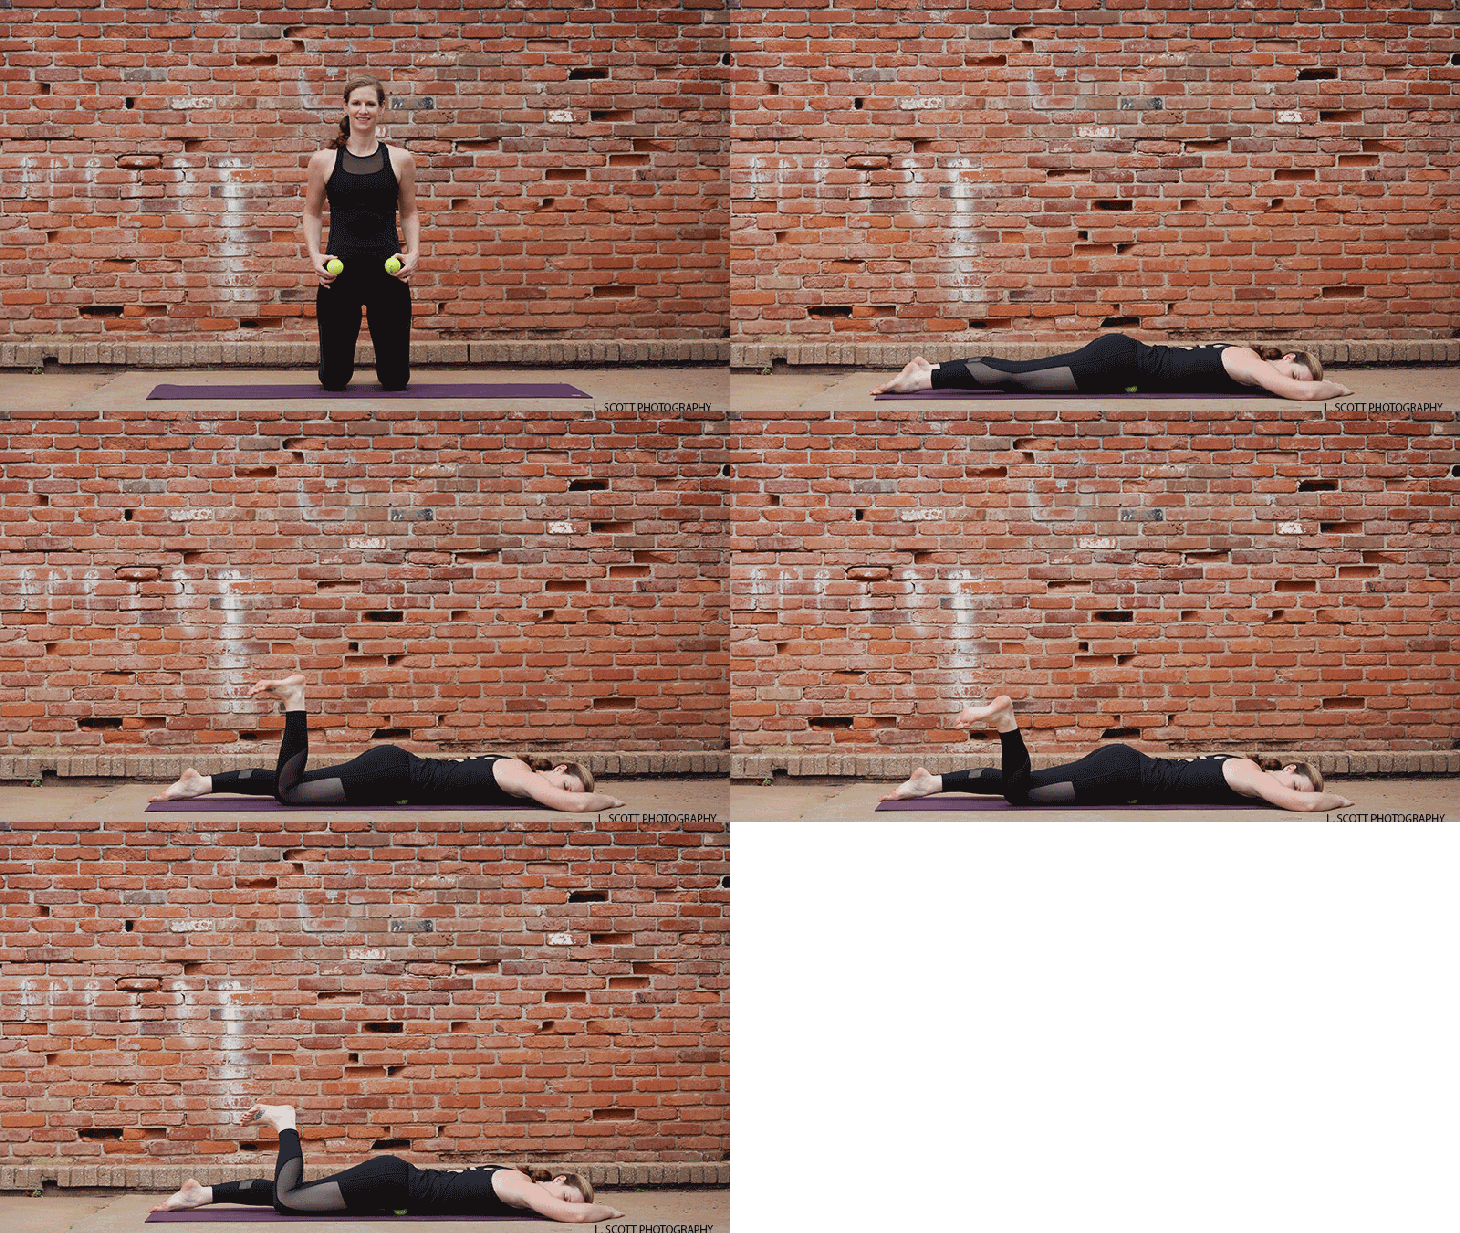
Move the tennis balls to the inner border of the frontal hip bones and lie flat relaxing into the insertion. Stay for 60 seconds. To intensify the release bend one leg up to the sky and windshield wiper the lower leg side to side. Repeat this movement with the breath for 5–6 cycles, then switch legs.
See also Happiness Toolkit: Belly Breathing Meditation to Build Boundaries
6. Low Lunge
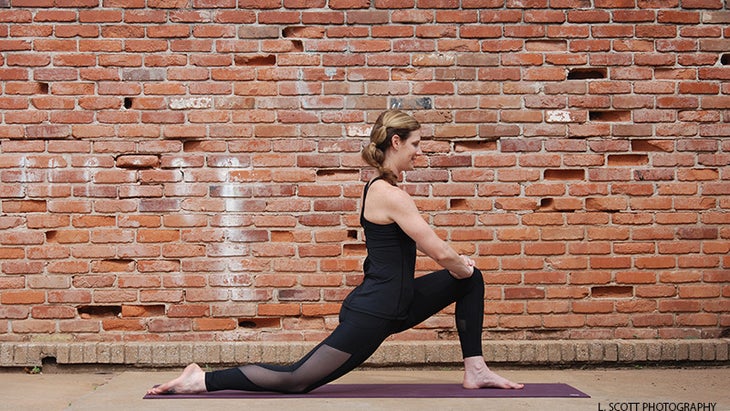
From Downward-Facing Dog, step one foot forward aligning the knee over the ankle in a Low Lunge. Slide the opposite leg back and lower the leg to the floor forward of the knee. As you move your hips forward, begin to lift the chest and place your hands on the front leg stretching the front of the hip of the back leg. Stay for 3–5 breaths and repeat on the opposite leg.
See also Yoga for Moms: Healing Your Pelvic Floor
7. Quad Release
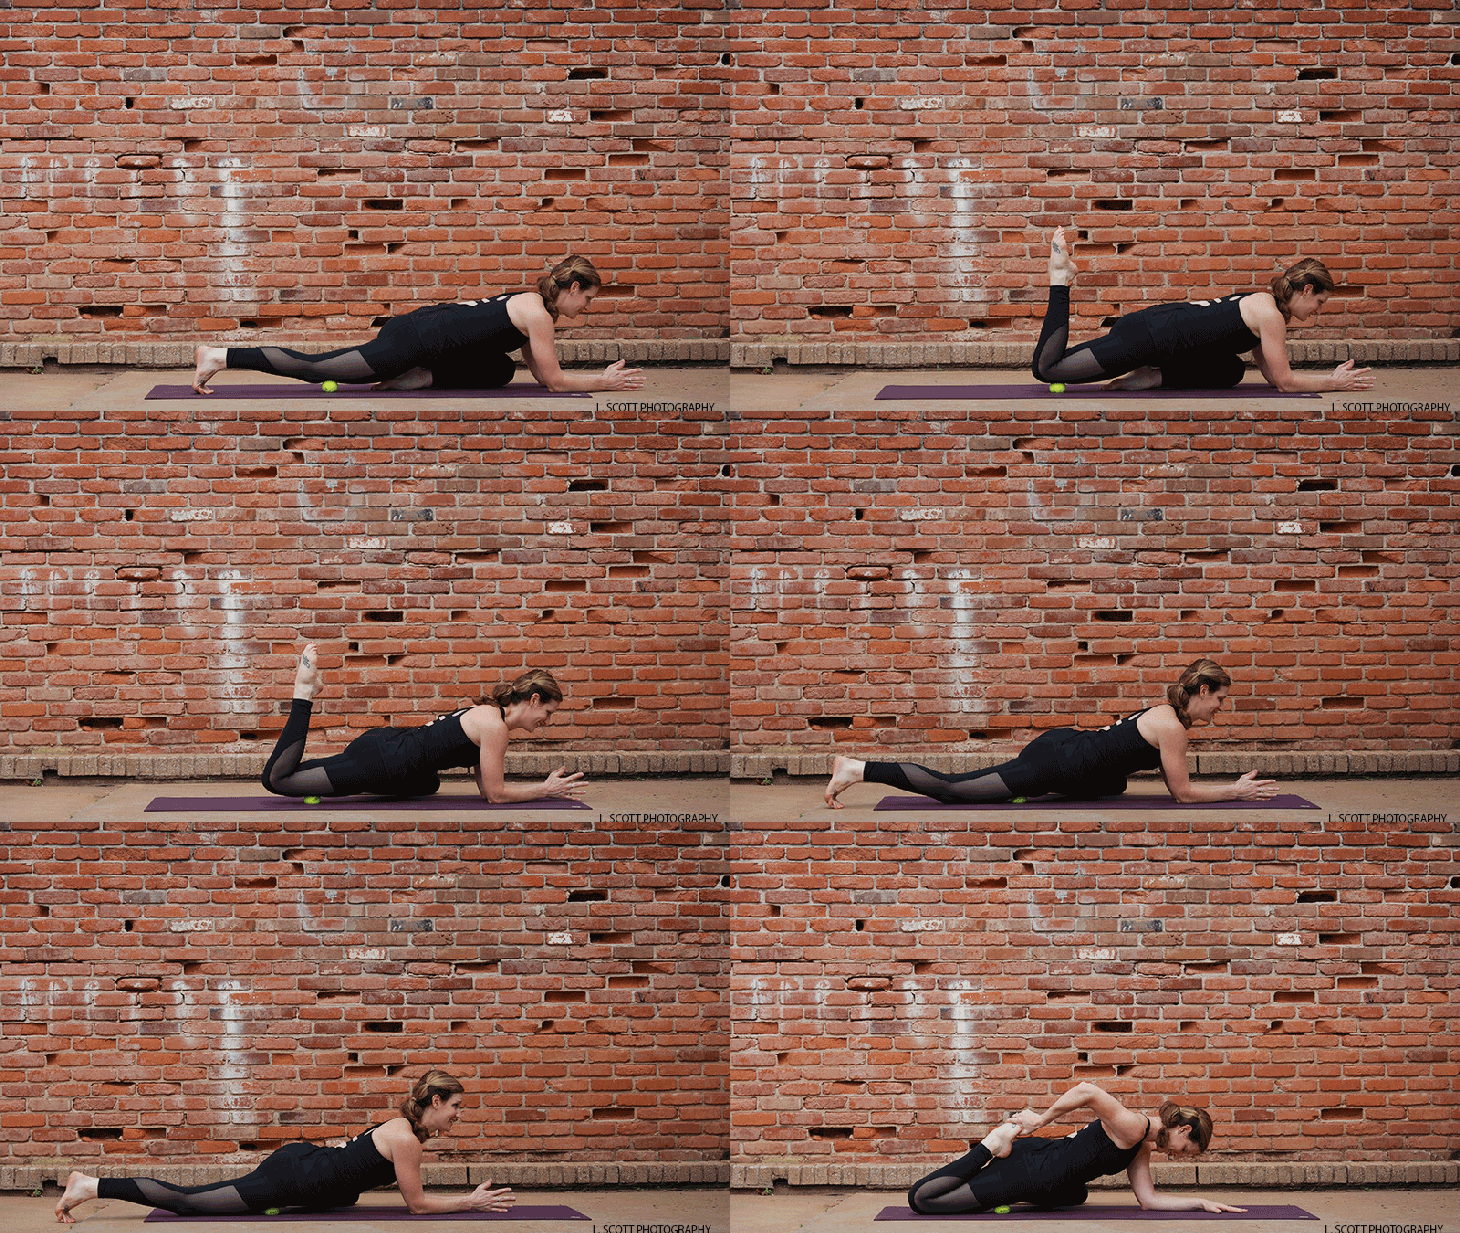
For the Quad Release we are going to hit four points. To release each point, make front-to-back, side-to-side and circular motions gliding the tennis ball around the targeted part of the thigh. To intensify the release, bend and straighten the lower part of the back leg. Stay on each point for 60 seconds.
Point 1: From Tabletop position, take one shin between the hands and lower it to the mat as you slide the opposite leg back. Place the tennis ball 2 inches above the kneecap on the back leg with your toes tucked under.
Point 2: Move the front leg to the side as you slide down your mat, moving the tennis ball 2 inches up your leg.
Point 3: Slide down your mat moving the tennis ball another 2 inches up your leg.
Point 4: Slide down your mat moving the tennis ball another 2 inches up your leg, making sure you are on upper-mid part of the leg and not in the inner hip crease. To intensify the release, you have the option of grabbing the back foot and drawing the heel toward the glute.
See also Anatomy 101: Understand Your Quadratus Lumborums (QLs)
8. Hero Pose
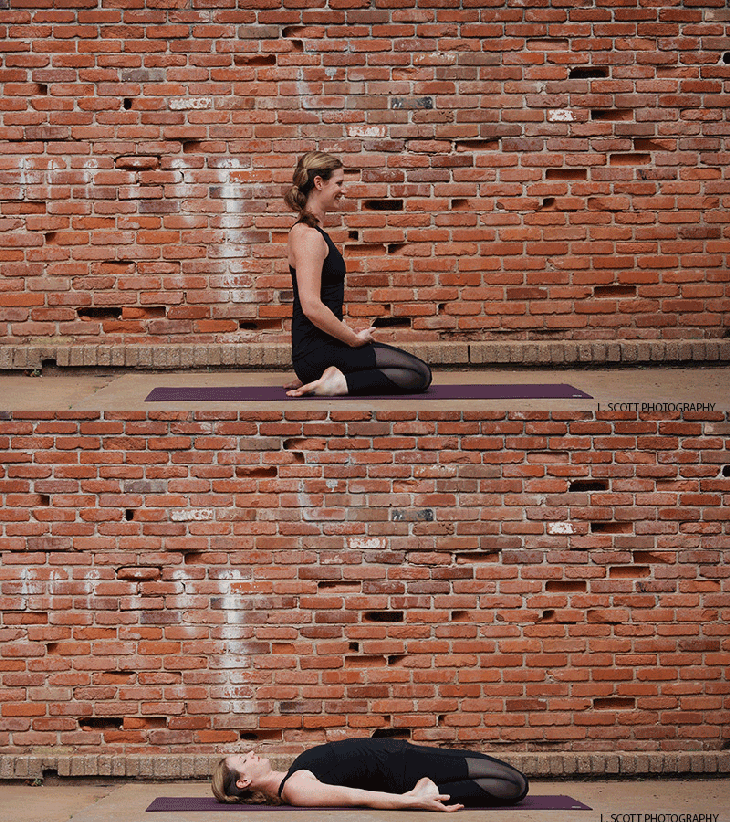
From a kneeling position, use your hands move the flesh of the calves out of the way and sit your hips between your heels. Make sure your heels are pointing straight up and there is no pain in the knees. Breathe deeply for 3–5 breaths.
To modify, place a block under the hips.
To intensify, begin to recline as you draw the tailbone toward the knees.
See also Give Yourself Props in Hero Pose
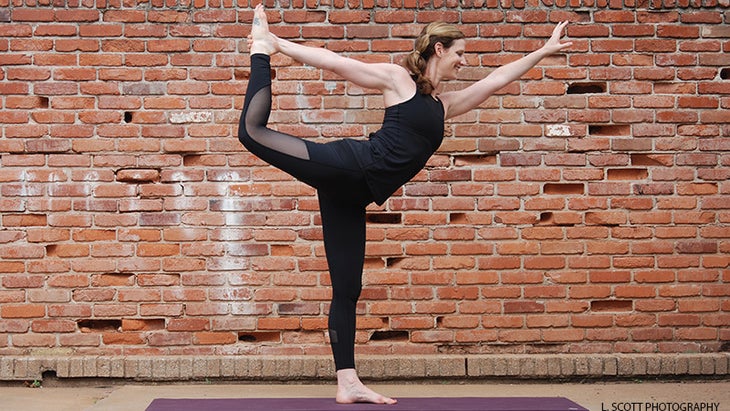
9. Dancer’s Pose
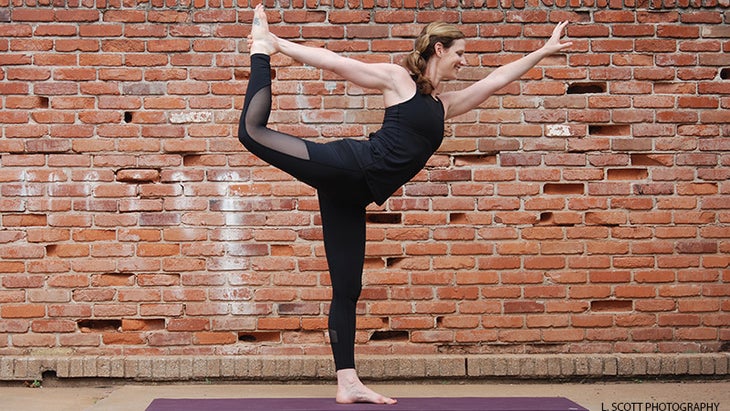
From a standing position, ground down through one standing leg as you grab the ankle of the other leg with your hand. Lengthen your tailbone and lift up through your lower abs as you lean forward to balance, kicking the foot into your hand. Hold for 3–5 breaths then repeat on the opposite side.
See also Q+A: Which Advanced Pose Is Easier Than People Think?
10. Seated Forward Fold
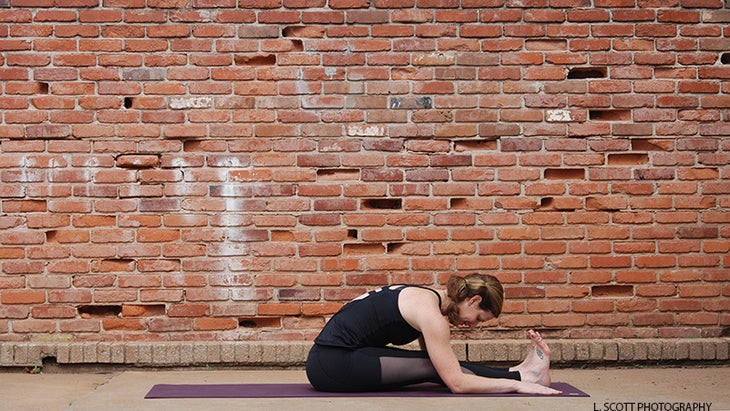
As a counterpose to the front-body work, ground the sitting bones and extend your legs out in front of you. Walk your hands forward as you lengthen your spine away from your waist. Modify by bending knees. Hold for 3–5 breaths.
See also Not Flexible? You Need This Seated Forward Bend
11. Supine Twist
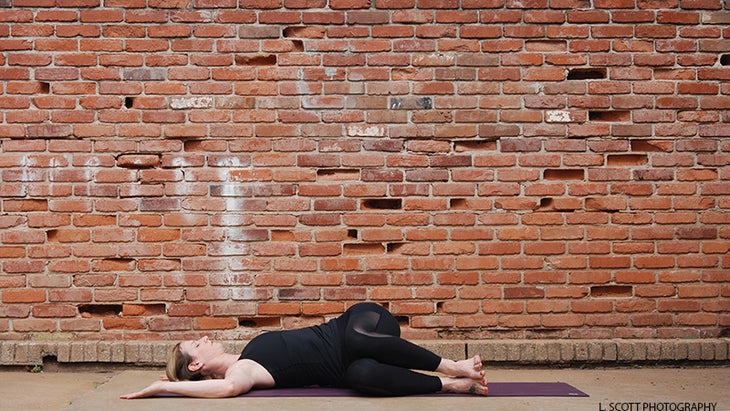
Lie on your back and bend your knees into your chest, keeping your head and shoulders resting on the floor as you take both knees over to one side. Hold for 3–5 breaths and repeat on the opposite side.
See also Which Way Should I Twist First to Aid Digestive Cleansing?
12. Jaw Release
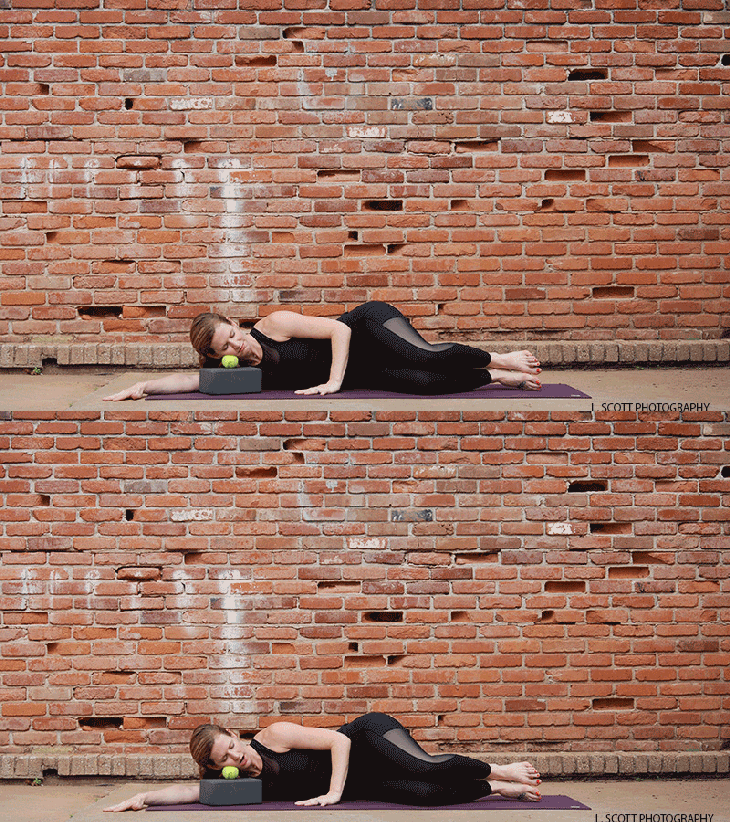
Place a tennis ball on a block and lie on your side resting your cheek lightly on the tennis ball, while using your forearm to support you.
To decrease the intensity of this release, place a towel between the tennis ball and your cheek and explore some support under the chest or head. If you are comfortable there, try slowly opening and closing the jaw to release the muscles in the face while avoiding any popping or clicking. Repeat this movement with the breath for 5–6 cycles, then switch sides.
See also Teach It: How to Avoid Neck Tension By Releasing the Jaw
About Our Expert
Allison Candelaria is a senior Yoga Medicine teacher and the owner of Soul Yoga studio in Oklahoma City, where she resides with her husband and two children. For Allison, yoga was a perfect transition from her previous dancing career and complement to her professional work in the non-profit sector. Her vinyasa flow classes are anatomically informed by years of study and uniquely incorporate myofascial release techniques to balance the mind, body and breath. She is currently working on her 1000-hour certification with Yoga Medicine where she has also had the privilege to be personally mentored by Tiffany Cruikshank herself. You can find Allison leading 200-hour trainings with Yoga Medicine around the world and teaching workshops, classes and privates in the midwest. Learn more on allisoncandelaria.com and soulyogaokc.com.