Tutorial: Configuring a Kubernetes DevTest Cluster in DigitalOcean
DigitalOcean is an affordable cloud computing platform for developers. With presence across America, Asia, and Europe, it is one of the fastest growing public cloud services company. Kubernetes is also gaining ground, in the container orchestration ecosystem. Many businesses are considering it as the container management platform for production workloads.
This tutorial walks you through the steps involved in configuring a multi-node Kubernetes cluster in DigitalOcean from a Mac, for purposes of development and testing. What’s unique about this guide is that it shows you the tips and tricks to take advantage of the features available in DigitalOcean. We will learn how to effectively use the concepts of cloud-config, and the recently announced load balancer feature in DigitalOcean.
Some of these tricks can also be easily applied to other public cloud environments.
The final step will show you how to deploy a microservices application exposed through a load balancer.
You can download the scripts and the YAML file for sample application from GitHub. There is also a video walk-through of the setup available on YouTube.
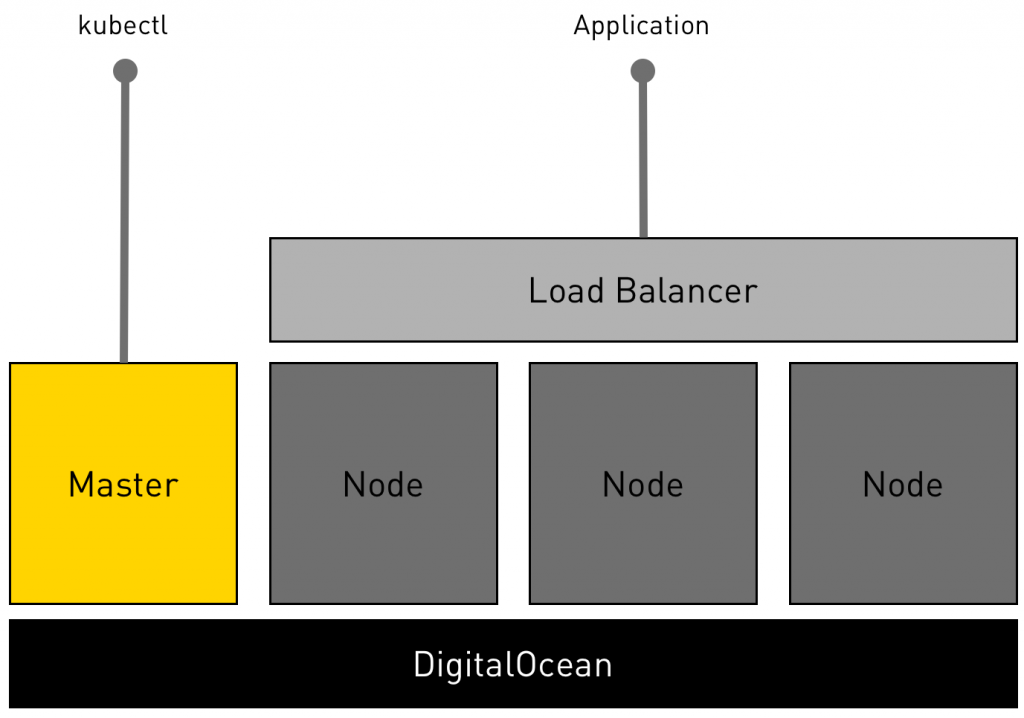
Here is an illustration of the deployment topology.

Kubernetes deployment topology on DigitalOcean
Setting up the Environment
Apart from an active account with DigitalOcean, we also need the CLI for both DigitalOcean and Kubernetes — doctl and kubectl.
Let’s start by downloading and installing the CLI for DigitalOcean.
|
1 2 3 4 5 |
$ curl -OL https://github.com/digitalocean/doctl/releases/download/v1.6.0/doctl-1.6.0-darwin-10.6-amd64.tar.gz $ tar xf ./doctl-1.6.0-darwin-10.6-amd64.tar.gz $ sudo mv ~/doctl /usr/local/bin |
Refer to this tutorial to associate DigitalOcean CLI with your account.
We will then download kubectl, the CLI for Kubernetes.
|
1 2 3 4 5 |
$ curl -LO https://storage.googleapis.com/kubernetes-release/release/$(curl -s https://storage.googleapis.com/kubernetes-release/release/stable.txt)/bin/darwin/amd64/kubectl $ chmod +x ./kubectl $ sudo mv ./kubectl /usr/local/bin/kubectl |
The next step is to generate an SSH key pair, and importing that into our DigitalOcean account. To securely access the cluster, we will create a pair of SSH keys associated with the Kubernetes master and nodes.
|
1 2 3 4 5 6 7 |
$ ssh-keygen -t rsa $ doctl compute ssh-key import k8s-ssh --public-key-file ~/.ssh/id_rsa.pub $ SSH_ID=`doctl compute ssh-key list | grep "k8s-ssh" | cut -d' ' -f1` $ SSH_KEY=`doctl compute ssh-key get $SSH_ID --format FingerPrint --no-header` |
The above step copies the public key to the cloud, which can be used during the creation of droplets, the VMs in DigitalOcean.
We will also create a couple of tags in the DigitalOcean environment that we need later.
|
1 2 3 |
$ doctl compute tag create k8s-master $ doctl compute tag create k8s-node |
We need a token that the Kubernetes nodes will need to discover the master. We will generate it through a simple one-line Python script and then replace the placeholder in the master.sh and node.sh that we will use later.
|
1 2 3 |
$ TOKEN=`python -c 'import random; print "%0x.%0x" % (random.SystemRandom().getrandbits(3*8), random.SystemRandom().getrandbits(8*8))'` $ sed -i.bak "s/^TOKEN=.*/TOKEN=${TOKEN}/" ./master.sh $ sed -i.bak "s/^TOKEN=.*/TOKEN=${TOKEN}/" ./node.sh |
Finally, let’s define a variable that holds the preferred region for the deployment.
|
1 |
$ REGION=blr1 |
To get a list of regions supported by DigitalOcean, you can use the below command
|
1 |
$ doctl compute region list |
With the environment configuration in place, let’s go ahead and deploy the Kubernetes master.
Configuring the Kubernetes Master
We are using kubeadm, a tool that dramatically reduces the pain of installing Kubernetes. Kubeadm supports either CentOS 7 or Ubuntu 16.04 distributions. We are going for Ubuntu for our setup.
The following script configures the Kubernetes master.
|
1 2 3 4 5 6 7 8 9 10 11 12 13 14 15 16 17 18 19 20 21 22 23 24 25 |
#!/bin/bash # Replace this with the actual token TOKEN=xxxxxx.yyyyyyyyyyyyyyyy apt-get update && apt-get upgrade -y curl -s https://packages.cloud.google.com/apt/doc/apt-key.gpg | apt-key add - cat <<EOF > /etc/apt/sources.list.d/kubernetes.list deb http://apt.kubernetes.io/ kubernetes-xenial main EOF apt-get update -y apt-get install -y docker.io apt-get install -y --allow-unauthenticated kubelet kubeadm kubectl kubernetes-cni # Get the public IP of DigitalOcean droplet from the metadata endpoint export MASTER_IP=$(curl -s http://169.254.169.254/metadata/v1/interfaces/public/0/ipv4/address) kubeadm init --pod-network-cidr=10.244.0.0/16 --apiserver-advertise-address $MASTER_IP --token $TOKEN |
|
1 2 3 4 5 6 7 8 9 10 11 |
cp /etc/kubernetes/admin.conf $HOME/ chown $(id -u):$(id -g) $HOME/admin.conf export KUBECONFIG=$HOME/admin.conf kubectl create -f https://raw.githubusercontent.com/coreos/flannel/master/Documentation/kube-flannel-rbac.yml --namespace=kube-system kubectl create -f https://raw.githubusercontent.com/coreos/flannel/master/Documentation/kube-flannel.yml --namespace=kube-system kubectl create -f https://rawgit.com/kubernetes/dashboard/master/src/deploy/kubernetes-dashboard.yaml --namespace=kube-system |
You are free to change the Token used by the master and nodes to join the cluster. Since we need to tell the master the IP address on which the API will be exposed, we use DigitalOcean’s droplet metadata to retrieve the IP address dynamically. This script, which is available in master.sh is passed to the droplet through the cloud-config configuration. This technique gives us a hands-free mechanism to setup Kubernetes master. As the droplet gets provisioned, the script that we passed will execute. Within just a few minutes, we will have a fully configured master ready to accept nodes.
Run the following command to launch the Kubernetes master based on the 2GB droplet configuration running Ubuntu 16.04 64-bit.
|
1 2 3 4 5 6 7 8 9 10 11 12 13 14 15 |
$ doctl compute droplet create master \ --region $REGION \ --image ubuntu-16-04-x64 \ --size 2gb \ --tag-name k8s-master \ --ssh-keys $SSH_KEY \ --user-data-file ./master.sh \ --wait |
Notice that we are passing the variables REGION and SSH_KEY that we populated during the environment setup. The script, master.sh is executed during the provisioning process. This single switch packs a lot of punch to the droplet creation by automating the installation of Kubernetes master. Give it 7 to 10 minutes before moving to the next step. The beauty of this approach is that you never to have to SSH into the droplet to confirm the installation. This is a fully-automated, hands-free setup.
Since we need the public IP address of master, run the below commands to populate a couple of environment variables.
|
1 2 3 |
$ MASTER_ID=`doctl compute droplet list | grep "master" |cut -d' ' -f1` $ MASTER_IP=`doctl compute droplet get $MASTER_ID --format PublicIPv4 --no-header` |
After a few minutes, run the following command to grab the configuration file from the master. We can start using this file with the Kubernetes CLI, kubectl to access the cluster.
|
1 |
$ scp root@$MASTER_IP:/etc/kubernetes/admin.conf . |
If you see “No such file or directory” error, that means the master is not ready yet.
It’s time to confirm that the master is successfully configured. Run the below command to see the available nodes.
|
1 2 3 4 5 |
$ kubectl --kubeconfig ./admin.conf get nodes NAME STATUS AGE VERSION master NotReady 44s v1.6.1 |
This is a sign that the master is fully configured. Within a few minutes, the status changes to Ready.
With the Kubernetes master in place, let’s go ahead and configure the nodes.
Configuring the Kubernetes Nodes
Like master, we will also use a cloud-config script for configuring the nodes.
|
1 2 3 4 5 6 7 8 |
#!/bin/bash # Replace this with the token TOKEN=xxxxxx.yyyyyyyyyyyyyyyy MASTER_IP=xxx.xxx.xxx.xxx apt-get update && apt-get upgrade -y |
|
1 2 3 4 5 6 7 8 9 10 11 12 13 14 15 16 17 |
curl -s https://packages.cloud.google.com/apt/doc/apt-key.gpg | apt-key add - cat <<EOF > /etc/apt/sources.list.d/kubernetes.list deb http://apt.kubernetes.io/ kubernetes-xenial main EOF apt-get update -y apt-get install -y docker.io apt-get install -y --allow-unauthenticated kubelet kubeadm kubectl kubernetes-cni kubeadm join --token $TOKEN $MASTER_IP:6443 |
Ensure that the TOKEN environment variable is same as the master. The MASTER_IP variable tells the nodes where to look for the API server. This should point to the master.
The command below will update the script with the current IP address of the master.
|
1 |
$ sed -i.bak "s/^MASTER_IP=.*/MASTER_IP=${MASTER_IP}/" ./node.sh |
With everything in place, let’s go ahead and launch two nodes.
|
1 2 3 4 5 6 7 8 9 10 11 12 13 14 15 |
$ doctl compute droplet create node1 node2 \ --region $REGION \ --image ubuntu-16-04-x64 \ --size 2gb \ --tag-name k8s-node \ --ssh-keys $SSH_KEY \ --user-data-file ./node.sh \ --wait |
The cloud-config script with the token and the IP address of the master will ensure that the nodes immediately register with the master.
After a few minutes, check the number of nodes again. Though it may show that the nodes are not ready, everything stabilizes within a few minutes.
|
1 2 3 4 5 6 7 8 9 |
$ kubectl --kubeconfig ./admin.conf get nodes NAME STATUS AGE VERSION master Ready 10m v1.6.1 node1 Ready 1m v1.6.1 node2 Ready 1m v1.6.1 |
Congratulations! You now have a full-blown Kubernetes cluster running in the cloud. It’s time for us to deploy a microservices application.
Deploying an Application
We will deploy a simple To-Do application based on the MEAN stack to our Kubernetes cluster. The following command uses a YAML file that contains the definition of pods, replication controllers, and services.
|
1 2 3 4 5 6 7 8 9 |
$ kubectl --kubeconfig ./admin.conf create -f todo-all-in-one.yaml pod "db" created service "db" created replicationcontroller "web" created service "web" created |
Check the available pods and services with kubectl.
|
1 2 3 4 5 6 7 8 9 |
$ kubectl --kubeconfig ./admin.conf get pods NAME READY STATUS RESTARTS AGE db 1/1 Running 0 1m web-b6xkj 1/1 Running 0 1m web-hwcjr 1/1 Running 0 1m |
|
1 2 3 4 5 6 7 8 9 |
$ kubectl --kubeconfig ./admin.conf get svc NAME CLUSTER-IP EXTERNAL-IP PORT(S) AGE db 10.105.206.173 <none> 27017/TCP 1m kubernetes 10.96.0.1 <none> 443/TCP 13m web 10.110.85.30 <nodes> 80:32360/TCP 1m |
The service web shows that the application is available on each node at port 32,360. At this point, you can grab the public IP address of any node to access the To-Do application at port 32,360.
Instead of hitting a specific node, let’s create a DigitalOcean load balancer that points port 80 to the port 32,360 on each node. This will make our application accessible through the load balancer’s public IP with the requests routed to each node through a round-robin mechanism.
Configuring the Load Balancer
We can populate an environment variable with the NodePort value of the Kubernetes web service. This will be handy to dynamically configure the load balancer through a script. The command below shows how to get the NodePort through kubectl.
|
1 |
$ NODEPORT=`kubectl --kubeconfig ./admin.conf get svc -o go-template='{{range .items}}{{range.spec.ports}}{{if .nodePort}}{{.nodePort}}{{"\n"}}{{end}}{{end}}{{end}}'` |
We will now create a DigitalOcean load balancer with health checks and forwarding rules pointing to the microservices application. The forwarding rules will map load balancer’s port 80 to the NodePort of the Kubernetes service, where the application’s frontend is available.
|
1 2 3 4 5 6 7 8 9 10 11 |
$ doctl compute load-balancer create \ --name k8slb \ --tag-name k8s-node \ --region $REGION \ --health-check protocol:http,port:$NODEPORT,path:/,check_interval_seconds:10,response_timeout_seconds:5,healthy_threshold:5,unhealthy_threshold:3 \ --forwarding-rules entry_protocol:TCP,entry_port:80,target_protocol:TCP,target_port:$NODEPORT |
We now have a fully configured environment with a sample application and a load balancer. It’s time to access the application.
Accessing the App
Run the following commands to open the application in the default browser.
|
1 2 3 4 5 |
$ LB_ID=`doctl compute load-balancer list | grep "k8slb" | cut -d' ' -f1` $ LB_IP=`doctl compute load-balancer get $LB_ID | awk '{ print $2; }' | tail -n +2` $ open http://$LB_IP |
The above commands get the public IP address of DigitalOcean’s load balancer and opens it in the default browser on Mac.

Accessing the microservices app from the browser via the load balancer
Adding Additional Nodes
How do you add new nodes to the cluster? It’s very simple — launch new droplets with the same configuration and parameters as the original nodes.
|
1 2 3 4 5 6 7 8 9 10 11 12 13 14 15 |
$ doctl compute droplet create node3 node4 \ --region $REGION \ --image ubuntu-16-04-x64 \ --size 2gb \ --tag-name k8s-node \ --ssh-keys $SSH_KEY \ --user-data-file ./node.sh \ --wait |
Because of node.sh, the script file has everything it takes to add new nodes to the cluster, it would work like a charm.
Here is another unique capability that we leveraged from DigitalOcean — Droplet Tags. Any new node launched with the tag k8s-node will be automatically discovered by the load balancer. That means when you scale the replication controller, and the pods get scheduled on the new nodes, they instantly become available to users. This is because the load balancer will route the traffic to any node that responds to the health check positively, including the ones that are recently added. This simple trick ensures that we are able to dynamically scale-out and scale-in the nodes.

Droplets with the tags k8s-nodes represent the Kubernetes nodes

Load Balancer dynamically discovers any droplet with tag k8s-nodes
Tear Down
Once you are done, you can run the following commands to tear down the environment without leaving any traces.
|
1 2 3 4 5 6 7 |
# Delete SSH Key SSH_ID=`doctl compute ssh-key list | grep "k8s-ssh" | cut -d' ' -f1` SSH_KEY=`doctl compute ssh-key get $SSH_ID --format FingerPrint --no-header` doctl compute ssh-key delete $SSH_KEY |
|
1 2 3 4 5 |
# Delete Tags doctl compute tag delete k8s-master -f doctl compute tag delete k8s-node -f |
|
1 2 3 |
# Delete Droplets doctl compute droplet delete master node1 node2 -f |
|
1 2 3 4 5 |
# Delete Load Balancer LB_ID=`doctl compute load-balancer list | grep "k8slb" | cut -d' ' -f1` doctl compute load-balancer delete $LB_ID -f |
The objective of this tutorial was to show you how easy it is to configure a Kubernetes dev/test environment in DigitalOcean. The scripts are available on GitHub for you to try. With a few additional configuration changes, it can be easily adopted for production deployment.
Disclaimer: The setup process described in the article is not suitable for production. It is only meant to explain the workflow involved in using the kubeadm tool. Please do not replicate the steps as is for configuring a production cluster.
We would like to thank Joe Beda for pointing the security flaws in the setup and helping us fix them. The Python-based Token Generator used in the script is borrowed from his POC for deploying Kubernetes on GCE using Terraform.