
10 Tips to Help You Make Better Videos
An overview of how I prep, plan, shoot, edit, post, and grow my videos on YouTube. And what you can apply to improve your own content.
How do you create a video from start to end? How do you tell an interesting story? After your Youtube video is published, how do improve its performance and get more views?
A good video grabs your attention, tells you a compelling story, and gives you a new perspective on things. It’s what I aim for in all of my content. If you’re unfamiliar with me and my background, I’ve been making videos for a long time. From TV commercials to music videos, to content here. In this blog I'll share my Youtube filmmaking process and my favorite tools and tips so you can improve your own content.
Watch the video overview of my process.
Quick note: Some of the links provided below are affiliate links, which I receive a small commission for at no extra cost to you. Shopping through those links is the easiest way to support my content. Thank you.
1. Identify the point
My process starts by answering a few simple questions. The answer to these gives me a direction to head in, a target to hit, and guardrails that project my project from spiraling out of control.
What's the point?
What do I want to say?
What question am I answering?
Why do I want to share this?
It may sound overly simplistic and obvious. But if you don’t have a clear answer to these early on, you’re going to waste a lot of time throughout the process. You’ll shoot things that don’t matter. Overwhelm yourself, sorting through footage. And you’ll be wrestling with a convoluted story until you know the point of it all. Trust me, I’ve been there before.
When you have a clear direction, you’ll capture with intent, and can focus your creative efforts.
2. Give them a reason to care
Because my background is in design, I approach videos in a similar manner. I identify my audience, their needs, and do my best to line up my content with their curiosities. A few things I should know is:
Who is this for?
Are they searching for this?
What will they get out of it?
Is my content different or better than what’s already out there?
If you don’t have these clearly defined, you’ll end up making your video for an audience of one: yourself. Which is totally fine. But if you're like me, you make content because you enjoy it, and want to share your message with an audience you can connect to.
One way to test the viability of your ideas, is to see if people are already searching for the subject you're covering. I use a tool called Tubebuddy, because it helps me determine how big of an appetite there is for my type of content, and the competition I might face.
I research different keywords, to find what people are searching for, and I use the information I find to sharpen my idea. My goal is to find the white space in that niche. To do what others are not, and to tell a unique story from my perspective.
That way my content has a chance of standing out, amongst the noise.
3. Create a flexible plan
Once I have a viable idea worth producing, then I spend a good amount of time planning. A good plan helps take a big project, and break it down into small manageable tasks.
I like to start by building a loose outline of the major points of my video, which eventually becomes my story, and script. From here I build a shot list of what I need to capture for the edit. This helps me gauge how much work needs to get done, so I can set aside enough time for it.
Of course, just because I plan stuff in pre production, doesn't mean there isn't room for exploration. When it comes time to shoot, I often discover interesting angles to capture, outside of what was planned on my shot list. Also, just because you plan it all, doesn't mean it will always work. So you have to be ready to adapt and learn to work with what you get, the day of the shoot.
4. Shoot interesting footage
When I shoot, at minimum, I cover the following, whenever I capture a scene:
1 wide shot to establish the scene
1 medium shot to focus on the subject
3-5 close up detail shots to keep the viewer visually stimulated
I tend to look for things in the space that describe the character of the scene. Putting the camera in unexpected places, giving the viewer visual surprises. When you’re capturing B-roll shots (like the close up details), I make sure to capture a wide variety of shots, and get at least 20 seconds per clip. Having this kind of coverage will give you a lot to play with in the edit. You’ll thank yourself later.
While it’s nice to have good camera gear, don’t underestimate what you can accomplish with the one you already have in your pocket. I use shots from my phone all the time, and for the most part, the footage looks as good as my fancy cameras. Phone cameras are surprisingly high-quality, very portable, and can get into places that bulky cameras cannot.
In case you’re wondering, my main camera is the Canon EOS R6, and my favorite lens is the 24-70mm f2.8 RF lens. For my complete gear list, check out my kit here.

5. Audio is (more than) half the experience
I’m no audio expert, but I try to put a lot of care into audio of my content. Sound is half of the experience. Many would argue that it's more important than the visuals. When I shoot my footage, I always try to capture the natural sounds of what's taking place, and layer them into my videos. Just like good b-roll, this secondary audio gives texture and detail to the experience.
In most of my videos, I use voice over narration to carry the story along. To record good audio you need to be in a quiet room with good acoustics. Since my office isn't sound treated, I do my recordings in my closet, because the clothes around me eliminate any echo and outside noise.
Quick tips for capturing good voice-over audio:
Kill all sound reflections. Go in your closet or under a blanket.
Get your mouth as close to your mic as possible
Breathe, take your time, and put spaces between your sentences. This makes it easier to say and edit.
Underneath the captured audio, is music. When you're watching something, music tells you how to feel. I generally like relaxing vibes, so I prefer to use mostly chill beats. I source my tunes from several music libraries. Here are the top three I use:
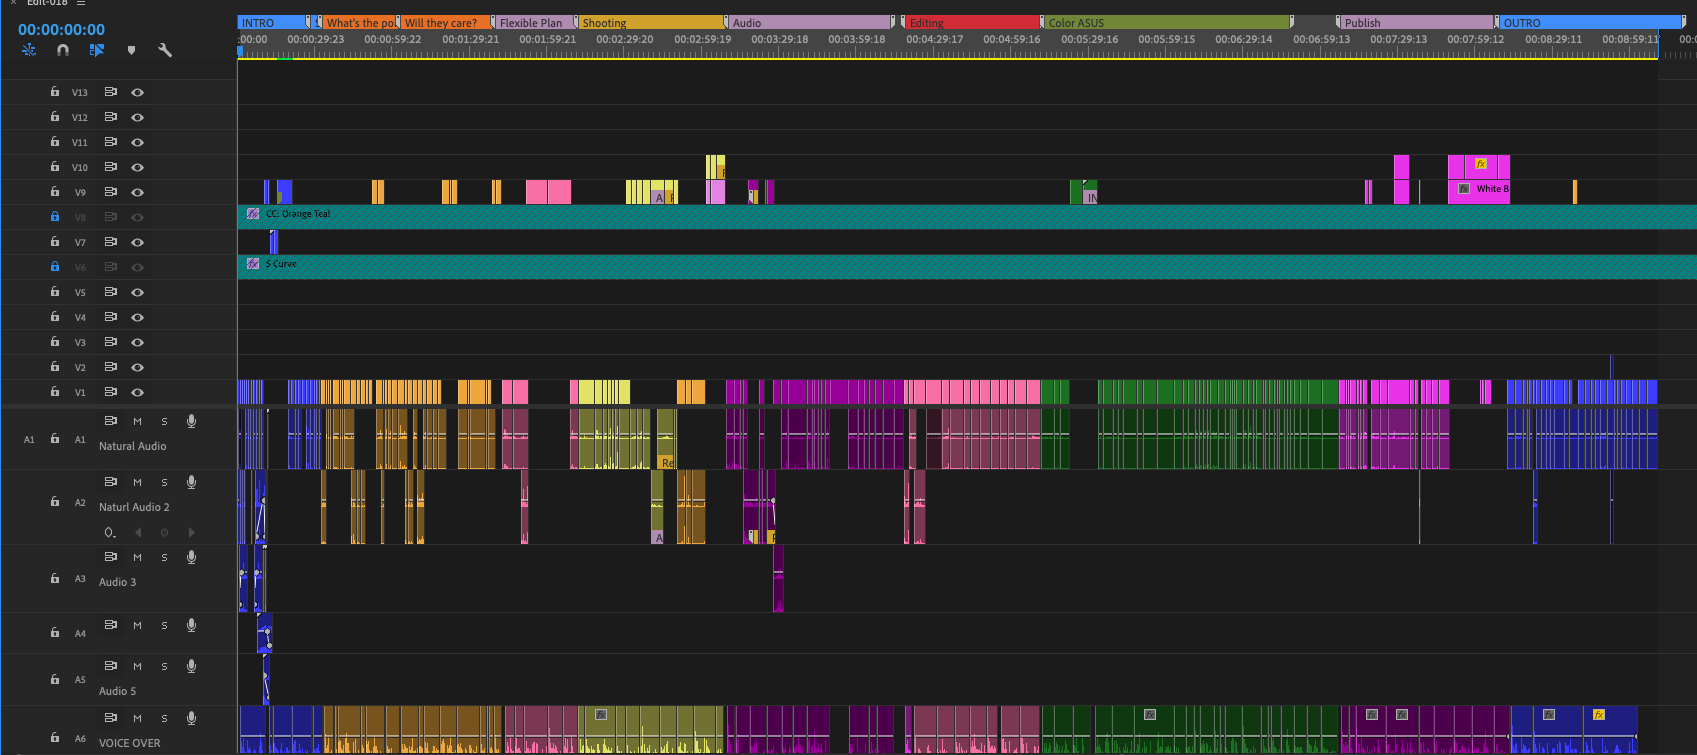
6. Be a ruthless editor
The edit is where the story is made (again). To be a good editor of your own work requires you to be emotionally detached from what you shot, and solely focused on what you're trying to communicate. You have to be willing to kill your creative babies. Every shot should have a purpose. And every sequence should move the story forward. Everything else should be edited out.
My editing process goes something like this:
I pull in the footage, and line it up with my narration, to make my rough cut. This helps me see how well the story has come together. This gives me a chance to see if my planned vision is hitting how I imagined.
If I feel like I’m missing something, I’ll do a pick up shoot, to get the shots and audio I need to complete the story. Usually I do 2-3 pick up shoots to make some scenes better.
Then I do several more passes on the edit to trim out excess, and refine my story points.
Organization tip: I color code the sections of my edit to match my script and shot list. This helps me easily identify each section of my story. This way, at every step my scenes share the same visual identity, speeding up my overall process.

7. A little color goes a long way
I used to loathe color correction and color grading, mostly because I didn’t know how, and was very slow at it. But now, color is one of my favorite parts of the post-production process. This is where I take the footage I’ve shot, color correct it (balancing temperature and making values even), and then add a little color grading to enhance the look of my picture. It’s part of the formula of what can give your videos style. For most of my shots, I like to slightly overexpose them and add a classic orange and teal color grade on top.
Here’s a great video by Aidin Robbins that gives you an overview of the coloring process.
8. Publishing is its own artform
After a video is colored, mixed, and rendered out, it’s ready to be published online. When I upload to Youtube I give it a search-friendly title, by including the keywords I discovered in my research at the beginning of the process. Remember step 2 above?
YouTube is the number two search engine in the world after Google. Search can be a big portion of your future video traffic, so make sure your title not only reads well, but contains the phrases people are already searching for.
Once I have a good title, I work on creating an interesting thumbnail to draw people in. The thumbnail and title are the most important elements to nail, outside of making good content. It's your first impression. Your bait, to lure and hook your potential audience. If you can't get them to click through, they'll never see your video.
9. Just because it’s published, doesn’t mean it's done
Once published, I monitor the performance of my videos over the next few days and weeks. Specifically, I study the comments, views, click-through rate, and retention, to see what areas I can improve.
What are they saying about the video?
Does it match their expectations?
How long are they watching and where are they rewatching (retention)?
What title and thumbnail is triggering the highest click through rate (CTR)?
I closely watch the Youtube analytics, and make adjustments on what I learn. Then I make a hypothesis and run a few A/B tests with different thumbnails and titles, using TubeBuddy.
These small adjustments help me improve the click-through rate on my videos so the Youtube algorithm is more likely to pick up and promote my content. Some videos take a few days to pick up, others a few weeks. These post-publish adjustments can make a huge difference in the overall success of a video.

An example of how I tested two separate titles for one of my videos. The variant title performed almost 25% better in terms of click through rate (CTR), which is one of the most important metrics on the YouTube platform. The higher this number– along with retention and watch time – the more likely the Youtube Algorithm will recommend your content to users in this niche.
10. You’re never finished learning
This is an overview of my video production process. These are the methods I've used to grow this channel, and the two others I work on (Matthew Encina, The Futur, The Futur Academy). There’s so much more to learn and go deep on. Take your time, be persistent and consistent. Work on improving improve one aspect of your video making process at a time.
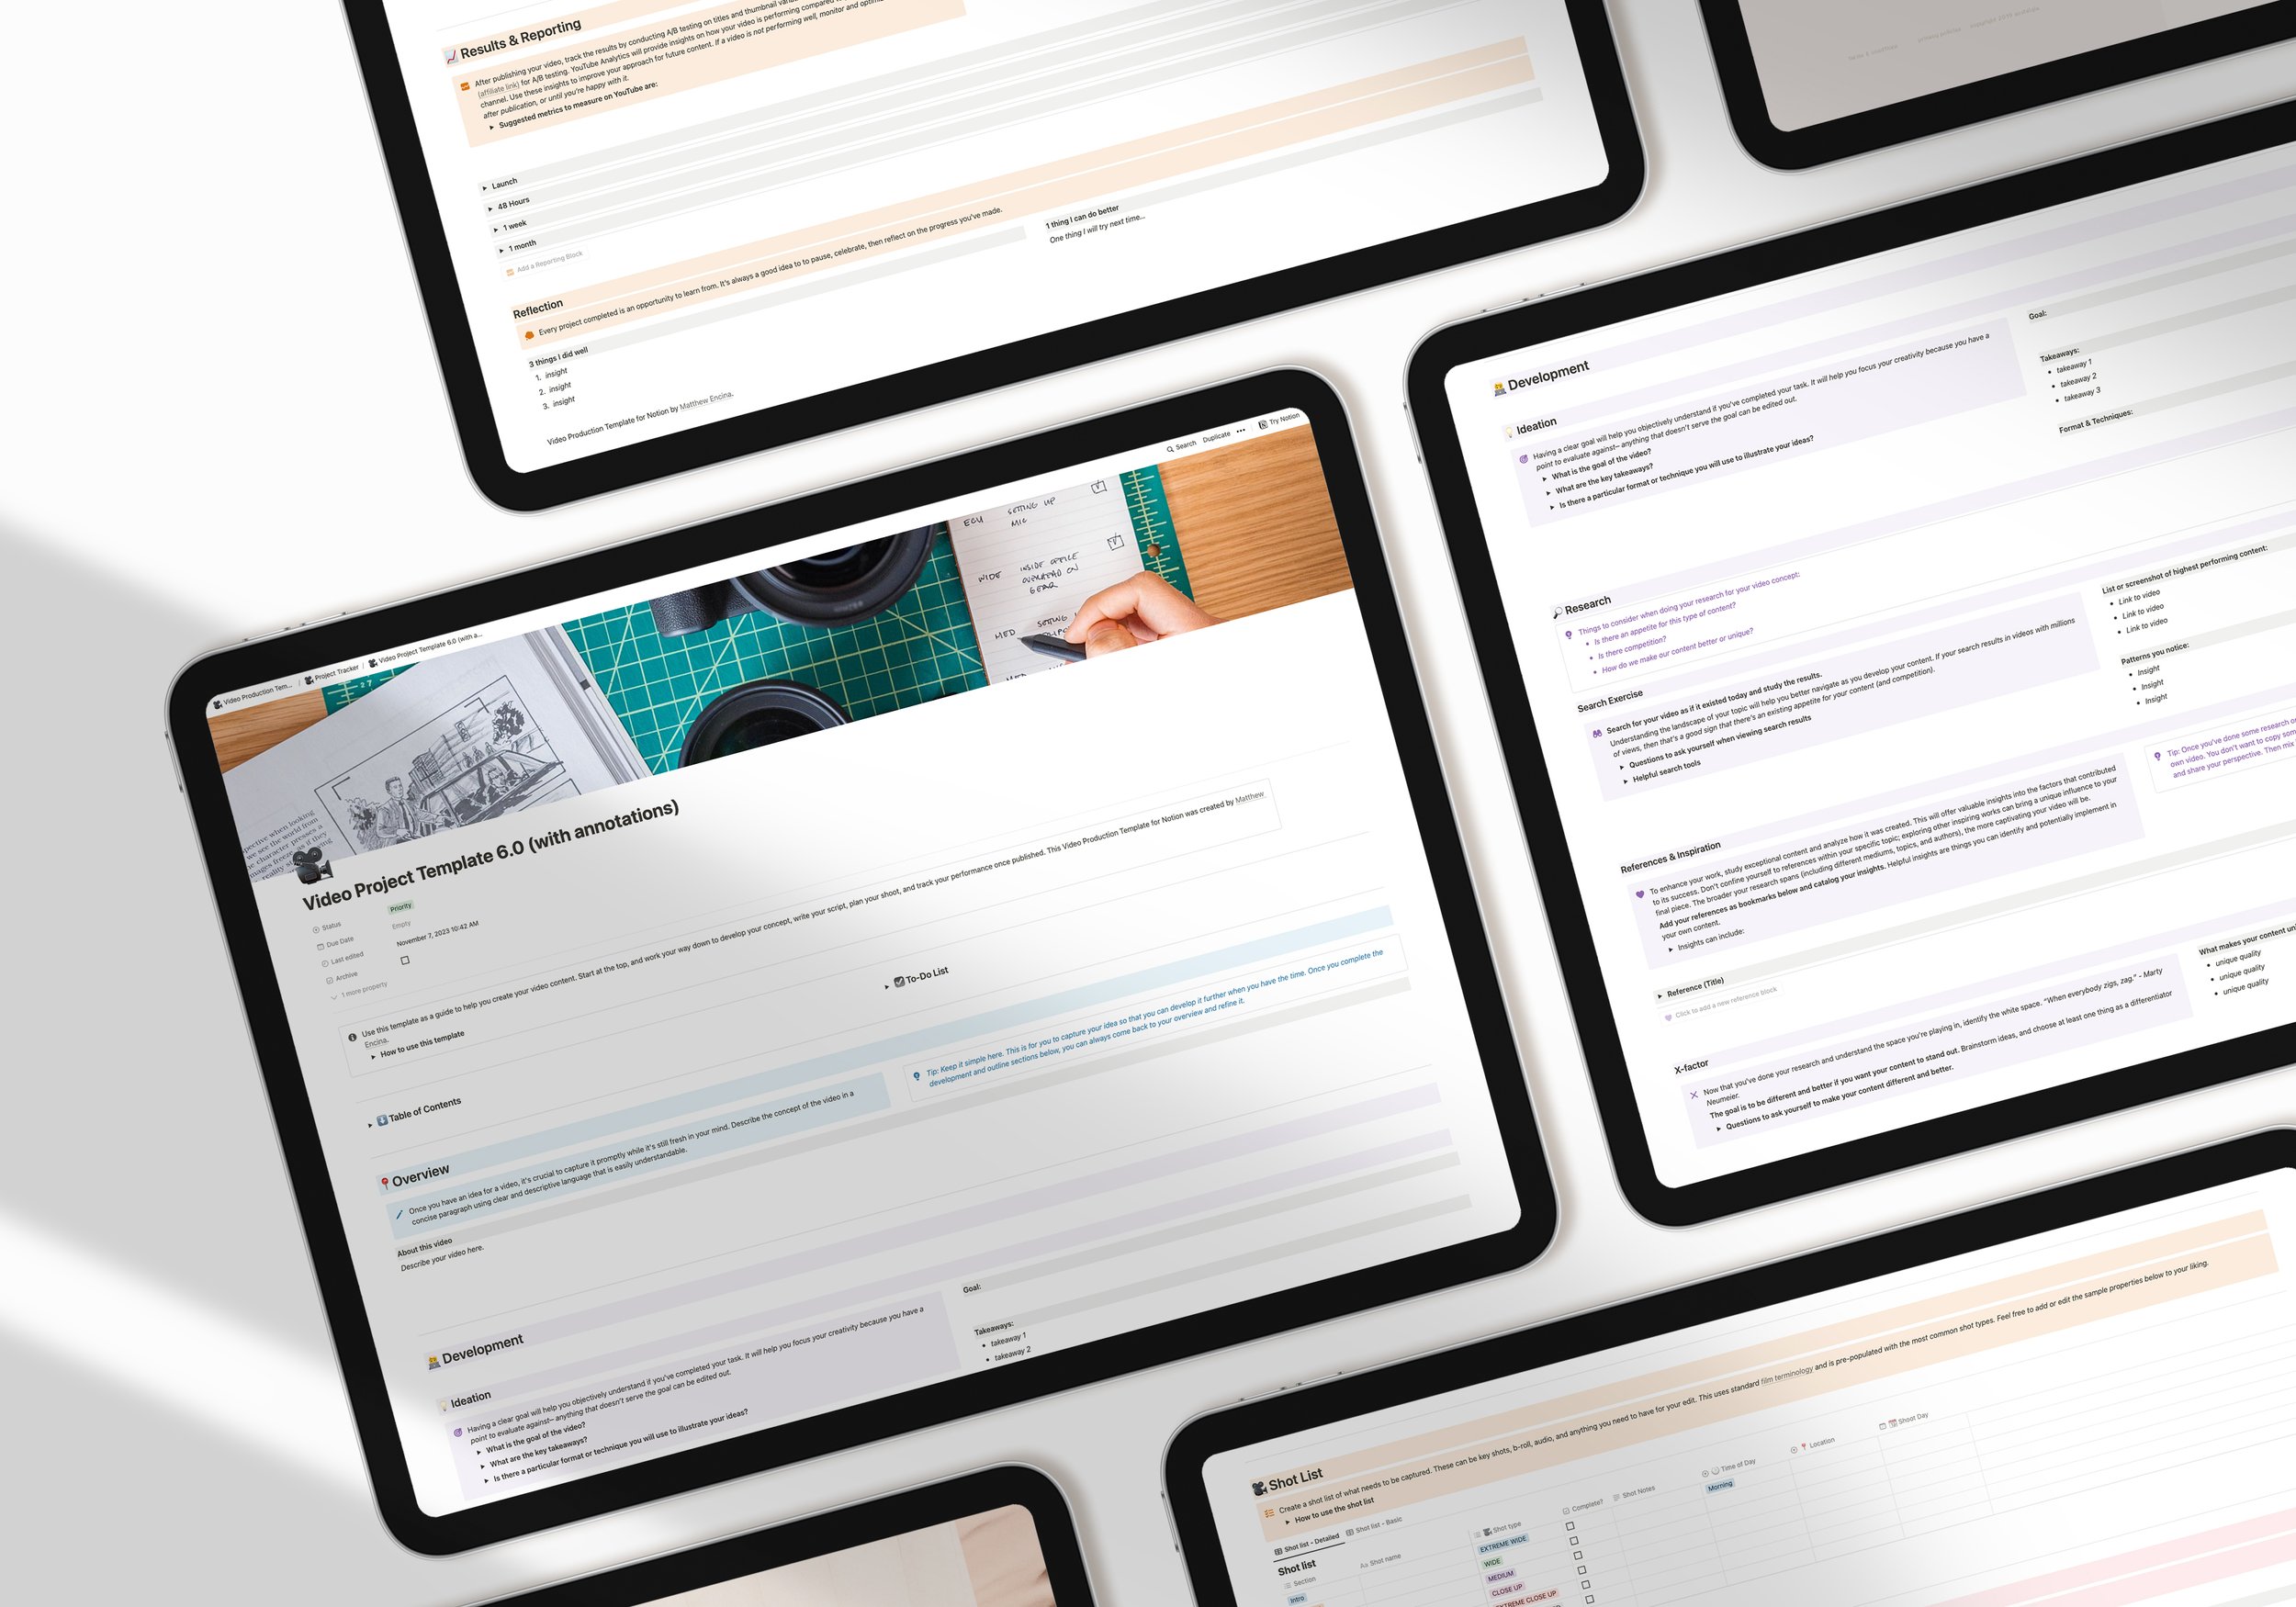
Check out the Video Production Template for Notion that I use to develop, plan, and track all of my video projects with.
