

Introduction: Motion and Gesture Detection by Arduino and PIR Sensor


![Color Recognition W/ TCS230 Sensor and Arduino [Calibration Code Included]](https://content.instructables.com/F9K/6MIC/K7BBJPVB/F9K6MICK7BBJPVB.gif?auto=webp&crop=1%3A1&frame=1&width=130)
In this article, we'll show you how to make a gesture detector by simple components like the PIR sensor and Arduino Nano. At the end of this article you can:
- Explain PIR sensor applications and how it works
- Run an 8-Pixel PIR sensor named TPA81
- Use the PIR sensor to detect motion and gesture by Arduino
- Make a cool detector to increase or decrease your speaker volume.
Step 1: Step1: How Does It Work?

A passive infrared sensor (PIR sensor) is an electronic sensor that measures infrared (IR) light radiating from objects in its field of view. They are most often used in PIR-based motion detectors.
All objects with a temperature above absolute zero emit heat energy in the form of radiation. Usually, this radiation isn't visible to the human eye because it radiates at infrared wavelengths, but it can be detected by electronic devices designed for such a purpose. The term passive in this instance refers to the fact that PIR devices do not generate or radiate energy for detection purposes. They work entirely by detecting infrared radiation emitted by or reflected from objects. They do not detect or measure heat. (Source: Wikipedia)
Step 2: About TPA81

The TPA81 is a thermopile array detecting infra-red in the 2um-22um range. This is the wavelength of radiant heat. The Pyro-electric sensors that are used commonly in burglar alarms and to switch on outside lights, detect infra-red in the same waveband. These Pyro-electric sensors can only detect a change in heat levels though – hence they are movement detectors. Although useful in robotics, their applications are limited as they are unable to detect and measure the temperature of a static heat source. Another type of sensor is the thermopile array. These are used in non-contact infra-red thermometers. They have a very wide detection angle or field of view (FOV) of around 100° and need either shrouding or a lens or commonly both to get a more useful FOV of around 12°. Some have a built-in lens. More recently sensors with an array of thermopiles, built-in electronics, and a silicon lens have become available. This is the type used in the TPA81. It has an array of eight thermopiles arranged in a row. The TPA81 can measure the temperature of 8 adjacent points simultaneously. The TPA81 can also control a servo to pan the module and build up a thermal image. The TPA81 can detect a candle flame at a range of 2 meters (6ft) and is unaffected by ambient light!
PIR sensors are similar to cameras that only can see warm things. So TPA81 is a thermal camera with 8-pixel resolution, and of course, the Human body always emits heat. Now, If we control the PIR Sensor by a controller and define some gesture for PIR Sensor, we can make a simple gesture detector.
Step 3: Project Goals

In this project, We decided to make a gesture detector system using PIR and Arduino. We have used TPA81 as PIR but it’s a little expensive, so if you want to save money, you can use 8 simple PIR sensors without the white head (The focus part). TPA81 support I2C protocol and it is compatible with Arduino Nano. This cool project helps you to find out the basics of image processing and gesture detection. Let’s do it!
Step 4: Required Materials

Step 5: Circuit
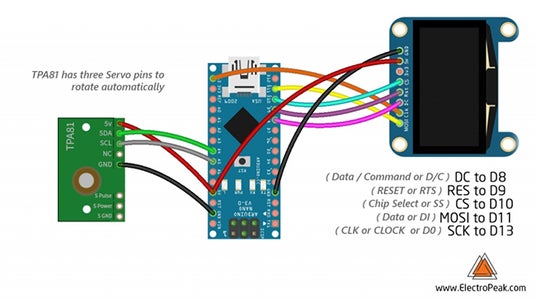

If you want to use 8 PIR sensors instead of TPA81, You should connect 8 single PIR sensors to an Arduino board and read them one after each other. This way you can save some money!
Step 6: Start the Code
For the first circuit (Using TPA81), you should copy the code in Arduino IDE. But first You must add the library and then upload the code. Download the TPA81 library from the following link. If it is the first time you run an Arduino board, don’t worry. Just follow these steps:
- Go to www.arduino.cc/en/Main/Software and download the software of your OS. Install the IDE software as instructed.
- Run the Arduino IDE and clear the text editor and copy the following code in the text editor.
- Navigate to sketch and include the libraries (Download libraries from the following links). Now click add ZIP library and add the libraries
- Choose the board in tools and boards, select Arduino Nano.
- Connect the Arduino to your PC and set the COM port in tools and port.
- Press the Upload (Arrow sign) button.
- You are all set!
Attachments

Step 7: Temperature Sensing

After running this code, Open the Serial Terminal in Arduino IDE and look at the 8 array temperature sensed by TPA81. the first number in each line belongs to the total temperature. Now put your hand in front of the sensor and see the temperature of your body. To define a gesture by hand, you should know your hand temperature and set it as an offset. We set it to 29 degrees.
Attachments
Step 8: Hand Movement

Upload the next code to see your hand movement in front of TPA81.
Attachments
Step 9: Algorithm of Detection

We wrote an algorithm to detect a simple gesture like increasing or decreasing the volume of a sound player. You can copy the following code and try it.
Attachments
Step 10: What’s Next?
Using the above method you can extend the code to detect other gestures like tapping, dragging, dropping, stretching, etc. Then define commands to do certain tasks upon detecting each of these motions and gestures.


