
How to Photograph Backlit Autumn Leaves with Flash
We all know autumn can be an incredible time for photography, especially around areas of deciduous woodlands.
As temperatures drop and daylight hours shorten, deciduous trees produce less chlorophyll. As the existing chlorophyll in leaves slowly breaks down, the lush green colours fade revealing a multitude of incredible yellow, orange and brown colours.


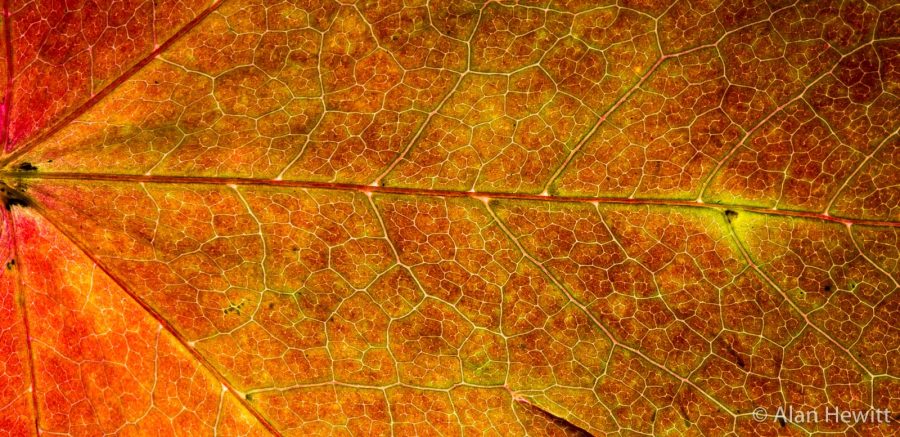
Take a very close look at a leaf and we can see an incredibly fine and intricate network of veins making up their life-sustaining structure. As the autumnal decay sets in the colour changes combine with this detail to make excellent macro photography studies. But as with a lot of macro photography, it’s all in the lighting!

Last year I acquired the Nikon R1 Close-Up flash system and I will raise my hands up and confess, it’s been a bit of a dust collector. It’s a fantastically versatile bit of kit but I just can’t seem to find the time to get around to doing as much macro photography as I would like to.
This autumn I thought I’d start to make an attempt to correct this so I dusted it off and opened up the elaborately boxed R1 flash system and looked at photographing this stunning natural detail.

First things first… leaves. Obviously, there is no shortage of leaves lying around at this time of year, certainly not in my corner of Northumberland in the UK. It’s worth spending a little bit of time being rather selective and looking for leaves which exhibit the most colours or transitions of decay with strong contrasting veins. Given my lighting plans, I also avoided leaves which were damaged (i.e. had holes, tears or were very dry). With a selection of leaves fitting my rather ‘choosy’ criteria I returned to my office / man cave and set to work.
Setting Up
My plan was to use a single flash unit to light the leaves from behind to give as much emphasis to the colours of the decaying structure.
The R1 flash system comes with a diffuser – basically a neutral semi-translucent piece of plastic. This would allow diffused transmission of the flash light and also provide a mount for the leaves to be taped onto. The diffuser was raised up from my desk to allow me to place a single SB-R200 speedlight underneath.

For these photographs I used my Nikon D800 and Nikkor 105mm f/2.8 Micro lens attached to a tripod pointing directly down at the mounted leaf. The camera was mounted underneath the tripod using a reversible column to help with stability.

To fire the flash I used my D800’s wireless commander mode. Given the proximity of subjects to the camera it is always advisable to use the IR Panel which also comes with the R1 flash kit. This is a piece of plastic which attaches to the hot shoe and covers the internal flash to prevent it from influencing exposure, whilst still allowing the wireless commander to operate.
It is of course possible to do all of this using a standard external flash unit, either wired or wireless. A piece of glass or perspex covered with paper could also be used, for example, to provide a mount for the leaves.

Some experimentation is required to gauge the flash power and exposure. The thickness or colour of the leaf will influence the required flash power as will the light transmission qualities of the surface you mount your leaves upon. The height / distance the mount needs to be from the flash will also be influenced by the flash power. You can adjust your flash’s power by switching it into manual mode directly on the unit. Just adjust the number (1/1, 1/2, 1/4 etc.) as you see fit.

As usual with any still life macro, I manually focussed using a magnified live view screen to acquire critical focus and used a remote shutter release to cut down on movement and camera shake.
Further Reading: “An Introduction to Macro Photography: Technique“
All photos in this article are taken at 1/3200, f/13, and ISO 100 with varying flash powers. (Be sure to engage high speed sync flash mode in your camera if you’re exceeding 1/250th second).
Equipment Used
- Nikon D800 camera
- Nikon 105mm f/2.8 Micro lens
- Nikon MC-30 remote release
- Nikon SB-R200 Speedlight (Part of the Nikon R1 Close-up Speedlight kit)
- Nikon SW-12 Diffuser (Part of the Nikon R1 Close-up Speedlight kit)
- Nikon SG-31R IR Panel for built-in flash (Part of the Nikon R1 Close-up Speedlight kit)
- Manfrotto Neotec tripod
- Manfrotto 405 geared head
Conclusion
Autumn is a great time of year and there is so much potential out there for us as a photographers. If you prefer to shoot in a less ‘studio’ style, be sure to read our tutorial ‘How to Take Creative Photos of Autumn Trees‘.
Have you tried this technique? Share it with us in the comments below!


