


Are you an iOS developer looking to ensure the iOS app testing before its official release?
You have spent months developing iOS app and now you are in the phase of testing. This is where the success of your app is determined. If your app has bugs, it is just a disaster that cannot easily be fixed. That’s when Testfligt provides a solution for beta testing and analyzing bugs and user experience issues.
Apple Inc. never disappoints its users. But this time they have a tribute to the developer community by making TestFlight. A report shows the market share of TestFlight is 25.43%
Now, if you are an iOS developer you have heard TestFlight plenty of times. If not we will help you. It is the most effective way to achieve a solution is through iOS app testing using TestFlight.
In this, guide we will walk you through the process of getting your iOS app into TestFlight and conducting testing using Xcode 14.3.
So don’t worry if you are a newbie or experienced developer, we will provide you with the necessary steps and insights to ensure a smooth and successful testing phase.
Overview of Xcode

Xcode is an integrated development environment (IDE) created by Apple for iOS App Development. It is specifically designed for developing software for Apple platforms, including iOS, iPadOS, macOS, and Watch O.
Moreover, it provides developers with a comprehensive set of tools, libraries, and frameworks to create, test and debug applications for Apple devices.
Overview of Testflight
Testflight is a platform developed by Apple that facilitates beta testing and app distribution for Apple devices. It allows developers to share pre-release versions of their apps with a limited group of users for testing purposes. Before making them available to the general public on the app store.
By looking at the overview, let’s discuss the steps to get your iOS app into TestFlight in the next section.
Steps To Get Your iOS App Into TestFlight and Test It, for Xcode 14.3
1. Developer Account
To get into TestFlight, you have to create an Apple developer account.
If you already have an account ignore this link https://developer.apple.com/. Or if you want to create, Go and sign up.
It will cost you $100 US per year, now you have a developer account in hand, follow the next steps:
- Open Xcode and launch the Xcode IDE on your MAC
- In the top menu bar, click on the Xcode menu located in the top left corner of the screen.
From the dropdown menu, select “Preferences”.
- You can also use the keyboard shortcut (command + comma) to directly open the preferences window.
- Now click on the second tab, Accounts, and click on the + button in the bottom left
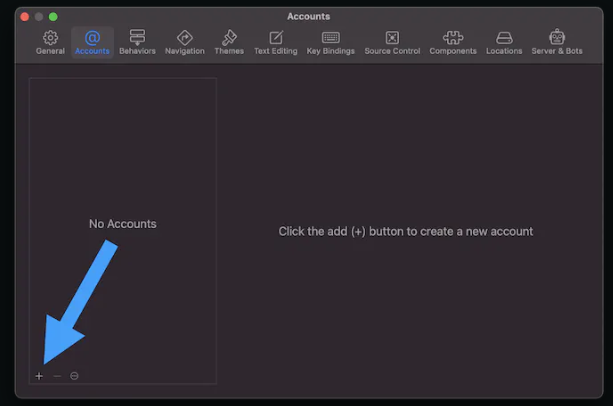
- Select Apple ID and click continue
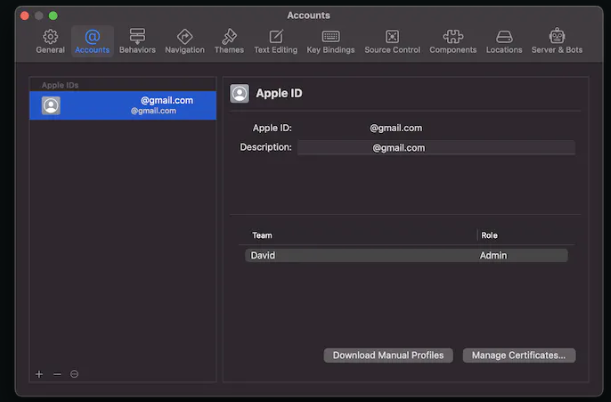
- Enter the Apple ID and Password for your Apple developer account
- Click on Next
This is how it looks:
3. Set Your Version And Build The Number
Now every uploaded archive to the app store needs a unique version & build number combination. When it comes to managing version and build numbers for your app releases and updates. Xcode provides flexibility to ensure proper tracking and differentiation.
While the initial version and build number start at 1.0 and 1 respectively. With this, you can customize them based on your preferred naming conventions and release strategies.
Now with build number assigning the build number as the date of upload is a useful practice. Following the format YYYMMDD ensures a clear chronological order.
For example, if you upload your first build today, your build number could be 20230517 (May 17, 2023).
For the initial upload of the day, it would be 2023051701. If you need to upload an additional build on the same day, increment the last two digits ( 2023051702, 2023051703, and so on ).
When it comes to versioning your software, there are various schemes used, with Semantic Versioning (SemVer) being one of the most popular.
SemVer utilizes three components in the version number: Major.Minor.Patch.
Following this scheme, the initial release could be 1.0.0, and subsequent updates such as bug fixes could be donated as 1.01. If you introduced new and significant features, the versions could be incremented to 1.1.0 and so on.
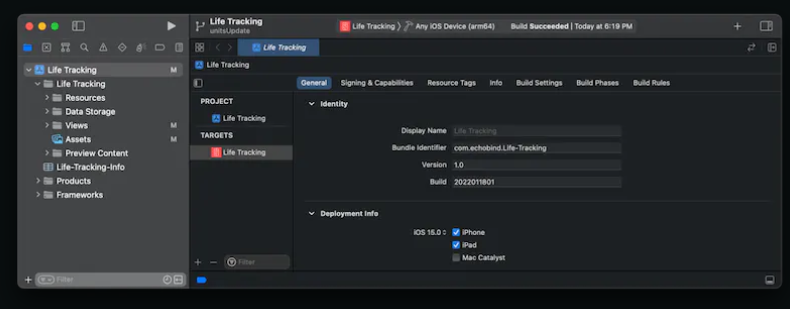
You can set the version and build number by going to the General tab:
3. Create and Archive
To create an Archive your app for uploading to the App Store, follow these steps:
- In the toolbar, where you typically choose a real device or simulator for running your app, make sure you have either a reading device selected or choose,” Any iOS device (arm64)”
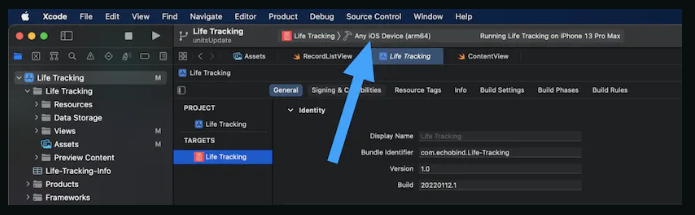
NOTE- If you have a simulator selected, you won’t be able to perform the archive process.
- At the top of Xcode, click on the “Product” menu to open it.
- Access the product menu, locate and click on the “Archive” option. If the archive option is grayed out, double-check that you have a real device selected in the toolbar instead of a simulator.
- After clicking archive, you’ll see various status messages appearing in the Xcode toolbar.
- Once the archiving process is complete, the Organizer window will automatically appear.
“ Window” in the Xcode menu and select “Organizer”.
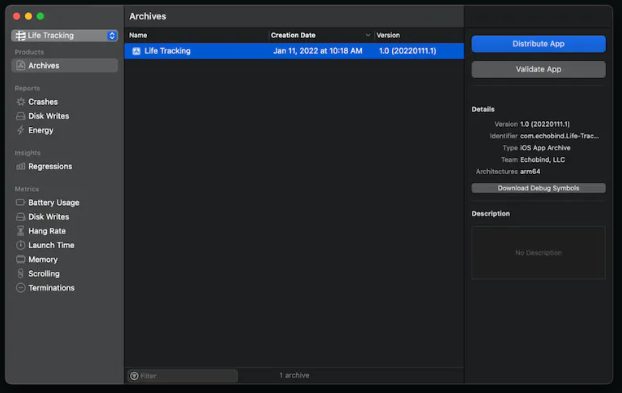
4. Distribute App
Once you have created the Archive in Xcode. The date of the archive should be today’s date and in the version column.
- Select the archive and choose the archive you just created from the list in the organizer window by clicking on it.
- Click the distributed app button locate and click on the distribute app button.
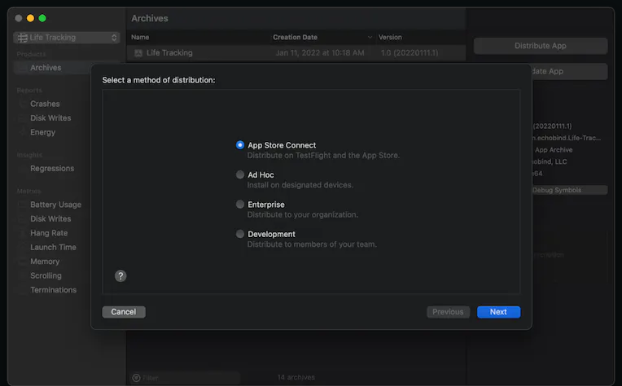
- Select a method of distribution on the “select a method of distribution” screen choose “app store connect” and click” Next.”
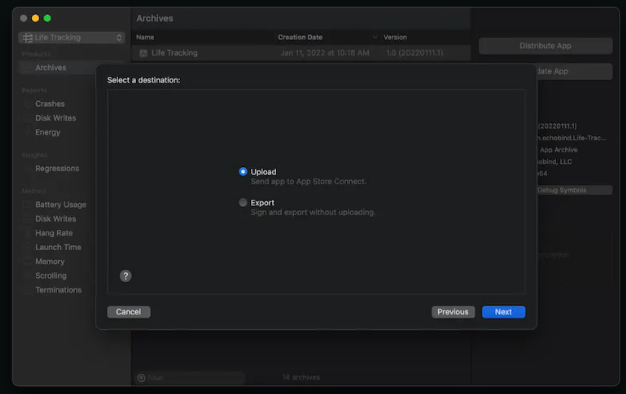
- On the “Select a destination” screen, select “Upload” and click “Next”.
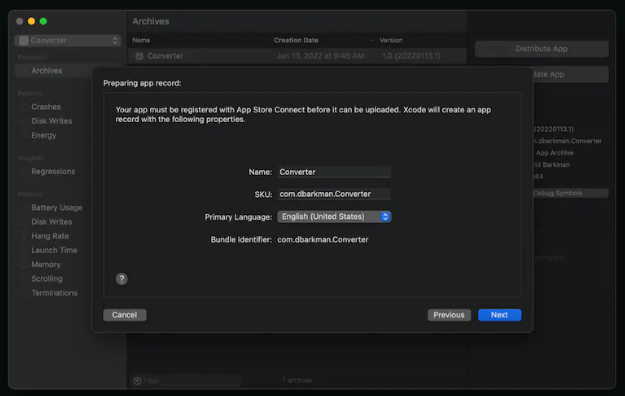
- This screen will only appear the first time you upload your build. Verify that the information displayed aligns with what you selected when you initially created your app in Xcode. If everything appears correct, click “Next”
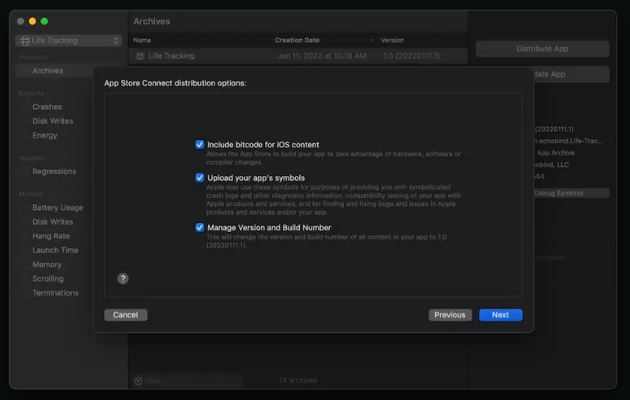
- App stores connect distribution options leave all three options checked on this screen and click “Next”
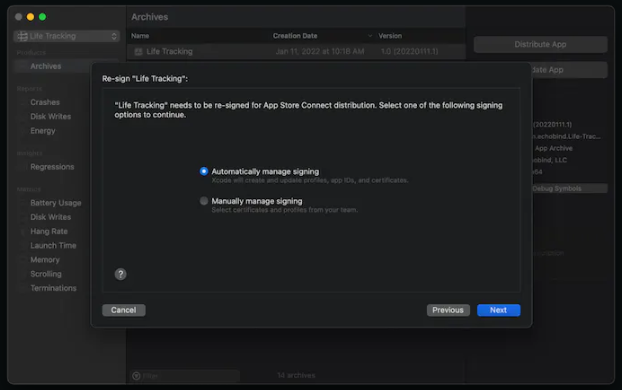
- Re-sign “your app name here and choose automatically manage to sign and click “Next”
- Review your app’s content by taking a brief look at the content of your “your_app_name_here.ipa” file to ensure nothing seems unusual or incorrect.
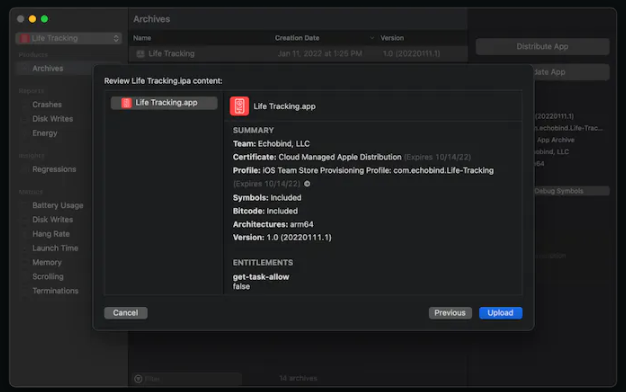
If you used the defaults, everything should be fine. If everything appears in order, click” Upload”.
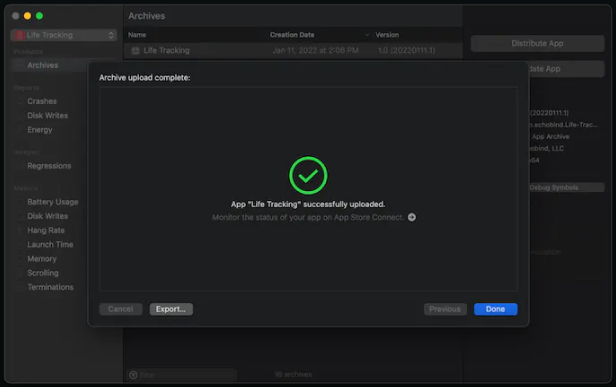
During the upload process, several messages will be displayed, and it may take a few seconds to complete. If the upload is successful, you will see a large green checkmark indicating success.
- Close the window and click “Done” to close the current window and you can also close the Organizer window.
Congratulations! You made it, you’re about halfway through completing the necessary steps to upload your app to the App Store.
4. App Store Connect, Users
Now to set up your testing team while App Store Connect processes your upload, follow these steps:
- Open your preferred browser and navigate to https://appstoreconnect.apple.com/login
- You can now easily log in by using the account credentials you created earlier to log into your App Store Connect account.
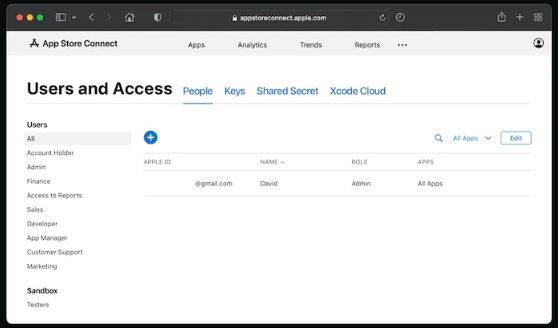
- Once logged in, click on “Users and Access” in the main menu
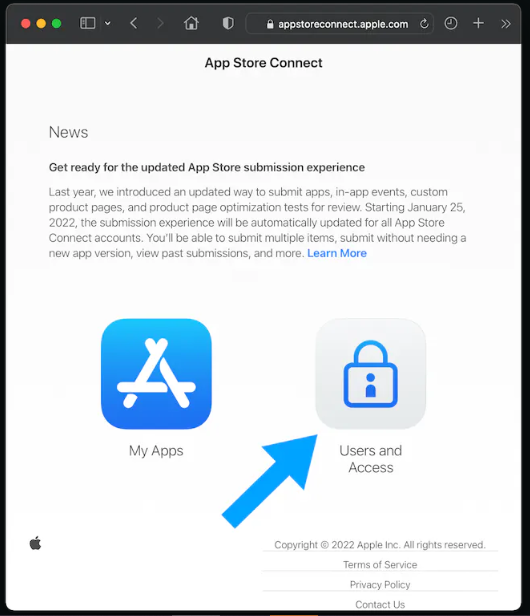
- Add a new user by going through the Users and Access section, locating the blue “+” button at the top of the list, and clicking on it.
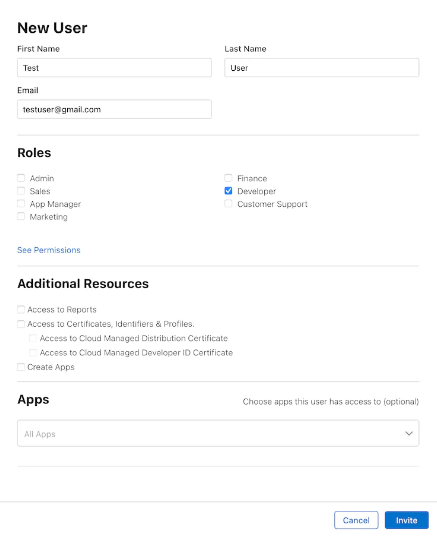
- Now, enter tester details by filling in first name, last name, and email fields with the information of the tester you want to invite
- Assign developer access and check the “Developer” box to grant the tester sufficient access to download and test your app
- Select the app for testing under the apps section, you have two options. Either choose a specific app you want this user to test by selecting it from the list, or select “ All Apps” to give them the ability to test any app your upload.
- The additional resources section is typically left blank, as it is not mandatory for setting up testers.
- Once all the necessary details have been entered, click on the “Invite” button.
- Tester confirmation, your tester will receive an email invitation that they need to respond to confirm their participation in the testing process.
- Repeat the above steps for any other testers your need to set up by clicking the blue “+” button and providing their details.
Each invited tester will receive an email invitation that they must respond to before you can assign them to TestFlight. This allows them to access and test your app once it is available for testing.
5. TestFlight Test Team
If you are still on the User and Access screen, navigate to the TestFlight setup by following these steps:
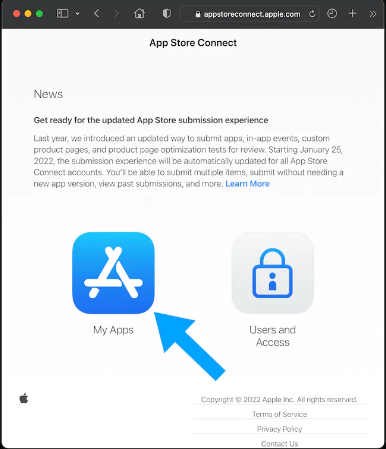
- Click “App Store Connect” in the top left corner of the screen
- Click on “ My Apps” from the drop-down menu
- Locate your new app on the next screen, which should be listed with a wireframe logo. Click on the app to access its details.
- Go to the “TestFlight” tab within the app’s settings.
Check for the display of your build, if not yet displayed. This means it is processing in the background and may take some time to appear.
You will receive an email notification once your build is processed and read. At that point, your build should be visible on the TestFlight Tab.
Now let’s proceed with setting up your test team:
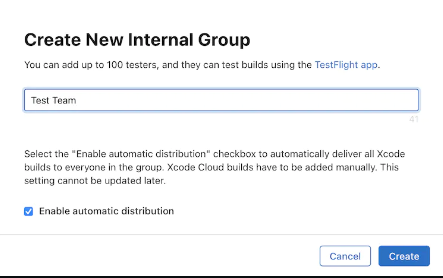
- Create a new internal group, while still on the TestFlight tab, click the blue “+” button next to “Internal Testing”
- Provide a name for your test team in the Create New internal group window; give your test team a name.
It is recommended to leave the “enable automatic distribution” option checked so that your test team members will receive automatic email notifications as soon as your release a new build for testing.

- Testers section After creating the internal group, you’ll see a section titled “Testers (0)” on the page.

- Confirm the Addition by clicking “Add” to add the selected testers to your test team. You will be returned to the TestFlight screen, where your selected testers will be displayed.
Note: it’s important to ensure that testers have accepted the initial invitation before you can add them to your test team.
Once added, they will receive another email inviting them to test the app. Testers must then install the TestFlight app on the device associated with the email they provided for their testing account.
6. TestFlight
Congratulations you reached here! Now once you have logged into App store connect, follow these steps:
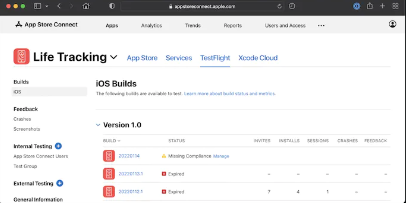
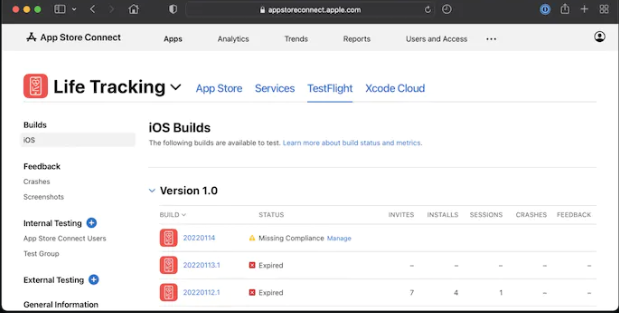
- Click on your app and navigate to the TestFlight section
- Locate your processed build under the version your set before creating the archive (eg., Version 1.0)
In the status column, it should display “Missing Compliance Manage”
- Click on “Manage”
Compliance management will depend on how your app is coded. Consider your app’s encryption usage and whether it makes calls to an HTTP domain.
Based on your app’s characteristics, select “Yes” or “No”
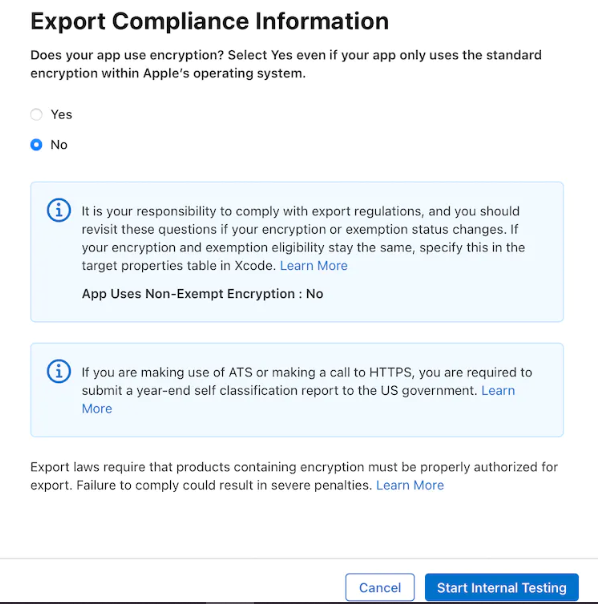
- By selecting No “Start Internal Testing” button will turn blue. Click on it and you have made it
- By selecting “Yes” a few more screens will appear. Read them carefully as they are most self-explanatory.
However, Apple provides helpful guidance for export compliance. If you are based in the US you can also review information from the US Department of Commerce regarding software exports outside the US.
Once you reach the last screen, you’ll find the blue “Start Internal Testing “button. Click on it your testers will be notified.
7. Testing
To provide testers with easy access to the app, follow these straightforward steps:
- The testers need to download and install the TestFlight app from the App Store on their iOS device
- Check your Email for an app invite
- Open the app invitation in the TestFlight word highlighted.
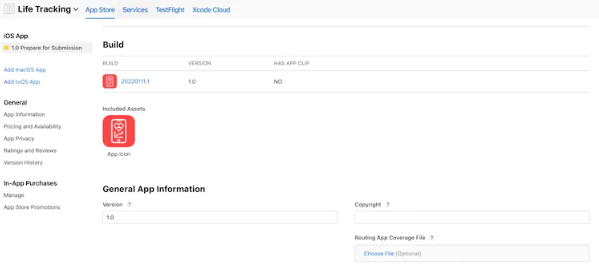
Bonus, fix the wireframe icon
Finally, now that you are ready to submit your app for review, you won’t need to choose a specific build for submission.
However, selecting a build at this stage serves the purpose of displaying your app’s icon throughout App Store Connect, giving it a polished appearance.
To set your app’s build and display your app’s icon in App Store Connect, follow these steps:
- Click on the “AppStore” tab at the top of the page
- Scroll down to the “Build” section
- Click the “Select a build before you submit your app” button
- Choose any recent build that already has your app’s icon associated with it.
After selecting a build, the “Build” section should display your chosen build along with the associated icon. Note that it may take a few minutes for the icon.
Note: It may take a few minutes for the icon to appear everywhere within App Store Connect. If the icon doesn’t show up immediately. You can try logging out and logging back in, which should resolve the issue.
Conclusion
TestFlight is a powerful tool provided by Apple. It allows developers to distribute and iOS app testing before submitting them to the App Store.
The initial steps seem daunting but with practice, the process becomes more straightforward. Taking advantage of the TestFlight feature enables you to gather valuable feedback before its public release.
So take the plunge, embrace TestFlight for iOS app testing, and elevate the quality of your app before it reaches the hands of your users. Happy testing!
FAQ
TestFlight is a service provided by Apple that allows developers to distribute and test their iOS apps with a selected group of testers before releasing them on the App Store.
TestFlight allows developers to upload their app builds to the service, invite testers via email, and distribute the app to them for testing. Testers can then install the app on their iOS devices and provide feedback to the developers.
Yes, TestFlight is a free service provided by Apple for developers to conduct beta testing of their iOS apps.
Initially, you can invite up to 10,000 testers to test your app through TestFlight. However, you can request an increase in this limit by contacting Apple’s Developer Support.
Yes, you can invite external testers to test your app using TestFlight. External testers can be individuals who are not part of your development team or organization.
The testing period for an app in TestFlight is limited to 90 days. However, you can submit a new version of your app for testing before the expiration of the previous build to continue the testing process.
Yes, you can upload new app builds to TestFlight during the testing phase. Testers will receive notifications and can update the app on their devices to test the latest version.
Yes, TestFlight provides a feedback mechanism where testers can provide feedback, report issues, and share their observations directly with the app’s developers.

Niketan Sharma is the CTO of Nimble AppGenie, a prominent website and mobile app development company in the USA that is delivering excellence with a commitment to boosting business growth & maximizing customer satisfaction. He is a highly motivated individual who helps SMEs and startups grow in this dynamic market with the latest technology and innovation.
Table of Contents


No Comments
Comments are closed.