

For users of the Speckle for Unreal Engine plugin, it is quite common to want to customise the way Speckle Objects are converted to native Unreal Objects.
The converters we provide offer some level of control, which may fit most users needs. For users looking for more control, beyond the settings/properties exposed by a specific converter, this tutorial is for you!
Maybe we don't include a converter for a specific type of object you need,
Maybe you are trying to support a completely custom type of object,
Maybe you just don't like the way we convert a specific type.
In this tutorial, we will showcase the process of adding support for a completely custom type of object. From defining our Object Model, Creating a new SpeckleConverter class, writing ToNative conversion, and finally receiving our new objects in our scene.
This tutorial is aimed at Developer/Quazai-Dev users and should be approachable by people with only a beginner level understanding of Unreal, and Speckle.
To follow along with this tutorial you need an Unreal 4/5 project with the Speckle for Unreal plugin installed, and a compatible IDE (VS2022/Rider). See our Getting Started for help getting setup.
::: tip Read the Docs!
Before starting this tutorial, it's a good idea to read the docs relevant to conversion in Unreal. If you get stuck or are doing something complex that this tutorial doesn't cover, then don't hesitate to open a discussion on our forums.
:::
Goals
In this tutorial we are going to add support for converting 3D Views as Camera actors. The View type is an Object Model that is defined in our Objects kit.
We will show the process of :
- Creating our Camera Object Model by mirroring the .NET
Viewobject model. - Creating a converter for this type in Blueprint.
- Adding an instance of our converter to our
SpeckleConverterComponent, and receiving camera objects along with our scene.
⚠️Views/Cameras are due for a bit of an overhall within Speckle, so much of the specific camera conversion is subject to change. However this still serves as a great example for this tutorial.
Defining an Object Model
Before we can do anything with a Speckle Object in Unreal Engine, we first require an Object Model. An Object Model represents our Speckle Object and defines its properties.
In our case, we have an Object Model already defined in .NET, and so we will be recreating it in Unreal. However, the process would be the same if this weren't the case.
This is the only part of this tutorial that must be written in C++.
If you aren't super familiar with C++, there is good news, we aren't writing any complex conversion logic here, we are just defining properties, and setting their values from the JSON object.
If we look at the .NET Object Model, we can see what properties we need to store.
  public class View
  {
    public String name { get; set; }
    public Point origin { get; set; }
    public Vector upDirection { get; set; }
    public Vector forwardDirection { get; set; }
    public bool isOrthogonal { get; set; } = false;
    public string units { get; set; }
}Objects.BuiltElements.ViewHere is a useful table of common .NET/Python/UE equivalent types.
| .NET | Python | UE |
|---|---|---|
bool |
bool |
bool |
double |
float |
double |
string |
str |
FString |
List<int> |
list[int] |
TArray<int32> |
Dictionary<string, Base> |
dict[str, "Base"] |
TMap<FString, UBase*> |
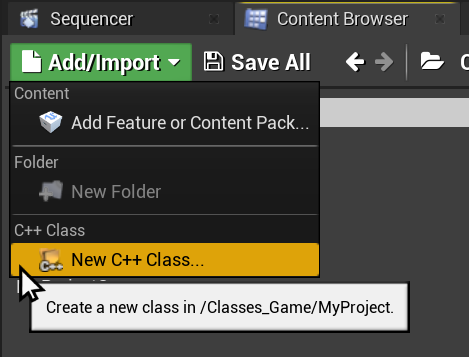
First we will create a new UObject class. This can be done from the C++ classes folder in the Content Browser, or through your IDE.
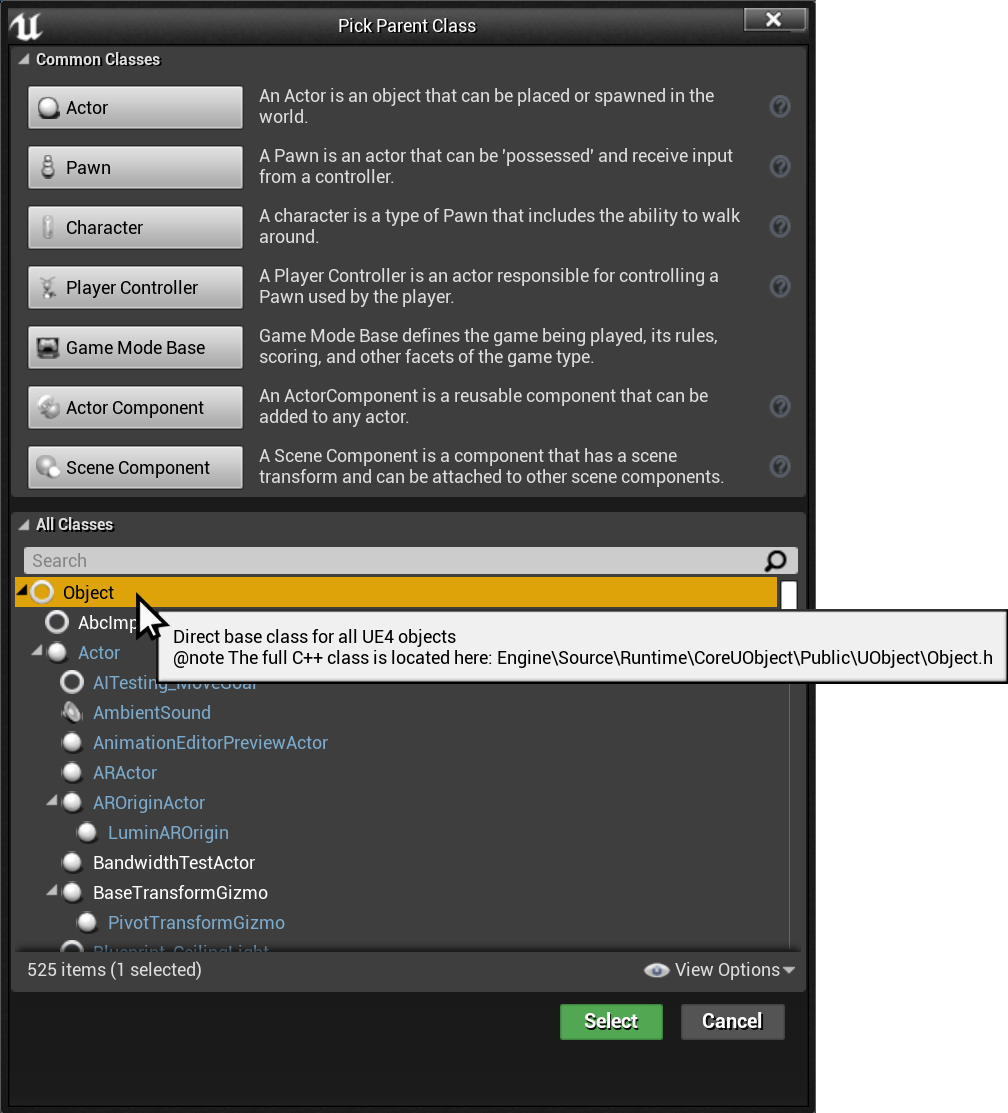
Then we will change our object to inherit from the UBase type. This is the type that all Object Models inherit from.
We can then add our properties, making sure we define them as UPROPERTY(BlueprintReadWrite). Setting a Category is optional. And finally declaring our Parse function and constructor, specifying the Speckle Type string.
UCLASS()
class MYPROJECT_API UView3D : public UBase
{
    GENERATED_BODY()

public:

    UPROPERTY(BlueprintReadWrite)
    FVector Origin;

    UPROPERTY(BlueprintReadWrite)
    FVector UpDirection;

    UPROPERTY(BlueprintReadWrite)
    FVector ForwardDirection;

    UPROPERTY(BlueprintReadWrite)
    bool IsOrthogonal;

    UView3D() : UBase(TEXT("Objects.BuiltElements.View")) {}

    virtual bool Parse(const TSharedPtr<FJsonObject> Obj,
        const TScriptInterface<ITransport> ReadTransport) override;
};
UPROPERTY declarationsWe will ignore the Units property, as we will be baking unit conversion in our Parse method.
The final step is to create a Parse function that will define how we want to set these properties from the received JSON object.
Looking at the relevant docs, we can understand the structure of this function.
We have two parameters,
Obj- the JSON object we want to parse,ReadTransport- A collection of all other received JSON Speckle Objects.
This is needed to dereference detached properties, dechunk chunked properties, and parse nested speckle object properties.USpeckleObjectUtilshas some helper functions to make this process quite easy, which we can use to easily parse our Vector properties.
bool UView3D::Parse(const TSharedPtr<FJsonObject> Obj, const TScriptInterface<ITransport> ReadTransport)
{
	if(!Super::Parse(Obj, ReadTransport)) return false;

	const float ScaleFactor = USpeckleObjectUtils::ParseScaleFactor(Units);

	// Parse optional Name property
	if(Obj->TryGetStringField("name", Name)) DynamicProperties.Remove("name");

	// Parse Origin
	if(!USpeckleObjectUtils::ParseVectorProperty(Obj, "origin", ReadTransport, Origin)) return false;
	Origin *= ScaleFactor;
	DynamicProperties.Remove("origin");

	// Parse UpDirection
	if(!USpeckleObjectUtils::ParseVectorProperty(Obj, "upDirection", ReadTransport, UpDirection)) return false;
	DynamicProperties.Remove("upDirection");

	// Parse ForwardDirection
	if(!USpeckleObjectUtils::ParseVectorProperty(Obj, "forwardDirection", ReadTransport, ForwardDirection)) return false;
	DynamicProperties.Remove("forwardDirection");

	// Parse IsOrthogonal
	if(!Obj->TryGetBoolField("isOrthogonal", IsOrthogonal)) return false;
	DynamicProperties.Remove("isOrthogonal");

	return true;
}View3D::Parse function For required properties, we want to return false if they are missing/invalid, rather than perform fatal assertions or exceptions.
We also want to remove the explicit properties we parse from the DynamicProperties array.
ThisParsemethod is an area we are looking to improve/simplify the developer experiance. There are a few techincal challanges for us to overcome before we can push a native deserializer like the reflection based deserializers we use in the .NET and Python SDK.
Let us know how important this feature is on the forums!
Creating a Converter
Now we have an Object Model defined, we can create a Converter class to define how to convert these objects into Native Actors/Components.
This step can be done in either C++ or Blueprint. To keep it simple for this tutorial, we will show it using Blueprint.
First create a new Object blueprint.
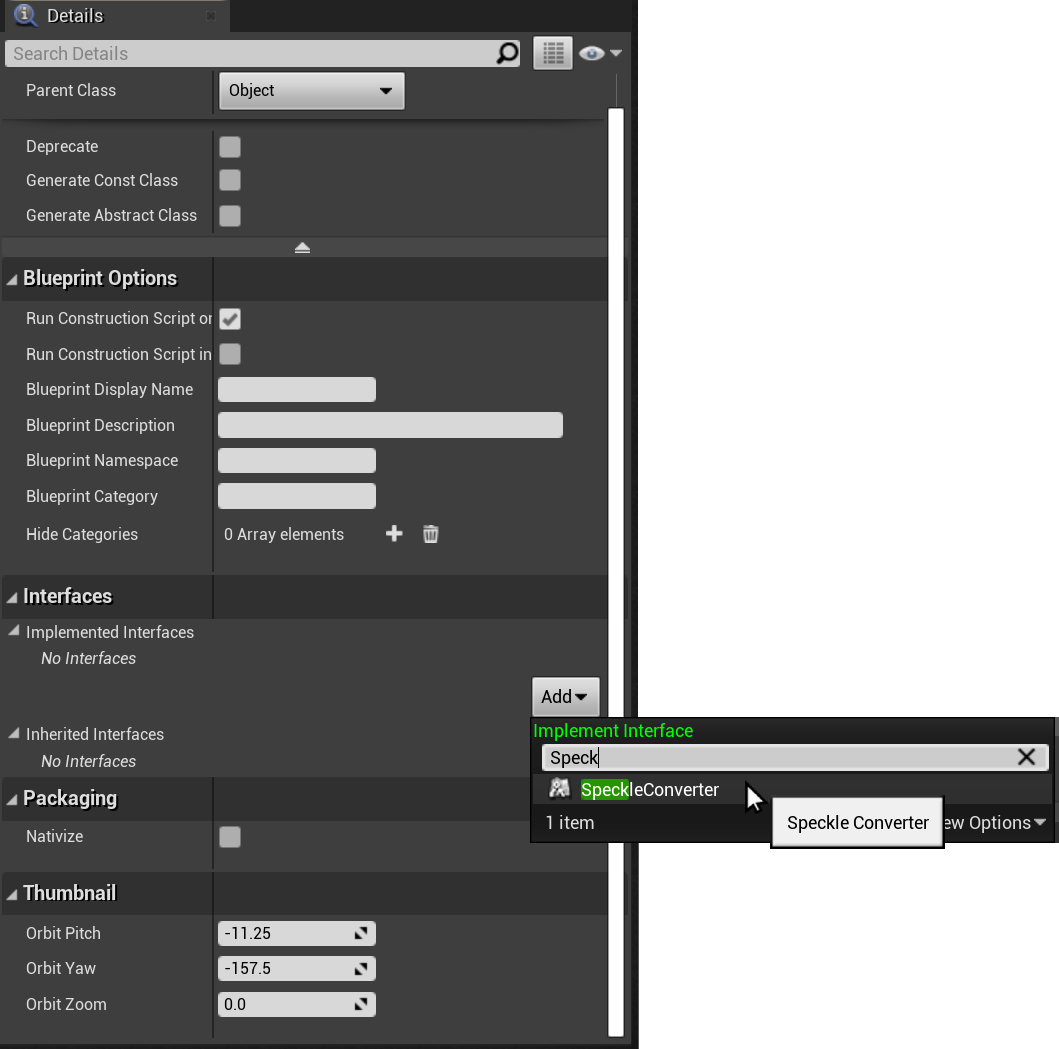
Then, under Class Settings, add ISpeckleConverter as the interface we are implementing.
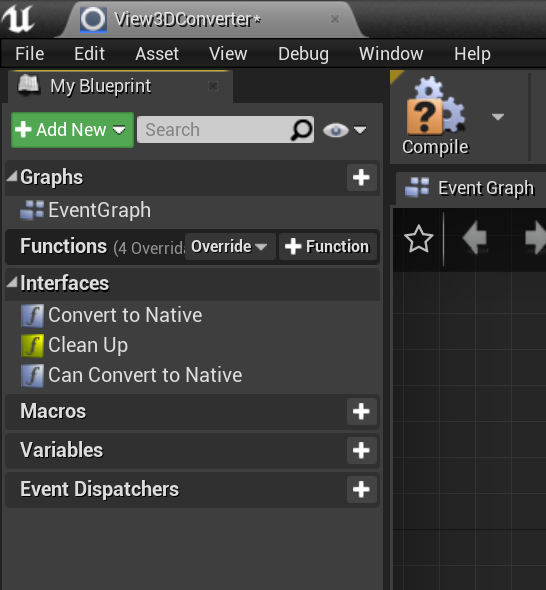
Now, we can see the interface functions we must implement.
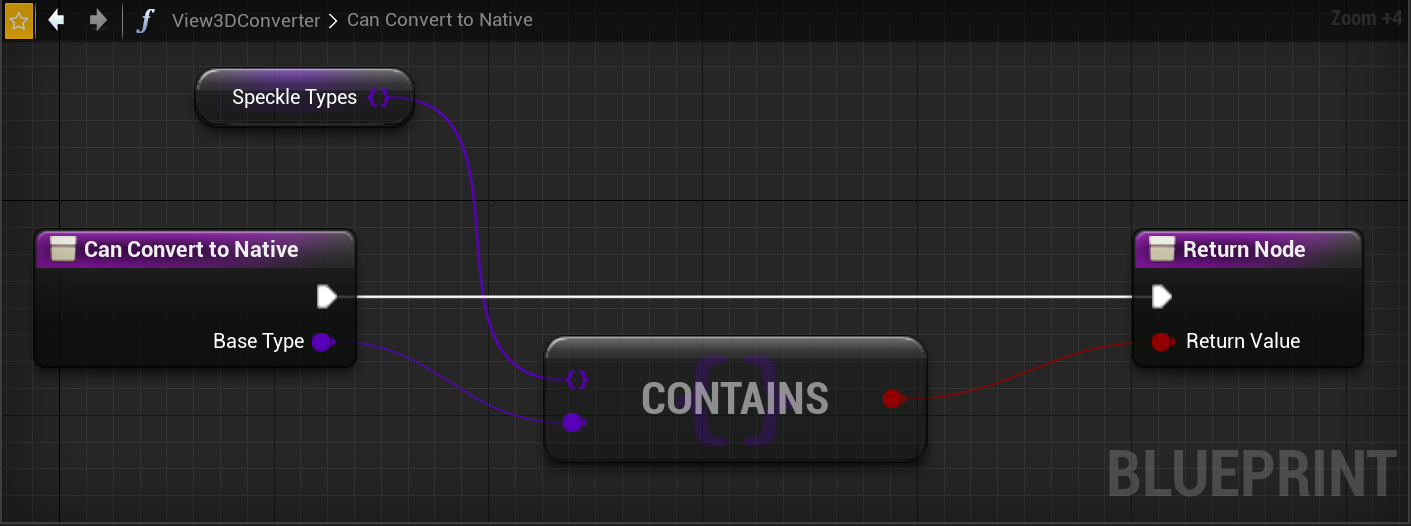
The first function we shall implement is CanConvertToNative. This is a simple function where we can define what types of Speckle Objects this converter can convert. First we shall create a new member Variable of type Base Class Reference.
We can then set the default value of this set to include our View3D class. In this case, this will be the only type we will convert.
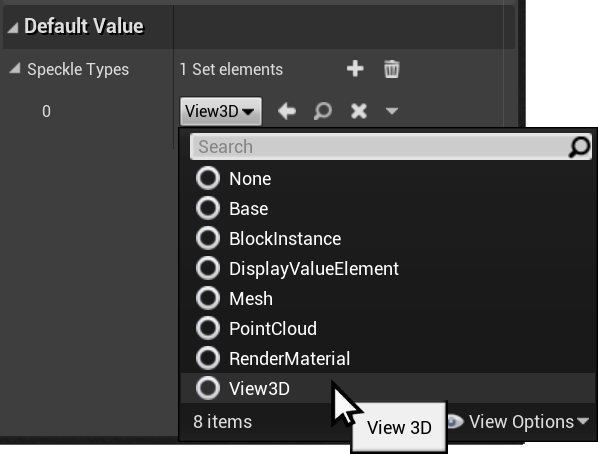
We can then implement our CanConvertToNative function, which will simply check if a given Base Type is in our SpeckleTypes set, evaluating to a bool which we return.
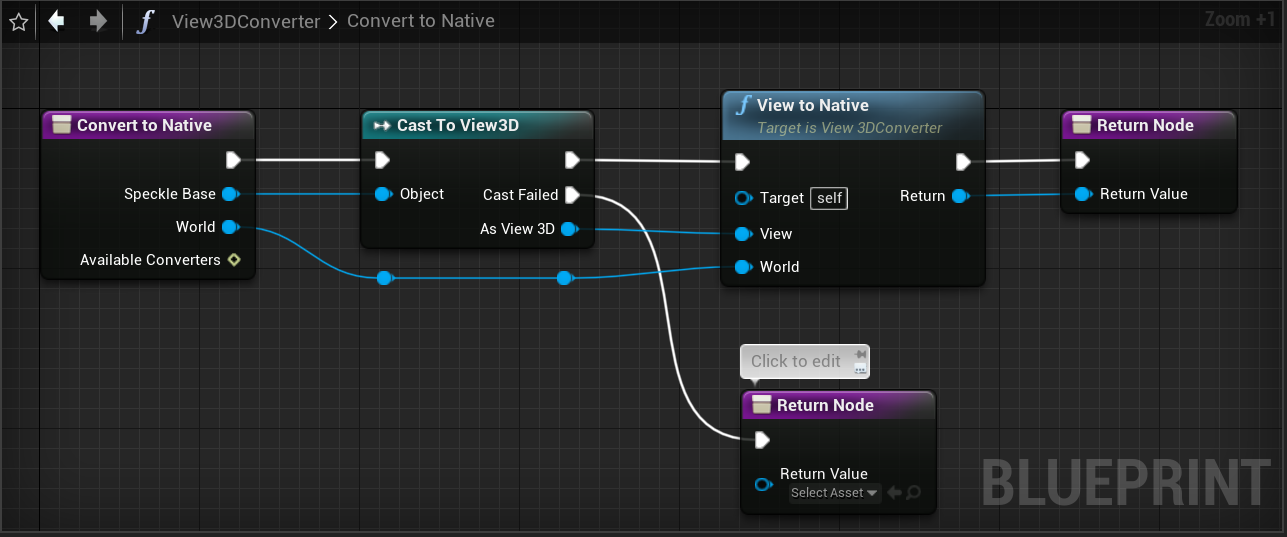
Now for the juicy part, implementing our ToNative function! For the interface implementation, we want to first cast SpeckleBase is the type we expect (in our case View3D), then we can create a function ViewToNative that will have our actual ToNative conversion logic.
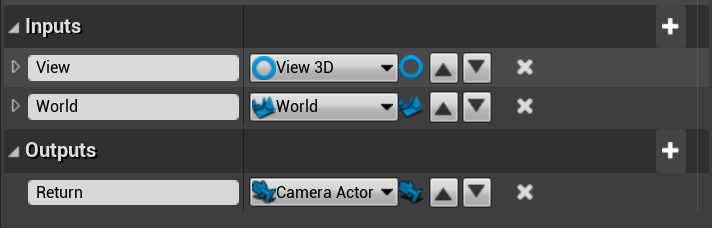
The ViewToNative to native function will have the following inputs/outputs.
If you are unable to set an input of typeWorld, then add aSpawn Actor in Worldnode, then collapse to function.
Our ViewToNative function should create our CameraActor and set it up with the correct Transform and Camera settings. The first part is we want to create a transform from the ForwardsDirection and UpDirection vectors we have. Then we can use the Spawn Actor in World node to create our actor.
Normally it is not possible to Spawn actors in an Object blueprint, because creating an actor requires a world context and Epic decided to only expose this for Actor blueprints (even though here we have a world context!). To get around this Spawn Actor in World node is actually a custom node we provide that wraps the UWorld::SpawnActor function, and is accessible in any Blueprint.
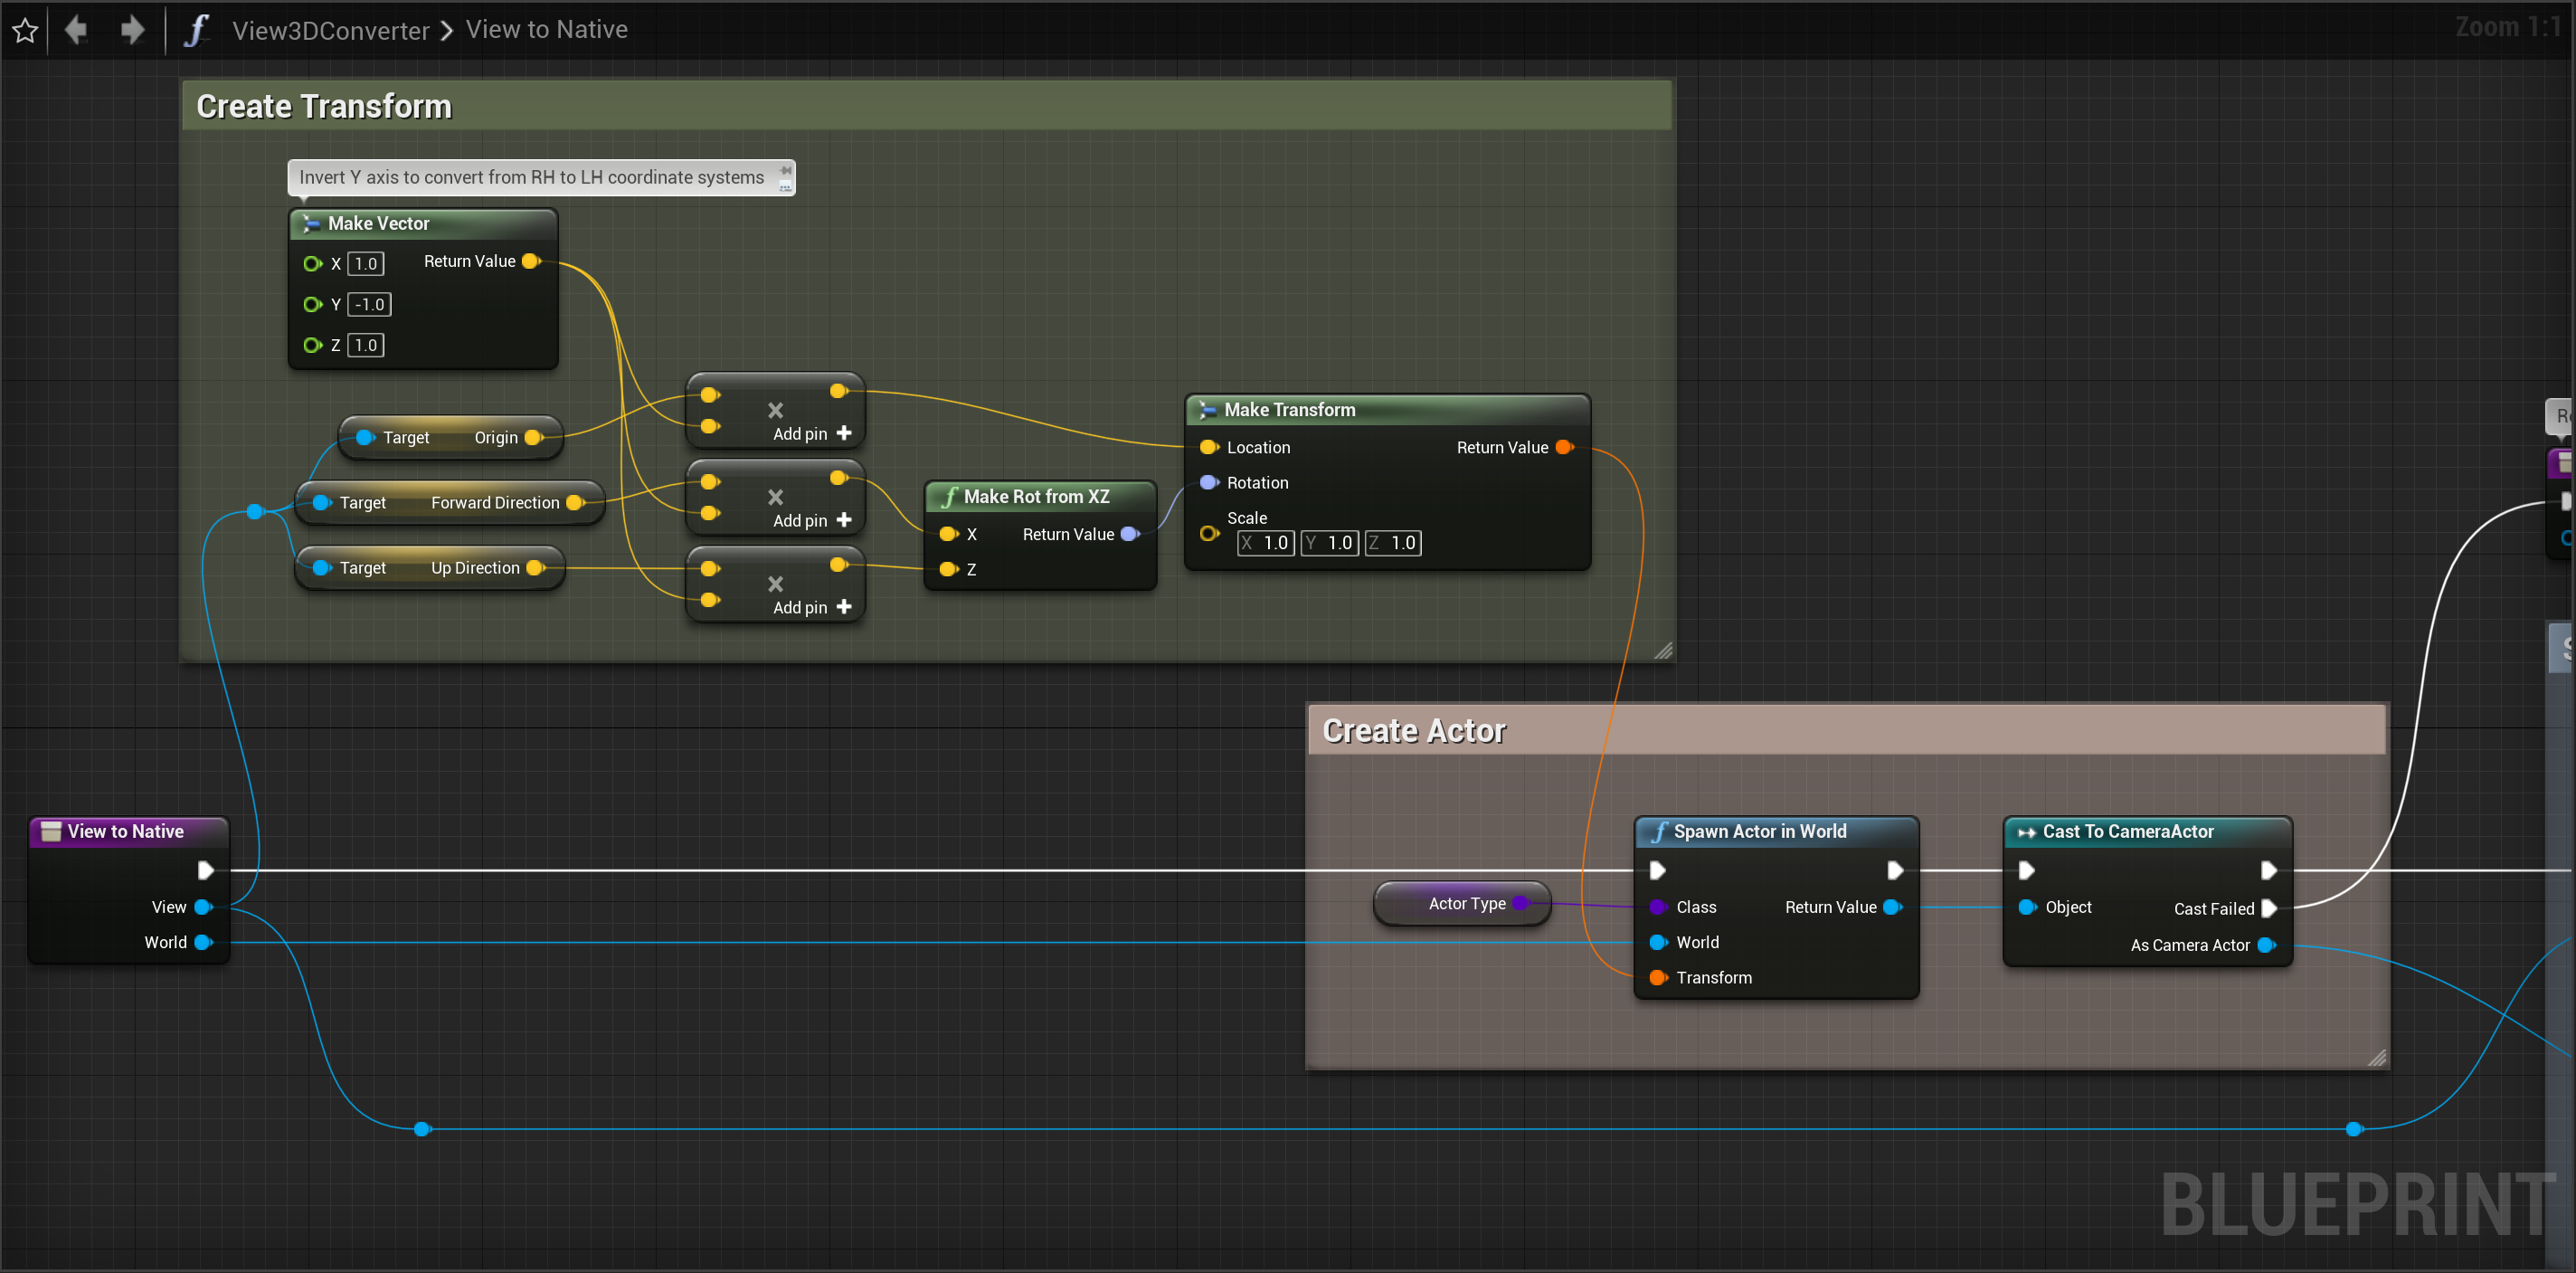
For the transform conversion, we must make sure we flip the Y axis, since Speckle Objects use a Right Handed, Z-up coordinate system, and Unreal uses a Left Handed, Z-up coordinate system.
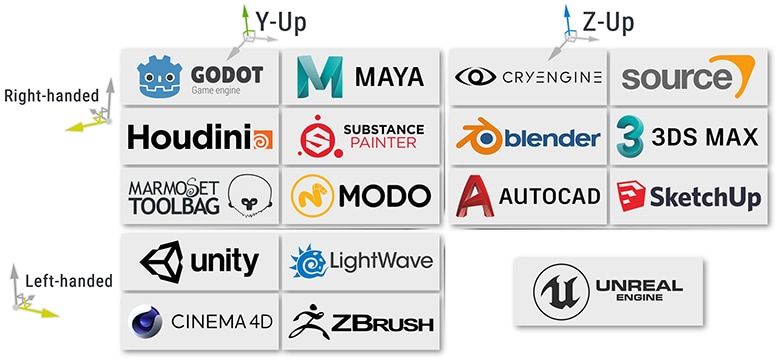
For further reference to UE's coordinate system, see A Practical Guide to Unreal Engine 4’s Coordinate System by Nick Mower.
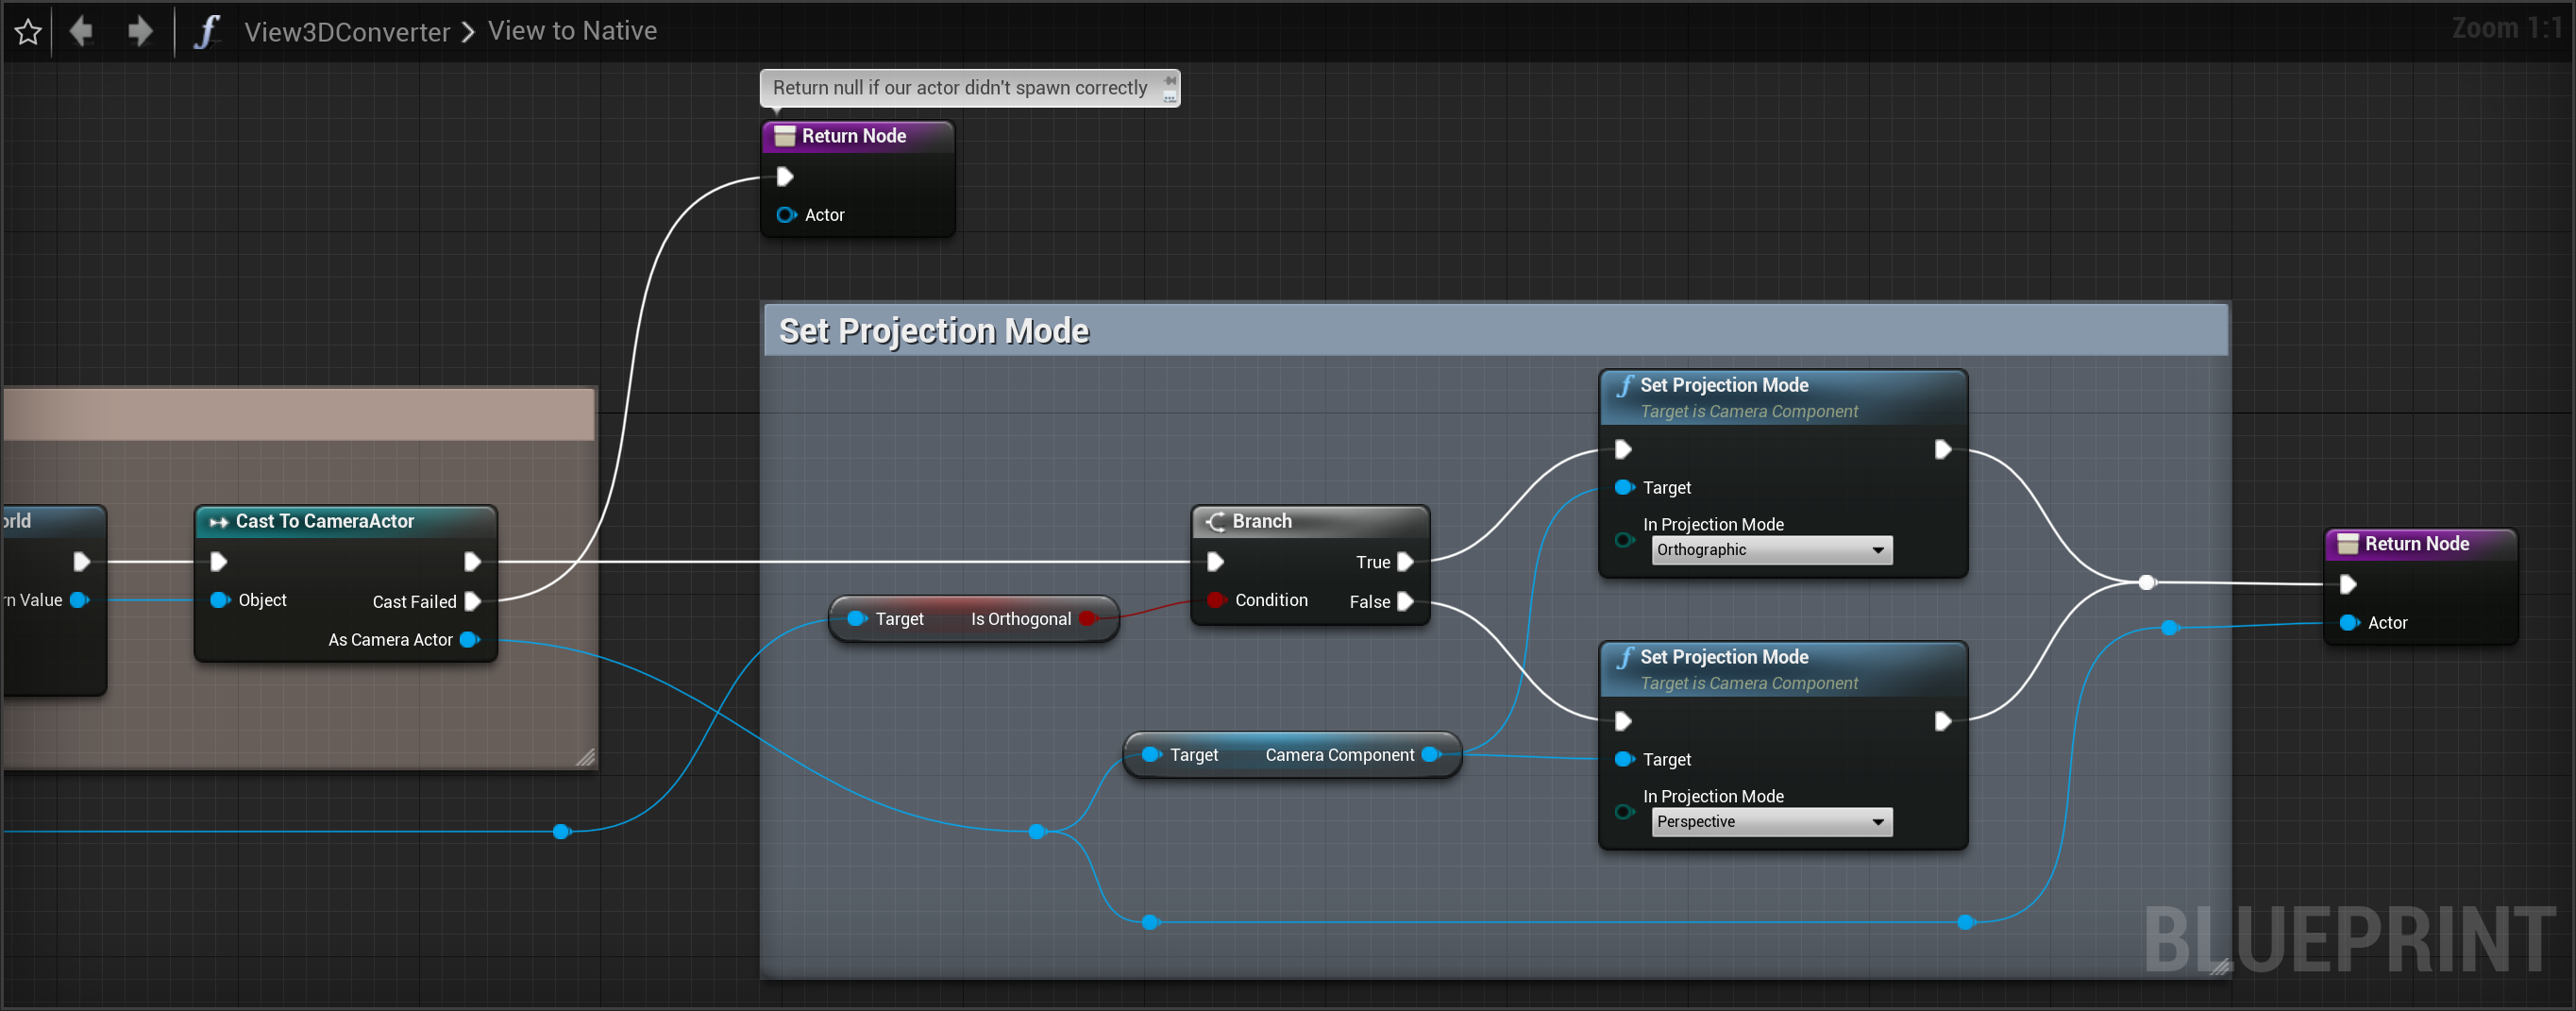
Now we have set up the creation of actors with a correct transform. The final step is to apply our Camera Projection Mode.
Receiving Setup
Now we have implemented our camera converter, we need to add it to our Speckle Unreal Manager. This can be done by first, creating an instance of our converter in our Contents folder. This can be done by right-clicking in a Content folder, and under "Create Advanced Asset", selecting Speckle Converter.

We select our View3DConverter type, and give our instance a name (e.g. "MyView3DConverter"). We can then add it to the SpeckleConverterComponent on our SpeckleUnrealManager.
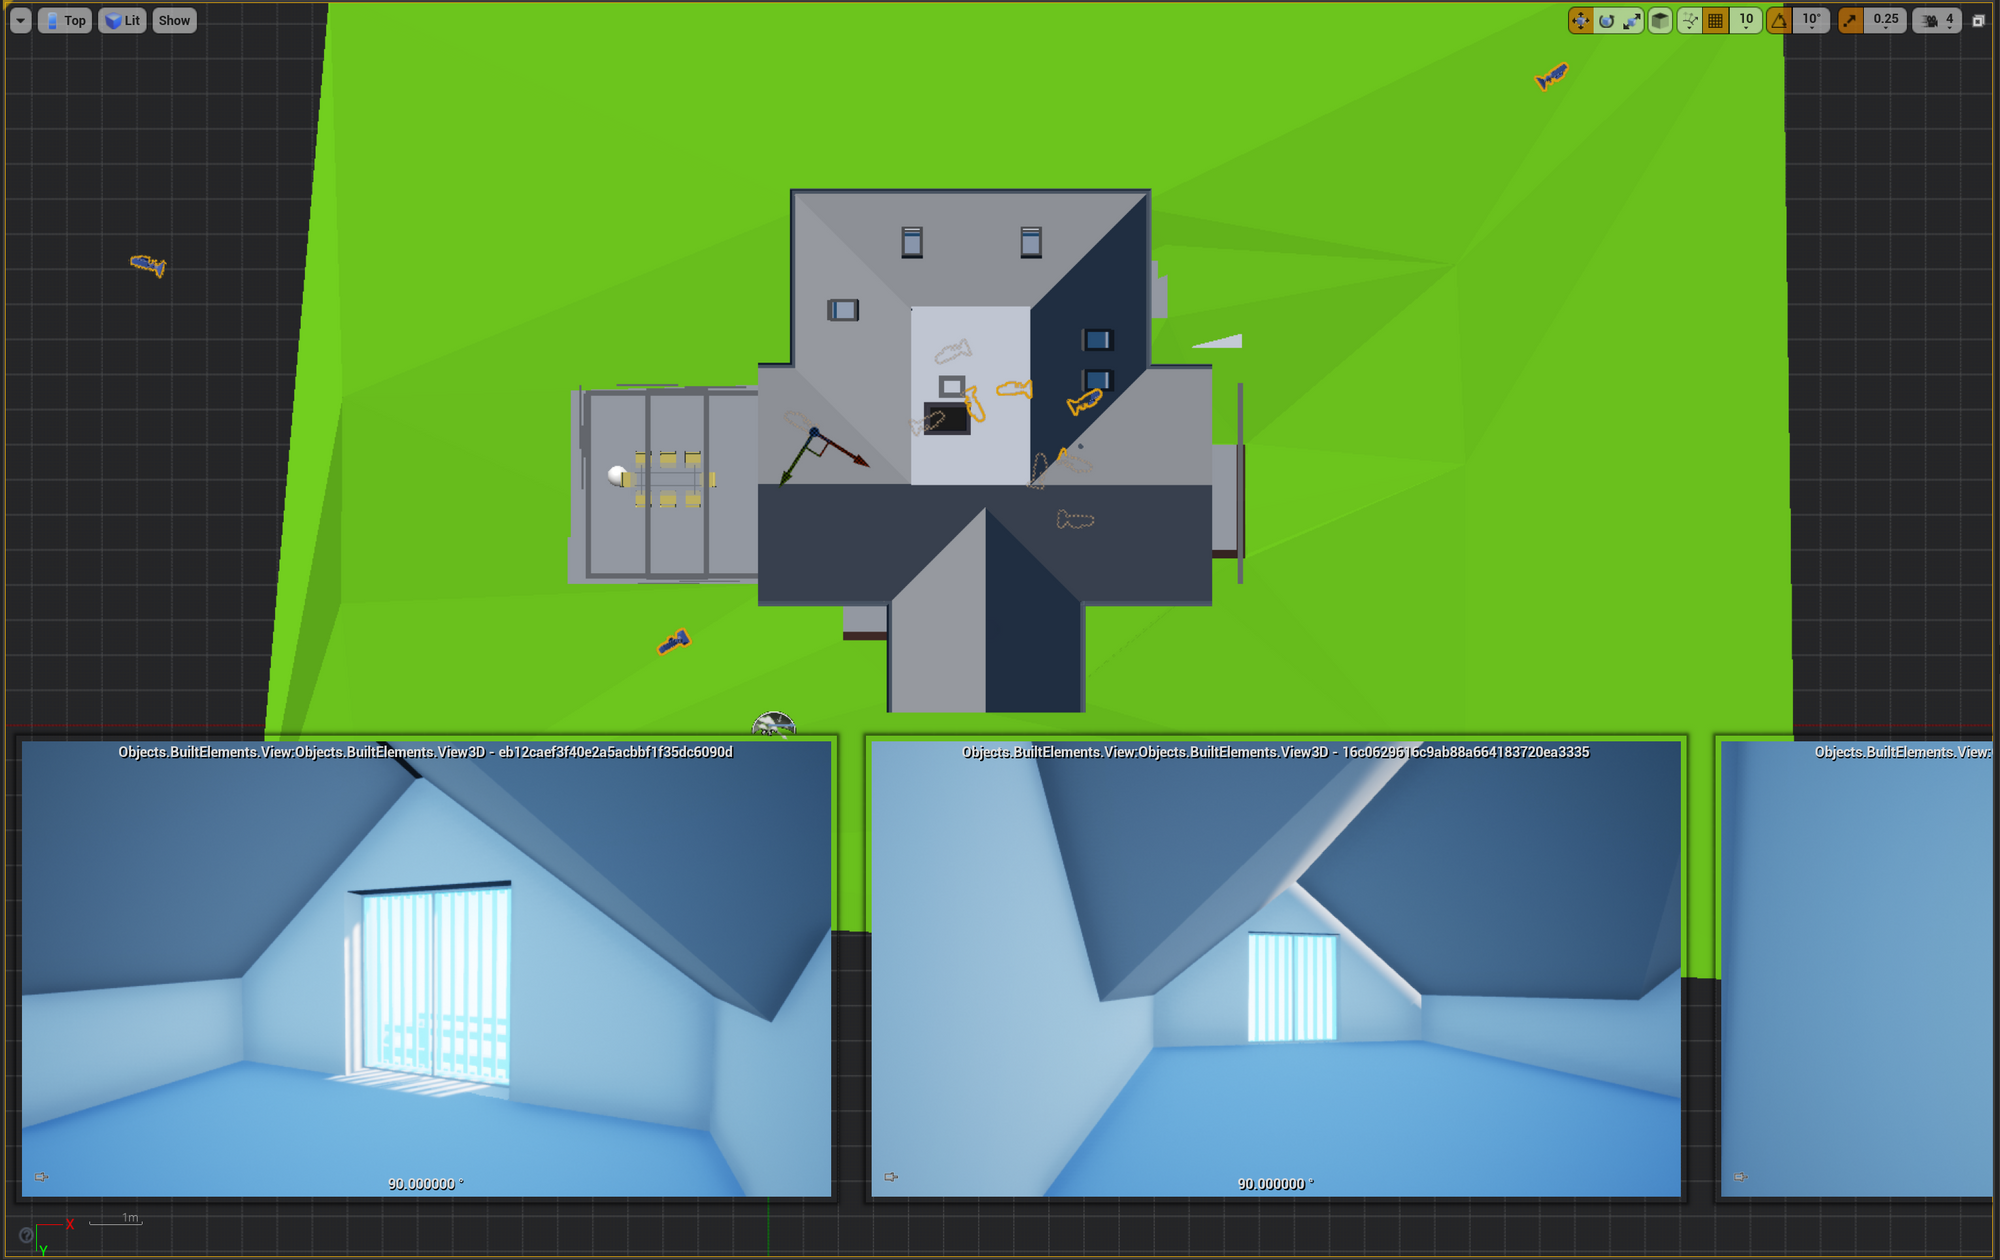
Now finally we can test receiving a stream with views, and see what objects are created. Here is an example stream with several views:
And receiving our stream, we can see our camera actors have been created in the right spots! 🥳
Conclusion
In conclusion, whether for adding support for a new type of object, or simply as a tool for controlling the conversion process, the Speckle for Unreal Engine plugin allows easy development of custom conversion logic. In this tutorial we explored the process of developing conversion for the View objects to Camera Actors. We hope this tutorial was helpful, and empowers our users to develop their own conversion logic.
If you have any further questions, or need help in any way, please reach out on our forums.
Don't forget to ⭐ our GitHub repositories.
Happy Hacking!