How To Create A Prototype With Arduino (Easy Guide & Example)
When I first started Arduino, my vision was to create cool projects just like the YouTuber Mark Rober. I got into learning the basics of circuitry and programming surrounding the Arduino and realized that my builds were most likely not going to match up against Mark Rober’s invention. Nevertheless, I was determined to accomplish what I initially set out to do.
I tried finding online resources, but many of them weren’t helpful from a beginner’s standpoint. That’s why I decided to go through it myself and write this guide to help those who are looking to build something from scratch themselves. Now you’re probably wondering:
“How do I make a prototype with an Arduino?”
The overall prototyping process I used to go from an idea to an actual physical product is this:
- Ideation
- List
- Mockup
- Pseudocode
- Create/Build
- Test (repeatedly)
- Fix (problems)
- Polish (your work)
- Celebrate! (optional)
For the rest of this guide, I’ll be going more in-depth about each step with an example to help solidify your understanding.
I’ll be using my Arduino Alarm Clock project as an example. Here’s a picture of the finished product:
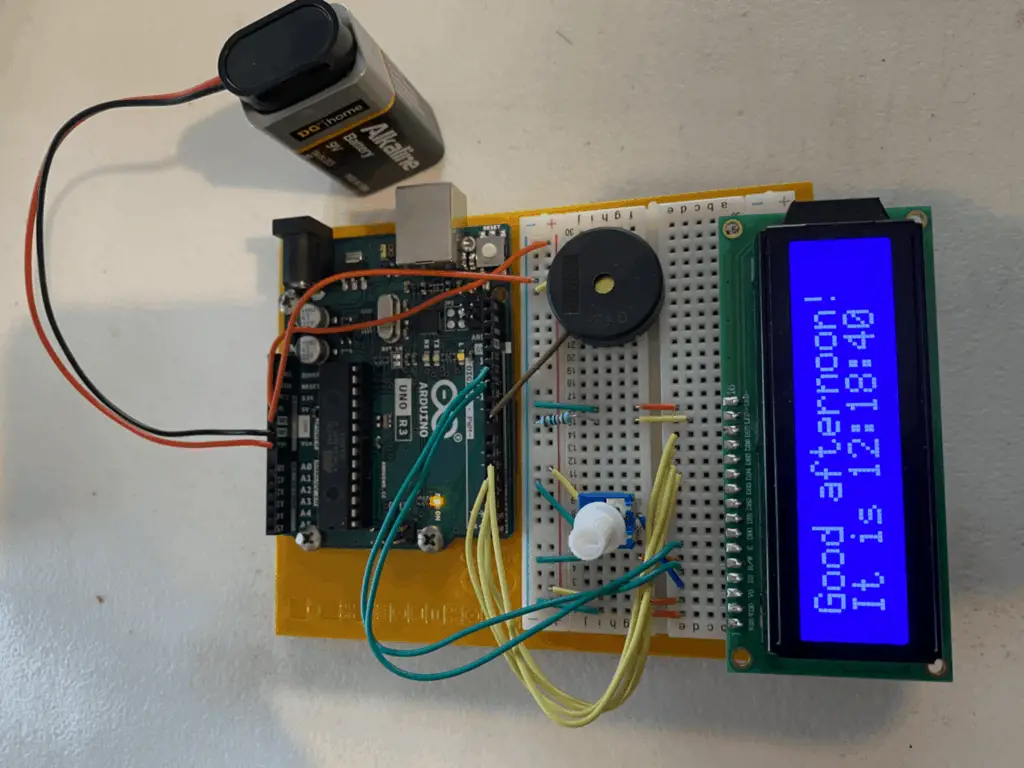
This prototype works amazingly. Firstly, it used a battery so I don’t need to keep it hooked up to a computer. It also has a piezo that emits a shrill alarm whenever it reaches the time I set it to ring at and an LCD (liquid crystal display) that displays a friendly message in the first line and the time in the second one.
Prototyping Process
1. Ideation
Whenever you doing something, the best thing to do first is to plan. Consequently, I drew a rough sketch of what I wanted to have for my alarm clock.
The drawing doesn’t have to be perfect. The whole point of it is to put your ideas on paper so you understand how to move forward. If you’re a bad drawer, just draw rectangles and circles (like I did), but make sure to label them. That way, when you come back to it in the future, you know what the shapes mean.
Here’s an image of what I did:
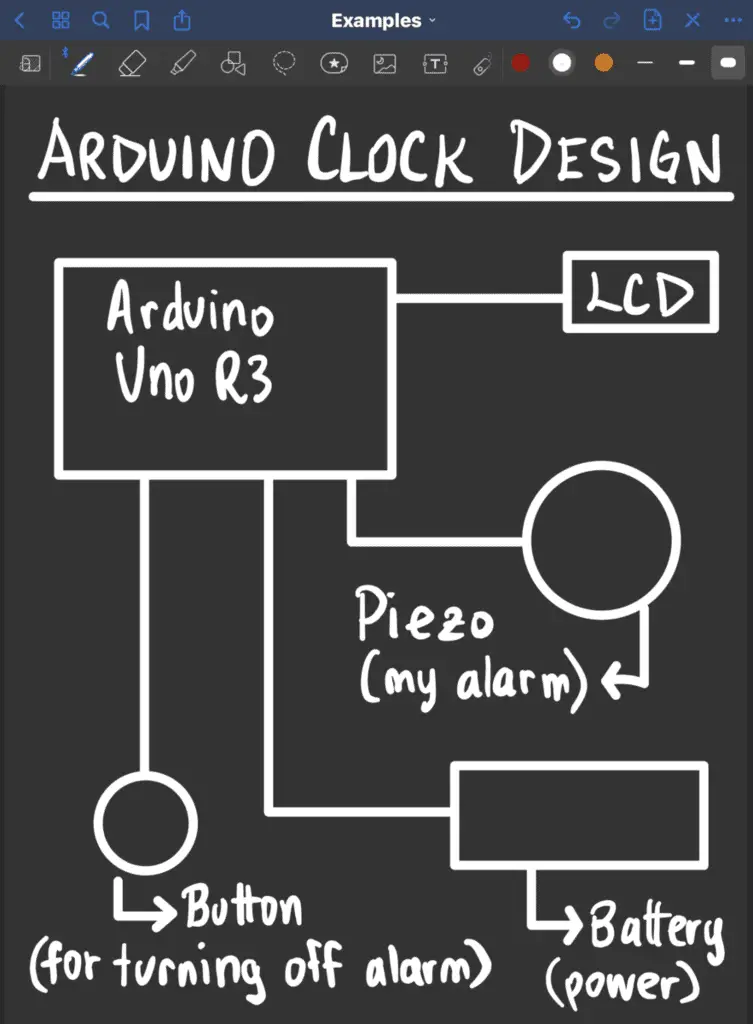
Remember, you don’t have to use all the components you originally planned.
As you can see in the picture above, I included a button to turn off the alarm in the diagram, but I left it out it out in my actual product. Instead, I programmed a 10-second timer that would turn off the alarm.
2. List
After you’ve created the simple drawing, you should make a list of all the components you’ll need for your project. This list should contain the components you absolutely need. You can leave out the other things that aren’t essential to your prototype until you’re done with the basic model. This allows you to focus on the important details first and then polish up the design in the future.
For example, my alarm clock list would look like this:
- Arduino Uno R3
- Piezo
- Jumper wires
- Resistor
- LCD
- USB (universal serial bus) and computer
I’ve excluded the battery because it would get in the way of the testing phase. I recognized that a computer would be better suited since I can upload code and supply power to the Arduino with it.
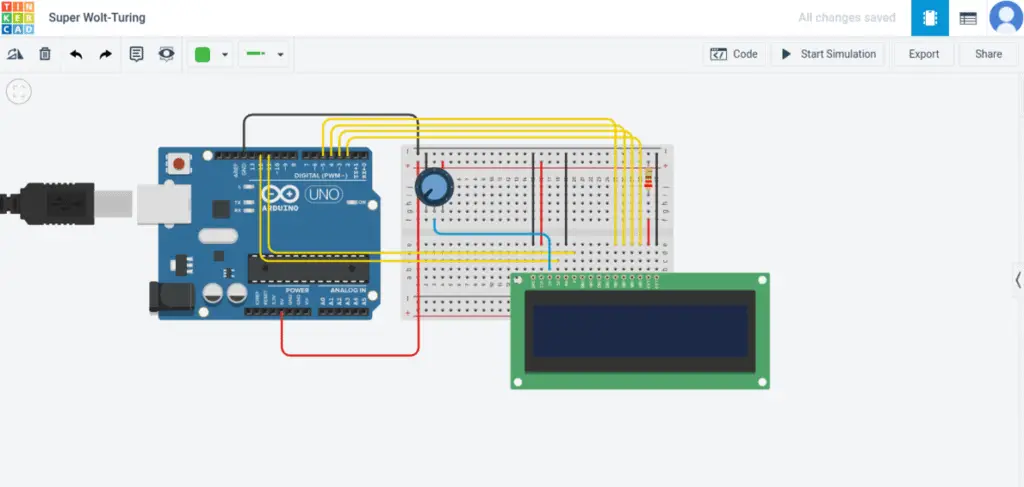
3. Mockup
In this stage, I like to use an Arduino simulator and put my idea into action. That way, if I come across any problems, I can handle them quickly and efficiently. Moreover, I can protect my Arduino board from actual physical damage if I encounter easy mistakes such as forgetting to use a resistor when utilizing an LED (light-emitting diode).
Here’s what my initial design looked like. It took me 5 minutes to set up and start writing and testing my initial code.
4. Pseudocode
Similar to designing your hardware, coming up with the code to complement your hardware also requires some planning.
Pseudocode is basically just fake code that is understandable to any human being. The Arduino IDE (integrated development environment) won’t know what to do with it, so you need to put it in the comments to guide your programming.
Here’s an example of my pseudocode:
// call LCD library
// initialize pins that correspond with LCD

// keep track of the seconds - make sure it repeats and stays between the range of 0 to 60
// keep track of the minutes - make sure it repeats and stays between the range of 0 to 60
// keep track of the hours - make sure it repeats and stays between the range of 0 to 24

// create an alarm that emits a noise whenever the clock reaches my set time
// display greetings based on the time of day (i.e. good morning or good evening)
// polish up the LCD (i.e. include colons to make it look pretty)
Admittedly, it doesn’t look very impressive. However, you need to keep in mind that it’s acting like a guide. This pseudocode breaks down all the necessary components that need to be completed in order for me to reach my end goal. Here’s what my actual code looks like in the end:
// include the library code:
#include <LiquidCrystal.h>

// initialize the library by associating any needed LCD interface pin
// with the arduino pin number it is connected to
const int rs = 12, en = 11, d4 = 5, d5 = 4, d6 = 3, d7 = 2;
LiquidCrystal lcd(rs, en, d4, d5, d6, d7);

// this is the user interface: user can change minutes and hours here to fit their time and/or set an alarm
byte userSetHour = 12; // user can change the hour value here to set their clock (use military time - 0-24)
byte userSetMinute = 18; // user can change the minute value here to set their clock
byte alarmHour = 12; // user can change the hour value here to set an alarm for their clock
byte alarmMinute = 15; // user can change the minute value here to set an alarm for their clock

byte pinSound = 8; // this is the pin attached to the piezo

// the following variables are used for calculating and adjusting the minute values
bool turnOffMin = false; // this controls whether we should be using the user input for minutes - after their set minute is over, we stop using it
byte setMinute; // used to calculate the current time (minutes) based on user input
byte remainMin; // does the math to revert time (minutes) back to normal after user changes it

// the following variables are used for calculating and adjusting the hour values
bool turnOffHour = false; // this controls whether we should be using the user input for hours - after their set hour is over, we stop using it
byte setHour; // used to calculate the current time (hours) based on user input
byte remainHour; // does the math to revert time (hours) back to normal after user changes it
byte minuteMore; // adjusts the hour based on the minutes that went by
byte setMinute1; // used to calculate the current time (hours with minutes) based on user input

void setup() {
  // set up the LCD's number of columns and rows:
  lcd.begin(16, 2);
}

void loop() {
  // starts displaying the beginning words of the second line on the LCD
  lcd.setCursor(0, 1);
  lcd.print("It is");

  // the following code handles the second algorithm
  byte interval = 60; // the max number the second or minutes can't go above. Once they reach this, the minutes and second starts over from 0.
  unsigned long mult = millis() / 60000; // multiplies the interval (below) to bring the second down between the 0-60 range
  unsigned long currentSec = millis() / 1000; // keeps track of the seconds - is displayed as seconds on the LCD
  if (currentSec >= interval) { // if the seconds value is over 60 seconds
    currentSec = currentSec - (interval * mult); // does the math that brings the range for the second to 0-60
  }
  if (currentSec < 10) { // if the second is a single digit number
    // add a zero in front of the single digit
    lcd.setCursor(13, 1);
    lcd.print(currentSec);
    lcd.setCursor(12, 1);
    lcd.print(0);
  }
  if (currentSec >= 10) { // if the second is a double digit number
    // make its place regular
    lcd.setCursor(12, 1);
    lcd.print(currentSec);
  }

  // the following code handles the minute algorithm
  if (turnOffMin == false) { // this utilizes the user's input for the minutes
    setMinute = userSetMinute; // this changes the second
    remainMin = 0;
  }
  if (turnOffMin == true) { // this stops using the user's input for the minutes
    setMinute = 0;
    remainMin = 60 - userSetMinute; // does the math to adjust minute's value due to user's input on minute
  }
  unsigned long multMin = (millis() / 60000 - remainMin) / 60; // multiplies the interval (below) to bring the minute down between the 0-60 range
  unsigned long currentMin = millis() / 60000 + setMinute - remainMin; // keeps track of the minutes - this is displayed as minutes on the LCD
  if ((currentMin >= interval) && (turnOffMin == true)) { // if the minutes value is over 60 and we're not using the user's input for minutes anymore
    currentMin = currentMin - (interval * multMin); // does the math that brings the range for the minute to 0-60
  }
  if ((currentMin >= interval) && (turnOffMin == false)) { // if the minutes value is over 60 and we're using the user's input
    currentMin = currentMin - 60;
    turnOffMin = true; // now we stop using user's input and revert back to the old method
  }
  if (currentMin < 10) { // if the minute value is a single digit number
    // readjust the numbers so that a zero is in the ten's place
    lcd.setCursor(10, 1);
    lcd.print(currentMin);
    lcd.setCursor(9, 1);
    lcd.print(0);
  }
  if (currentMin >= 10) { // if the minute value is a double digit number
    // leave it how it is
    lcd.setCursor(9, 1);
    lcd.print(currentMin);
  }

  // the following code handles the hour algorithm
  if (turnOffHour == false) { // use the following variables based on the user's changes
    setMinute1 = userSetMinute;
    setHour = userSetHour;
    remainHour = 0;
    minuteMore = 0;
  }
  if (turnOffHour == true) { // use the following variables without the user's changes
    setMinute1 = 0;
    setHour = 0;
    remainHour = 24 - userSetHour - 1; // minus 1 because the minutes took away a number
    minuteMore = 60 - userSetMinute; // helps readjust the hour value since the minute was changed by the user
  }
  byte intHour = 24; // doesn't allow the hour number go above 24
  unsigned long currentHour = (millis() / 60000 + setMinute1 - minuteMore) / 60 + setHour - remainHour; // keeps track of the hour - shows the hour value on the LCD
  unsigned long multHour = ((millis() / 60000 - remainMin) / 60 - remainHour) / 24; // multiplies the intHour to bring the hour down between the 0-24 range
  if ((currentHour >= intHour) && (turnOffHour == true)) { // if the hour value is over 24 and we're not using the user's input anymore
    currentHour = currentHour - (intHour * multHour); // does the math that brings the range for the hour to 0-24
  }
  if ((currentHour >= intHour) && (turnOffHour == false)) { // if the hour value is over 24 and we're using the user's input for hours
    currentHour = currentHour - 24;
    turnOffHour = true; // now we stop using the user's input
  }

  if (currentHour < 10) { // if it's a single digit number
    lcd.setCursor(7, 1);
    lcd.print(currentHour);
    lcd.setCursor(6, 1);
    lcd.print(0);
  }
  if (currentHour >= 10) { // if it's a double digit number
    lcd.setCursor(6, 1);
    lcd.print(currentHour);
  }

  // the following code polishes up the user interface
  // set the cursor to column 0, line 1
  // (note: line 1 is the second row, since counting begins with 0):
  lcd.setCursor(8, 1);
  lcd.print(":");
  lcd.setCursor(11, 1);
  lcd.print(":");

  // the following code handles the algorithm for the message on the top of the LCD
  if ((currentHour >= 0) && (currentHour < 12)) { // if it is morning
    if ((currentSec == 0) && (currentHour == 0)) { // clears the message from before so that no stray letters so for one second (may appear to be glitchy)
      lcd.clear();
    }
    lcd.setCursor(0, 0);
    lcd.print("Good morning!");
  }
  if ((currentHour >= 12) && (currentHour < 18)) { // if it is the afternoon
    if ((currentSec == 0) && (currentHour == 12)) { // clears the message from before so that no stray letters so for one second (may appear to be glitchy)
      lcd.clear();
    }
    lcd.setCursor(0, 0);
    lcd.print("Good afternoon!");
  }
  if ((currentHour >= 18) && (currentHour < 21)) { // if it is the evening
    if ((currentSec == 0) && (currentHour == 18)) { // clears the message from before so that no stray letters so for one second (may appear to be glitchy)
      lcd.clear();
    }
    lcd.setCursor(0, 0);
    lcd.print("Good evening!");
  }
  if ((currentHour >= 21) && (currentHour < 24)) { // if it is night time
    if ((currentSec == 0) && (currentHour == 21)) { // clears the message from before so that no stray letters so for one second (may appear to be glitchy)
      lcd.clear();
    }
    lcd.setCursor(0, 0);
    lcd.print("Good night!");
  }

  // the following code handles the algorithm for sounding the alarm for 10 seconds to wake someone up (or to remind them of something)
  if ((currentHour == alarmHour) && (currentMin == alarmMinute) && (currentSec <= 10)) { // only rings for 10 seconds
    tone(pinSound, 650);
    tone(pinSound, 1000);
  } else {
    noTone(pinSound);
  }

}
Believe me, this beast didn’t come out of nowhere. It took me 3 weeks of creating, testing, and problem-solving to make sure my alarm clock worked to its fullest potential with minimal errors.
If you want to build your own Arduino alarm clock, check out my in-depth project guide that shows the exact hardware and code you’ll need to make one yourself.
5. Create/Build
Now with all the planning and modeling completed, we actually need to put our plan into action. Go through your list and acquire what you need. Assemble the components and make sure all the wiring is correct.
You should also go to your Arduino IDE and start spitballing ideas on how you can turn the individual comments you made into actual code that the Arduino can comprehend. Don’t worry if it’s not perfect. You can fix it up later in the test and polish phases.
Right now, your overall goal is to try to make something work.
6. Test
Now that you have actually built your hardware and created some code, you are bound to come across errors, whether they are bugs in your code or wiring problems on your breadboard.
First, you have to determine whether you’re having hardware issues or software issues. Personally, I find that if I programmed my board to do something physical (such as spinning a motor or lighting up an LED) and it’s not doing anything, I would think there is a hardware problem. Consequently, I would check the circuit and wiring first.
If you can’t find the hardware issue, then that means you have bugs in your code. From my experience, I would go through my code with a fine-tooth comb and test 3 to 4 lines at a time. I would also use the serial monitor to help me understand why the Arduino is not doing what I programmed it to do.
If you’re really stuck, I’d recommend you post your problem on the Arduino forum. I’ve used it before (but not for my clock project), and the comments were very helpful.
When I was creating my clock algorithm, I realized too late that my math for calculating and synchronizing the second, minute, and hour values was incorrect. This took me an additional week to fix.
I know this now, but when I was trying to fix my code, I didn’t take into account that the hours would be affected by the minute and the minutes would be affected by the seconds. You can see me troubleshooting in the next picture:
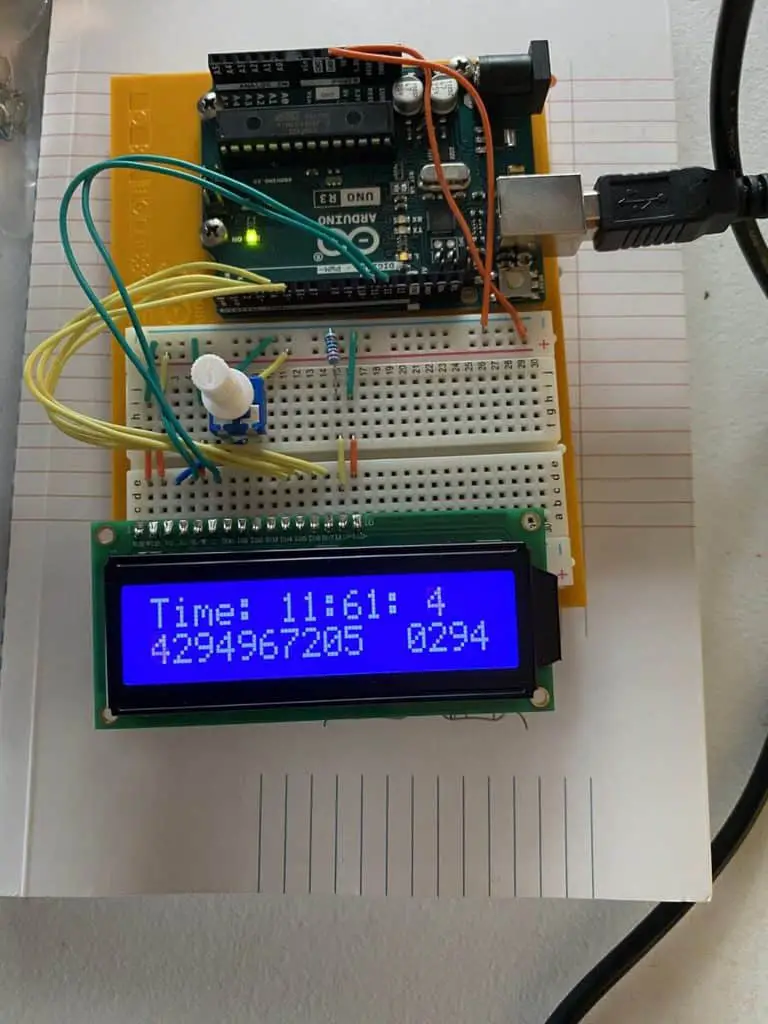
The large number on the bottom left of the LCD is the mult variable value. I was going through each line of my code meticulously when I stumbled onto this wacky value. As soon as I saw it, I need I needed to fix it.
7. Fix
This step may seem obvious, but it’s crucial for you to resolve the issues you’ve found in your code, hardware, or both.
If your hardware is having issues, make sure your circuit is complete and that you didn’t miswire anything. To prevent miswiring, make sure to use color-coded jumper wires. Typically, you would use red wires for positive (power) and black wires for negative (ground). Also, you need to check to see if your diodes are facing the right direction (like LEDs).
If you are having issues with your code, then you should use the serial monitor. I’ve written a great guide on how you can use the serial monitor to debug your code. You can check it out here.
One thing I want to emphasize for this stage is to not blow off fixing your code. Even if you solved it partway, you need to make sure there aren’t any more errors that result from this issue.
From my experience, I’ve ignored the advice above 2 or 3 times. In this project, I’ve partially solved some of my code and didn’t bother to finish solving it. Later, my negligence would bite me in the butt since the unresolved issue would cause further problems down the road.
Lastly, you’ll find yourself repeating steps 6 and 7. You’ll be constantly testing your prototype, finding new errors, fixing it, testing it again, finding more problems, etc. This may seem boring and tiring, but it is worth it in the end.
8. Polish
The final step of this entire process is polishing up your code and design.
For example, one thing you might want to polish is adding comments to all your code. If you’re like me, you don’t leave comments when you’re programming.
For me, I get too caught up in the heat of the moment and solely focus on creating code rather than reviewing my code and leaving comments. I find it better to leave comments after everything works because I don’t want to write comments for ineffective code. I feel like it’s a waste of my time if I do.
Regardless of when you start writing comments for your code, you just need to make sure you write comments. They’re very important because they can help others easily understand what you’re doing. Moreover, your future self might forget what you did and get frustrated at you if you didn’t explain your code.
You can also add cool features on the hardware side that adds to the overall user experience. For example, I installed two pushbuttons that can change the hour and minute value. They were not in my initial design, but near the end, I realized this would be more convenient than hooking up the board to a computer to change the values.
9. CELEBRATE!
This isn’t a step you need to follow, but it’s something you should do. When you go through a process like this and you fail repeatedly and make it out to the end, you need to recognize your accomplishment. Be proud of your efforts and show your project to everyone you know.
For me, I showed my clock project to my brother and sister, my parents, and my friends. They enjoyed my alarm clock, but one of my friends wondered why I didn’t go to Walmart, buy a clock there, and save 3 weeks. Truthfully, I wanted to go through the journey and understand the prototyping process.
Summary – tl;dr (Too Long; Didn’t Read)
I understand there’s a lot of information in this article to digest, so here are the key takeaways:
- Sketch out your prototype design: It doesn’t have to look good; your only goal is to lay down your ideas.
- Make a list: Create a list of all the components you need. Focus on the basic functionalities first before adding new features to it.
- Create the build online: Use an Arduino simulator to quickly locate the initial problems and visualize the design.
- Write pseudocode: To get started on your code, write down what you want your project to do.
- Build a physical prototype: It doesn’t have to be perfect, but you want to introduce your idea to the real world.
- Test your code and hardware: Everyone makes mistakes; you just need to test your prototype and locate them.
- Fix your code and hardware: Now that you know the sources of your errors, you’ll need to fix them!
- Polish up your code and hardware: Add comments or new cool features to improve on your initial design!
- Celebrate your success: You’ve worked hard and your prototype works! Share it with everyone and be proud of yourself!
Now that you have accumulated all this knowledge, it’s time for you to create your own prototype!