Project in Python – Breast Cancer Classification with Deep Learning
Free Machine Learning courses with 130+ real-time projects Start Now!!
If you want to master Python programming language then you can’t skip projects in Python. After publishing 4 advanced python projects, DataFlair today came with another one that is the Breast Cancer Classification project in Python. To crack your next Python Interview, practice these projects thoroughly and if you face any confusion, do comment, DataFlair is always ready to help you.
Before we begin this Breast Cancer Classification Project in Python, let me provide you the list of advanced python projects published by DataFlair:
- Fake News Detection Python Project
- Parkinson’s Disease Detection Python Project
- Color Detection Python Project
- Speech Emotion Recognition Python Project
- Breast Cancer Classification Python Project
- Age and Gender Detection Python Project
- Handwritten Digit Recognition Python Project
- Chatbot Python Project
- Driver Drowsiness Detection Python Project
- Traffic Signs Recognition Python Project
- Image Caption Generator Python Project
Breast Cancer Classification Project in Python
Get aware with the terms used in Breast Cancer Classification project in Python
What is Deep Learning?
An intensive approach to Machine Learning, Deep Learning is inspired by the workings of the human brain and its biological neural networks. Architectures as deep neural networks, recurrent neural networks, convolutional neural networks, and deep belief networks are made of multiple layers for the data to pass through before finally producing the output. Deep Learning serves to improve AI and make many of its applications possible; it is applied to many such fields of computer vision, speech recognition, natural language processing, audio recognition, and drug design.
What is Keras?
Keras is an open-source neural-network library written in Python. It is a high-level API and can run on top of TensorFlow, CNTK, and Theano. Keras is all about enabling fast experimentation and prototyping while running seamlessly on CPU and GPU. It is user-friendly, modular, and extensible.
Breast Cancer Classification – Objective
To build a breast cancer classifier on an IDC dataset that can accurately classify a histology image as benign or malignant.
Breast Cancer Classification – About the Python Project
In this project in python, we’ll build a classifier to train on 80% of a breast cancer histology image dataset. Of this, we’ll keep 10% of the data for validation. Using Keras, we’ll define a CNN (Convolutional Neural Network), call it CancerNet, and train it on our images. We’ll then derive a confusion matrix to analyze the performance of the model.
IDC is Invasive Ductal Carcinoma; cancer that develops in a milk duct and invades the fibrous or fatty breast tissue outside the duct; it is the most common form of breast cancer forming 80% of all breast cancer diagnoses. And histology is the study of the microscopic structure of tissues.
The Dataset
We’ll use the IDC_regular dataset (the breast cancer histology image dataset) from Kaggle. This dataset holds 2,77,524 patches of size 50×50 extracted from 162 whole mount slide images of breast cancer specimens scanned at 40x. Of these, 1,98,738 test negative and 78,786 test positive with IDC. The dataset is available in public domain and you can download it here. You’ll need a minimum of 3.02GB of disk space for this.
Filenames in this dataset look like this:
8863_idx5_x451_y1451_class0
Here, 8863_idx5 is the patient ID, 451 and 1451 are the x- and y- coordinates of the crop, and 0 is the class label (0 denotes absence of IDC).
Prerequisites
You’ll need to install some python packages to be able to run this advanced python project. You can do this with pip-
pip install numpy opencv-python pillow tensorflow keras imutils scikit-learn matplotlib
Steps for Advanced Project in Python – Breast Cancer Classification
1. Download this zip. Unzip it at your preferred location, get there.
Screenshot:

2. Now, inside the inner breast-cancer-classification directory, create directory datasets- inside this, create directory original:
mkdir datasets
mkdir datasets\original
3. Download the dataset.
4. Unzip the dataset in the original directory. To observe the structure of this directory, we’ll use the tree command:
cd breast-cancer-classification\breast-cancer-classification\datasets\original
tree
Output Screenshot:
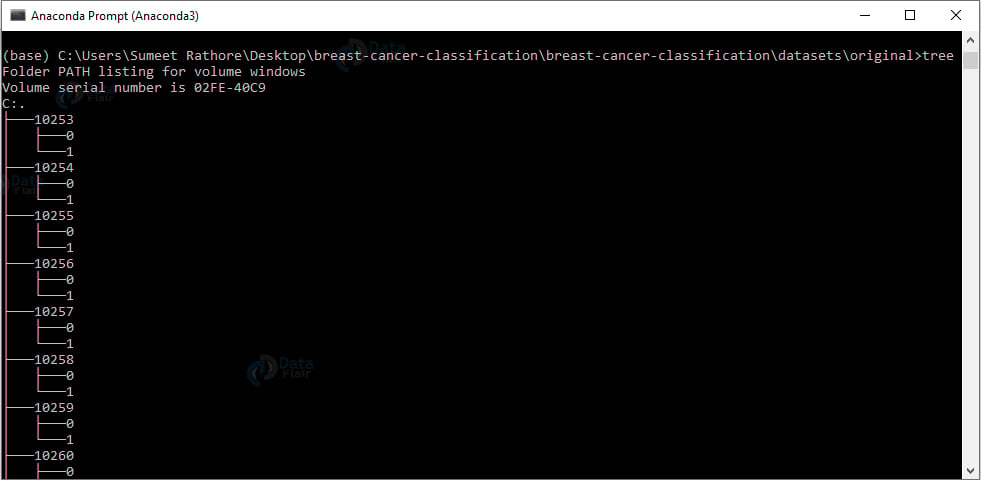
We have a directory for each patient ID. And in each such directory, we have the 0 and 1 directories for images with benign and malignant content.
config.py:
This holds some configuration we’ll need for building the dataset and training the model. You’ll find this in the cancernet directory.
import os

INPUT_DATASET = "datasets/original"

BASE_PATH = "datasets/idc"
TRAIN_PATH = os.path.sep.join([BASE_PATH, "training"])
VAL_PATH = os.path.sep.join([BASE_PATH, "validation"])
TEST_PATH = os.path.sep.join([BASE_PATH, "testing"])

TRAIN_SPLIT = 0.8
VAL_SPLIT = 0.1
Screenshot:
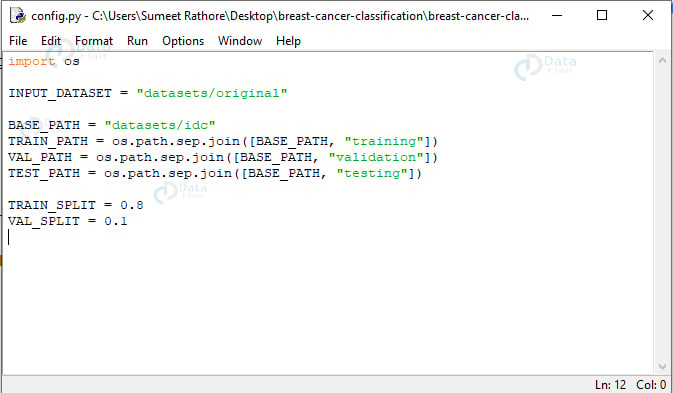
Here, we declare the path to the input dataset (datasets/original), that for the new directory (datasets/idc), and the paths for the training, validation, and testing directories using the base path. We also declare that 80% of the entire dataset will be used for training, and of that, 10% will be used for validation.
build_dataset.py:
This will split our dataset into training, validation, and testing sets in the ratio mentioned above- 80% for training (of that, 10% for validation) and 20% for testing. With the ImageDataGenerator from Keras, we will extract batches of images to avoid making space for the entire dataset in memory at once.
from cancernet import config
from imutils import paths
import random, shutil, os

originalPaths=list(paths.list_images(config.INPUT_DATASET))
random.seed(7)
random.shuffle(originalPaths)

index=int(len(originalPaths)*config.TRAIN_SPLIT)
trainPaths=originalPaths[:index]
testPaths=originalPaths[index:]

index=int(len(trainPaths)*config.VAL_SPLIT)
valPaths=trainPaths[:index]
trainPaths=trainPaths[index:]

datasets=[("training", trainPaths, config.TRAIN_PATH),
          ("validation", valPaths, config.VAL_PATH),
          ("testing", testPaths, config.TEST_PATH)
]

for (setType, originalPaths, basePath) in datasets:
        print(f'Building {setType} set')

        if not os.path.exists(basePath):
                print(f'Building directory {base_path}')
                os.makedirs(basePath)

        for path in originalPaths:
                file=path.split(os.path.sep)[-1]
                label=file[-5:-4]

                labelPath=os.path.sep.join([basePath,label])
                if not os.path.exists(labelPath):
                        print(f'Building directory {labelPath}')
                        os.makedirs(labelPath)

                newPath=os.path.sep.join([labelPath, file])
                shutil.copy2(inputPath, newPath)
Screenshot:
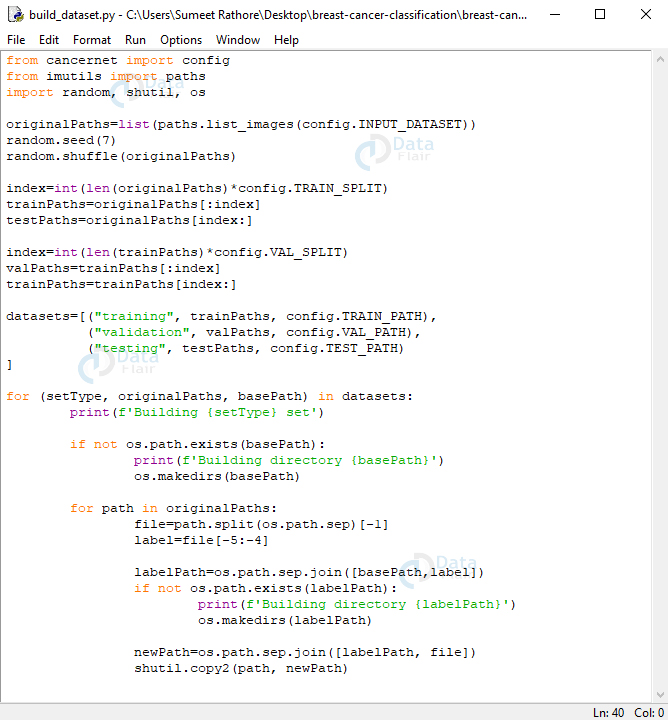
In this, we’ll import from config, imutils, random, shutil, and os. We’ll build a list of original paths to the images, then shuffle the list. Then, we calculate an index by multiplying the length of this list by 0.8 so we can slice this list to get sublists for the training and testing datasets. Next, we further calculate an index saving 10% of the list for the training dataset for validation and keeping the rest for training itself.
Now, datasets is a list with tuples for information about the training, validation, and testing sets. These hold the paths and the base path for each. For each setType, path, and base path in this list, we’ll print, say, ‘Building testing set’. If the base path does not exist, we’ll create the directory. And for each path in originalPaths, we’ll extract the filename and the class label. We’ll build the path to the label directory(0 or 1)- if it doesn’t exist yet, we’ll explicitly create this directory. Now, we’ll build the path to the resulting image and copy the image here- where it belongs.
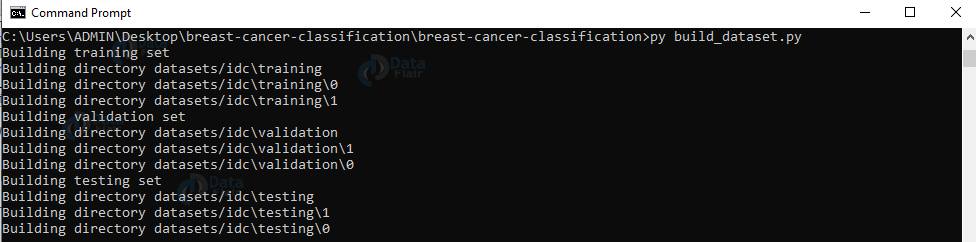
5. Run the script build_dataset.py:
py build_dataset.py
Output Screenshot:
cancernet.py:
The network we’ll build will be a CNN (Convolutional Neural Network) and call it CancerNet. This network performs the following operations:
- Use 3×3 CONV filters
- Stack these filters on top of each other
- Perform max-pooling
- Use depthwise separable convolution (more efficient, takes up less memory)
from keras.models import Sequential
from keras.layers.normalization import BatchNormalization
from keras.layers.convolutional import SeparableConv2D
from keras.layers.convolutional import MaxPooling2D
from keras.layers.core import Activation
from keras.layers.core import Flatten
from keras.layers.core import Dropout
from keras.layers.core import Dense
from keras import backend as K

class CancerNet:
  @staticmethod
  def build(width,height,depth,classes):
    model=Sequential()
    shape=(height,width,depth)
    channelDim=-1

    if K.image_data_format()=="channels_first":
      shape=(depth,height,width)
      channelDim=1

    model.add(SeparableConv2D(32, (3,3), padding="same",input_shape=shape))
    model.add(Activation("relu"))
    model.add(BatchNormalization(axis=channelDim))
    model.add(MaxPooling2D(pool_size=(2,2)))
    model.add(Dropout(0.25))

    model.add(SeparableConv2D(64, (3,3), padding="same"))
    model.add(Activation("relu"))
    model.add(BatchNormalization(axis=channelDim))
    model.add(SeparableConv2D(64, (3,3), padding="same"))
    model.add(Activation("relu"))
    model.add(BatchNormalization(axis=channelDim))
    model.add(MaxPooling2D(pool_size=(2,2)))
    model.add(Dropout(0.25))

    model.add(SeparableConv2D(128, (3,3), padding="same"))
    model.add(Activation("relu"))
    model.add(BatchNormalization(axis=channelDim))
    model.add(SeparableConv2D(128, (3,3), padding="same"))
    model.add(Activation("relu"))
    model.add(BatchNormalization(axis=channelDim))
    model.add(SeparableConv2D(128, (3,3), padding="same"))
    model.add(Activation("relu"))
    model.add(BatchNormalization(axis=channelDim))
    model.add(MaxPooling2D(pool_size=(2,2)))
    model.add(Dropout(0.25))

    model.add(Flatten())
    model.add(Dense(256))
    model.add(Activation("relu"))
    model.add(BatchNormalization())
    model.add(Dropout(0.5))

    model.add(Dense(classes))
    model.add(Activation("softmax"))

    return model
Screenshot:

Screenshot:
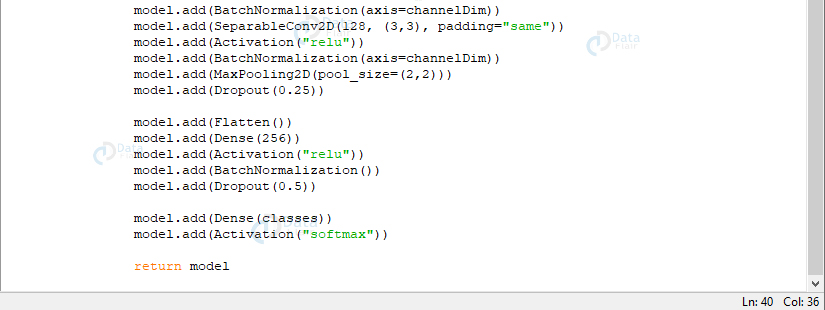
We use the Sequential API to build CancerNet and SeparableConv2D to implement depthwise convolutions. The class CancerNet has a static method build that takes four parameters- width and height of the image, its depth (the number of color channels in each image), and the number of classes the network will predict between, which, for us, is 2 (0 and 1).
In this method, we initialize model and shape. When using channels_first, we update the shape and the channel dimension.
Now, we’ll define three DEPTHWISE_CONV => RELU => POOL layers; each with a higher stacking and a greater number of filters. The softmax classifier outputs prediction percentages for each class. In the end, we return the model.
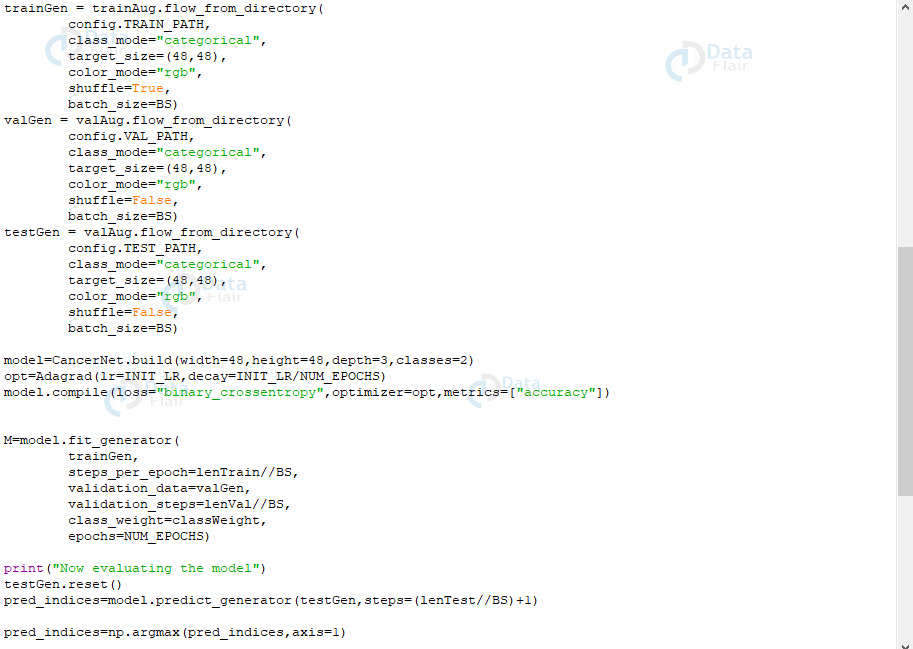
train_model.py:
This trains and evaluates our model. Here, we’ll import from keras, sklearn, cancernet, config, imutils, matplotlib, numpy, and os.
import matplotlib
matplotlib.use("Agg")
from keras.preprocessing.image import ImageDataGenerator
from keras.callbacks import LearningRateScheduler
from keras.optimizers import Adagrad
from keras.utils import np_utils
from sklearn.metrics import classification_report
from sklearn.metrics import confusion_matrix
from cancernet.cancernet import CancerNet
from cancernet import config
from imutils import paths
import matplotlib.pyplot as plt
import numpy as np
import os
NUM_EPOCHS=40; INIT_LR=1e-2; BS=32
trainPaths=list(paths.list_images(config.TRAIN_PATH))
lenTrain=len(trainPaths)
lenVal=len(list(paths.list_images(config.VAL_PATH)))
lenTest=len(list(paths.list_images(config.TEST_PATH)))
trainLabels=[int(p.split(os.path.sep)[-2]) for p in trainPaths]
trainLabels=np_utils.to_categorical(trainLabels)
classTotals=trainLabels.sum(axis=0)
classWeight=classTotals.max()/classTotals
trainAug = ImageDataGenerator(
rescale=1/255.0,
rotation_range=20,
zoom_range=0.05,
width_shift_range=0.1,
height_shift_range=0.1,
shear_range=0.05,
horizontal_flip=True,
vertical_flip=True,
fill_mode="nearest")
valAug=ImageDataGenerator(rescale=1 / 255.0)
trainGen = trainAug.flow_from_directory(
config.TRAIN_PATH,
class_mode="categorical",
target_size=(48,48),
color_mode="rgb",
shuffle=True,
batch_size=BS)
valGen = valAug.flow_from_directory(
config.VAL_PATH,
class_mode="categorical",
target_size=(48,48),
color_mode="rgb",
shuffle=False,
batch_size=BS)
testGen = valAug.flow_from_directory(
config.TEST_PATH,
class_mode="categorical",
target_size=(48,48),
color_mode="rgb",
shuffle=False,
batch_size=BS)
model=CancerNet.build(width=48,height=48,depth=3,classes=2)
opt=Adagrad(lr=INIT_LR,decay=INIT_LR/NUM_EPOCHS)
model.compile(loss="binary_crossentropy",optimizer=opt,metrics=["accuracy"])
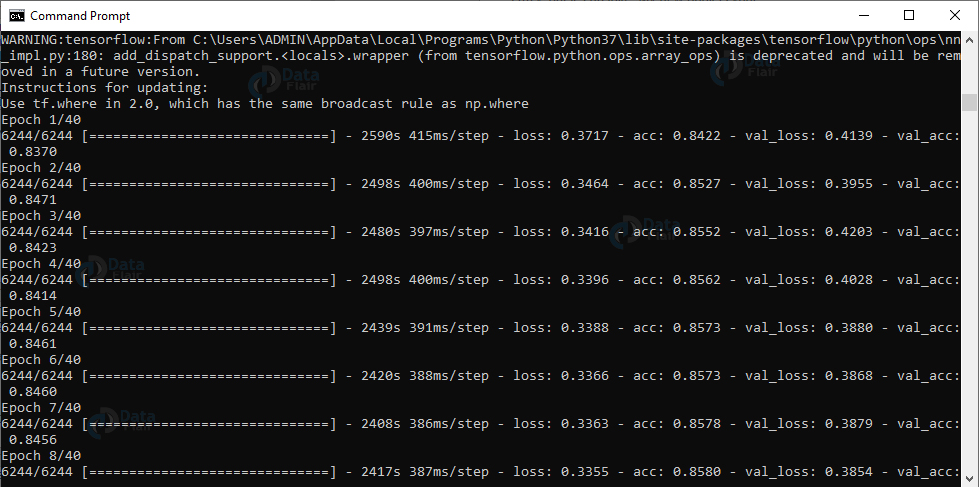
M=model.fit_generator(
trainGen,
steps_per_epoch=lenTrain//BS,
validation_data=valGen,
validation_steps=lenVal//BS,
class_weight=classWeight,
epochs=NUM_EPOCHS)
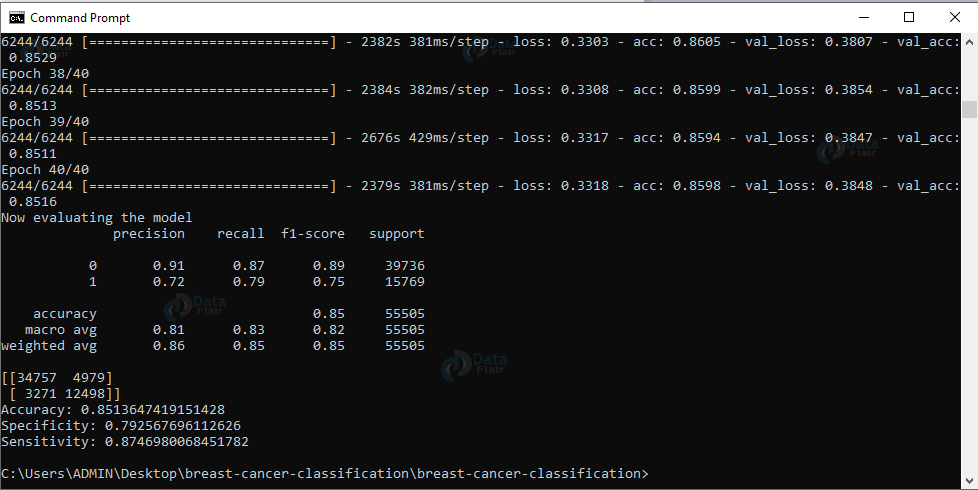
print("Now evaluating the model")
testGen.reset()
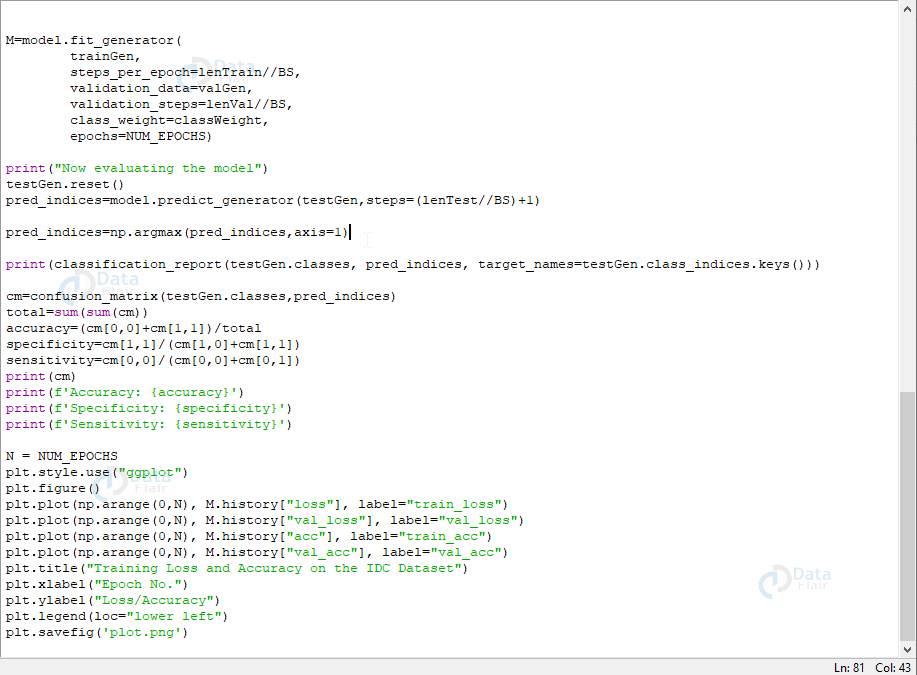
pred_indices=model.predict_generator(testGen,steps=(lenTest//BS)+1)
pred_indices=np.argmax(pred_indices,axis=1)
print(classification_report(testGen.classes, pred_indices, target_names=testGen.class_indices.keys()))
cm=confusion_matrix(testGen.classes,pred_indices)
total=sum(sum(cm))
accuracy=(cm[0,0]+cm[1,1])/total
specificity=cm[1,1]/(cm[1,0]+cm[1,1])
sensitivity=cm[0,0]/(cm[0,0]+cm[0,1])
print(cm)
print(f'Accuracy: {accuracy}')
print(f'Specificity: {specificity}')
print(f'Sensitivity: {sensitivity}')
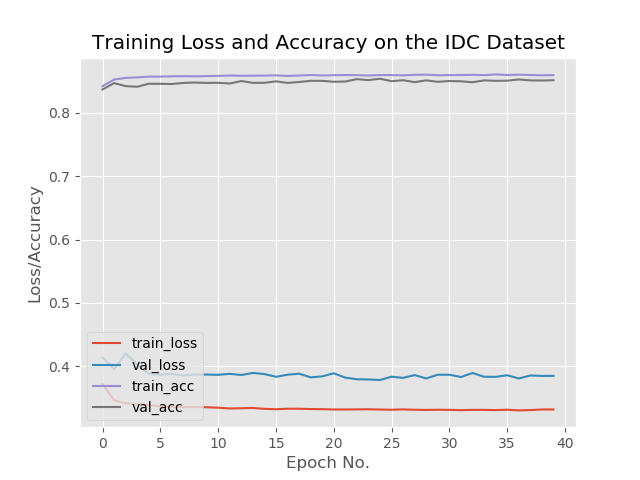
N = NUM_EPOCHS
plt.style.use("ggplot")
plt.figure()
plt.plot(np.arange(0,N), M.history["loss"], label="train_loss")
plt.plot(np.arange(0,N), M.history["val_loss"], label="val_loss")
plt.plot(np.arange(0,N), M.history["acc"], label="train_acc")
plt.plot(np.arange(0,N), M.history["val_acc"], label="val_acc")
plt.title("Training Loss and Accuracy on the IDC Dataset")
plt.xlabel("Epoch No.")
plt.ylabel("Loss/Accuracy")
plt.legend(loc="lower left")
plt.savefig('plot.png')Screenshot:

Screenshot:
Screenshot:
In this script, first, we set initial values for the number of epochs, the learning rate, and the batch size. We’ll get the number of paths in the three directories for training, validation, and testing. Then, we’ll get the class weight for the training data so we can deal with the imbalance.
Now, we initialize the training data augmentation object. This is a process of regularization that helps generalize the model. This is where we slightly modify the training examples to avoid the need for more training data. We’ll initialize the validation and testing data augmentation objects.
We’ll initialize the training, validation, and testing generators so they can generate batches of images of size batch_size. Then, we’ll initialize the model using the Adagrad optimizer and compile it with a binary_crossentropy loss function. Now, to fit the model, we make a call to fit_generator().
We have successfully trained our model. Now, let’s evaluate the model on our testing data. We’ll reset the generator and make predictions on the data. Then, for images from the testing set, we get the indices of the labels with the corresponding largest predicted probability. And we’ll display a classification report.
Now, we’ll compute the confusion matrix and get the raw accuracy, specificity, and sensitivity, and display all values. Finally, we’ll plot the training loss and accuracy.
Output Screenshot:
Output Screenshot:
Output:
Summary
In this project in python, we learned to build a breast cancer classifier on the IDC dataset (with histology images for Invasive Ductal Carcinoma) and created the network CancerNet for the same. We used Keras to implement the same. Hope you enjoyed this Python project.
Want to become a Data Scientist?
Start learning Python in detail with DataFlair Python Online Training and achieve success.
Did you like our efforts? If Yes, please give DataFlair 5 Stars on Google


hello!
I’m getting following error. can you help me to resolve this.
Traceback (most recent call last):
File “c:\Users\Neha Rani\Desktop\breast-cancer-classification\train_model.py”, line 24, in
trainLabels=np_utils.to_categorical(trainLabels)
File “C:\Users\Neha Rani\AppData\Local\Programs\Python\Python310\lib\site-packages\keras\utils\np_utils.py”, line 68, in to_categorical
num_classes = np.max(y) + 1
File “”, line 180, in amax
File “C:\Users\Neha Rani\AppData\Local\Programs\Python\Python310\lib\site-packages\numpy\core\fromnumeric.py”, line 2791, in amax
return _wrapreduction(a, np.maximum, ‘max’, axis, None, out,
File “C:\Users\Neha Rani\AppData\Local\Programs\Python\Python310\lib\site-packages\numpy\core\fromnumeric.py”, line 86, in _wrapreduction
return ufunc.reduce(obj, axis, dtype, out, **passkwargs)
ValueError: zero-size array to reduction operation maximum which has no identity
Hi I am getting same error
could you please help me
Hi there, the link is not working, I cannot download the images, could you please check and reply. thanks
hello guys. i have this issue saying:
Traceback (most recent call last):
File “C:\Users\Jonathan\Documents\breast-cancer-classification\train_model.py”, line 69, in
M=model.fit_generator(
File “C:\Python310\lib\site-packages\keras\engine\training.py”, line 2260, in fit_generator
return self.fit(
File “C:\Python310\lib\site-packages\keras\utils\traceback_utils.py”, line 67, in error_handler
raise e.with_traceback(filtered_tb) from None
File “C:\Python310\lib\site-packages\keras\engine\data_adapter.py”, line 1179, in _configure_dataset_and_inferred_steps
if class_weight:
ValueError: The truth value of an array with more than one element is ambiguous. Use a.any() or a.all()
C:\Users\Jonathan\Documents\breast-cancer-classification>pip install tf-nightly
Hey . In this program does it classify like a particular patient id in idc dataset has breast cancer as malignan or benign ? .
Hello.
When I run the fit function in the train_model.py:
#M = model.fit_generator(
M = model.fit(
trainGen,
steps_per_epoch=lenTrain//BS,
validation_data=valGen,
validation_steps=lenVal//BS,
class_weight=classWeight,
epochs=NUM_EPOCHS)
The following error arise:
ValueError: The truth value of an array with more than one element is ambiguous. Use a.any() or a.all()
Could you help me please.
Thanks in advance.
where we have to type
Please Teach about VR, AR, And Mixed reality and Bring some Projects.
hi, I am getting ValueError: zero-size array to reduction operation maximum which has no identity this error. How to resolve this. please do reply.