

Introduction: Machine Learning Based Gesture Detection Watch (ESP8266)


The world is certainly getting better everyday at technology based on gestures because it’s very intuitive, easy to use and clearly makes the interaction with gadgets and things around you futuristic and fancy! So, just to be on the trend we’ll be taking the watch we built in the previous instructable and plunge in some ML and see if we can detect what kind of gesture we are performing, and maybe in upcoming instructable we can use this gesture to perform some very cool projects based on this.
Supplies
These are the list of products which can help you do this project with ease
(Affiliate Link)
- Esp12E: https://amzn.to/3h3b37s
- OLED display: https://amzn.to/2VcEATc
- MPU6050: https://amzn.to/2J8E06T
- Haptic motor(exact one): https://amzn.to/2J8E06T
- Haptic motor(alternative): https://amzn.to/2J8E06T
- 3.3V regulator: https://amzn.to/2J8E06T
- 105mah battery: https://amzn.to/2J8E06T
- Velcro: https://amzn.to/2J8E06T
- HeaderPins: https://amzn.to/2J8E06T
- Angled Header Pins: https://amzn.to/2J8E06T
- Wires: https://amzn.to/2J8E06T
- FTDI: https://amzn.to/2J8E06T
- Male USB: https://amzn.to/2J8E06T
- PCB: https://amzn.to/2J8E06T
- Soldering Gun: https://amzn.to/2J8E06T
- Soldering Lead: https://amzn.to/2J8E06T
- Foam sheets: https://amzn.to/2J8E06T
Step 1: Story Time!

I posted a post on my instagram page telling all the new features I will be implementing on this version of the watch but, I dropped "micro USB port for charging" , "hold to turn on or turn off the circuit" and "heart rate monitoring". Because of the quite a mess I made but you know I'm extremely kind hearted and I feel extremely bad to disappoint my readers by not implementing the new hardware features. So, I had to step up my game on the software part.
So I thought about adding some ML to the project, it should be easy compared to electronics, it’s just a bunch of codes that we have to copy paste from stack overflow. At Least that’s what I thought. So, I just jumped heads first on implementing a ML based gesture detection. Oh boy I was so wrong...
It was just ughh, I hated it. Not because it was complicated, it was just so frustrating collecting the data and training the model. It was like teaching a little puppy how not to poop on the bed.
If you like to learn more about implementing ML on embedded system, check out this 2 links TinyML and Gesture detection . One explains how to use TinyML tensor flow with Arduino and another by using basic ML algorithms on Arduino. I referred a lot from the latter link because it's very simple to follow as well as it works with very low memory resource microcontrollers like Arduino NANO and UNO.
Step 2: PCB Assembly


Assembly. This time the assembly must be very simple and quick because of the printed circuit boards and for this I thank PCBWay for sponsoring this gorgeous black PCB’s for this project.
I gathered all the SMD components for the project, then arranged them in a place where I can easily access without messing around. Then the rest was just soldering!
Just follow the circuit diagram and solder the components accordingly in the PCB. To make the soldering easier work your way up from soldering smaller SMD components [Resistor, Capacitor, regulator] to bigger through hole components [MPU6050, OLED]. During the soldering I also secured the Lipo battery between the board and the OLED display using 3M tape.
It is difficult for me to find the right regulator to use for projects, so in my past videos I just use AMS1117 because it’s much cheaper and easy to find. But in order to make this project much more efficient than the previous builds. I have given 2 options in the PCB, you can either use MCP1700 or LSD3985. In my case I'm using the LSD3985 and ignoring the MCP1700. You can use any of the option depending on the availability.
If you need the exact pcb design check out this instructable.
Step 3: Need to Develop This Project Into a PCB?

Getting a electronics project into production would be nightmare. To ease you into the production world we have developed a platform (PCB CUPID) for PCB enthusiasts and hobbyists to ask and answer questions related to PCB design, fabrication, and assembly.
In addition to the Q&A feature, this website also has a wealth of blog posts and useful resources to help you learn about developing and manufacturing printed circuit boards. Whether you're a beginner looking for a crash course on PCB basics, or an experienced designer looking for tips and tricks, you'll find something of value on the site
So head on over and check it out, and don't forget to participate in the Q&A community to get help and share your own knowledge. Thanks!
Step 4: Programming the Watch


To make the programming simple, I have given up some space on the PCB so you can just plug in the FTDI module to start programming. To program the board you have to first put esp8266 into flashing mode, so just hold the button which is connected to GPIO-0 of the esp12E when connecting to the PC.
To test if the board is working just upload the code from my previous instructable [Github link] and test if all the features like, NTP time, flick to wake up, and changing the screen works. If everything works fine, your done with the hardware part.
Step 5: Machine Learning? [Part-1]
![Machine Learning? [Part-1]](https://content.instructables.com/FP5/145G/KKE0G8IE/FP5145GKKE0G8IE.png?auto=webp&fit=bounds&frame=1&height=1024&width=1024auto=webp&frame=1&height=300)
![Machine Learning? [Part-1]](https://content.instructables.com/FUU/FLBK/KKE0G8IF/FUUFLBKKKE0G8IF.png?auto=webp&fit=bounds&frame=1&height=1024&width=1024auto=webp&frame=1&height=300)
Machine learning sounds fancy and complicated but trust me few algorithm’s in ML are more intuitive to understand than few other non ML based algorithms. Check out this link if you want to learn more about it.
For most algorithms, When it needs to find an answer to a question we need to tell the algorithm the sequence of processes that it has to perform to get the end result. Simple example would be multiplication.
If you want to find the answer to a multiplication problem, let’s say 2 times 5 we can just tell the computer to perform multiple additions to get the answer. You can see here, we are telling the computer what to do to get the answer.
Step 6: Machine Learning? [Part-2]
![Machine Learning? [Part-2]](https://content.instructables.com/FBB/SHA4/KKE0G8IG/FBBSHA4KKE0G8IG.png?auto=webp&fit=bounds&frame=1&height=1024&width=1024auto=webp&frame=1&height=300)
![Machine Learning? [Part-2]](https://content.instructables.com/FLZ/Q0ZE/KKE0G8IJ/FLZQ0ZEKKE0G8IJ.png?auto=webp&fit=bounds&frame=1&height=1024&width=1024auto=webp&frame=1&height=300)
ML works little different, we just give the computer a bunch of questions and corresponding answers and ask the computer to figure out the way or the process, so that it can answer any new question without us programming the process manually.
Take an example of finding an apple in a photograph, it’s super easy for a human to do, but it’s pretty hard for us to code and make the computer understand all the features that an apple has, it’s not impossible but it’s super tedious and hard. Instead if we can write an algorithm which can learn by itself just looking at 1000’s of pictures of apples and learn by itself, wouldn't that be great?. There is also another upside of using ML algorithm, that is they may even come up with a new way of finding apples in a photograph that we didn’t even think of. So, ML is pretty interesting field to explore.
Note! I’m not really the best person to explain machine learning and artificial intelligence, I’m just writing what I have learned. But if you're reading this for this long you should check out my YouTube channel and if you haven’t subscribed to the channel probably you should subscribe right now! Trust me it’s definitely worth it! At Least for me :’)
Step 7: Classification


There are so many ways and techniques in machine learning to solve a problem and in our case to make gesture detection I will be using one of the techniques called Classification.
Why classification?
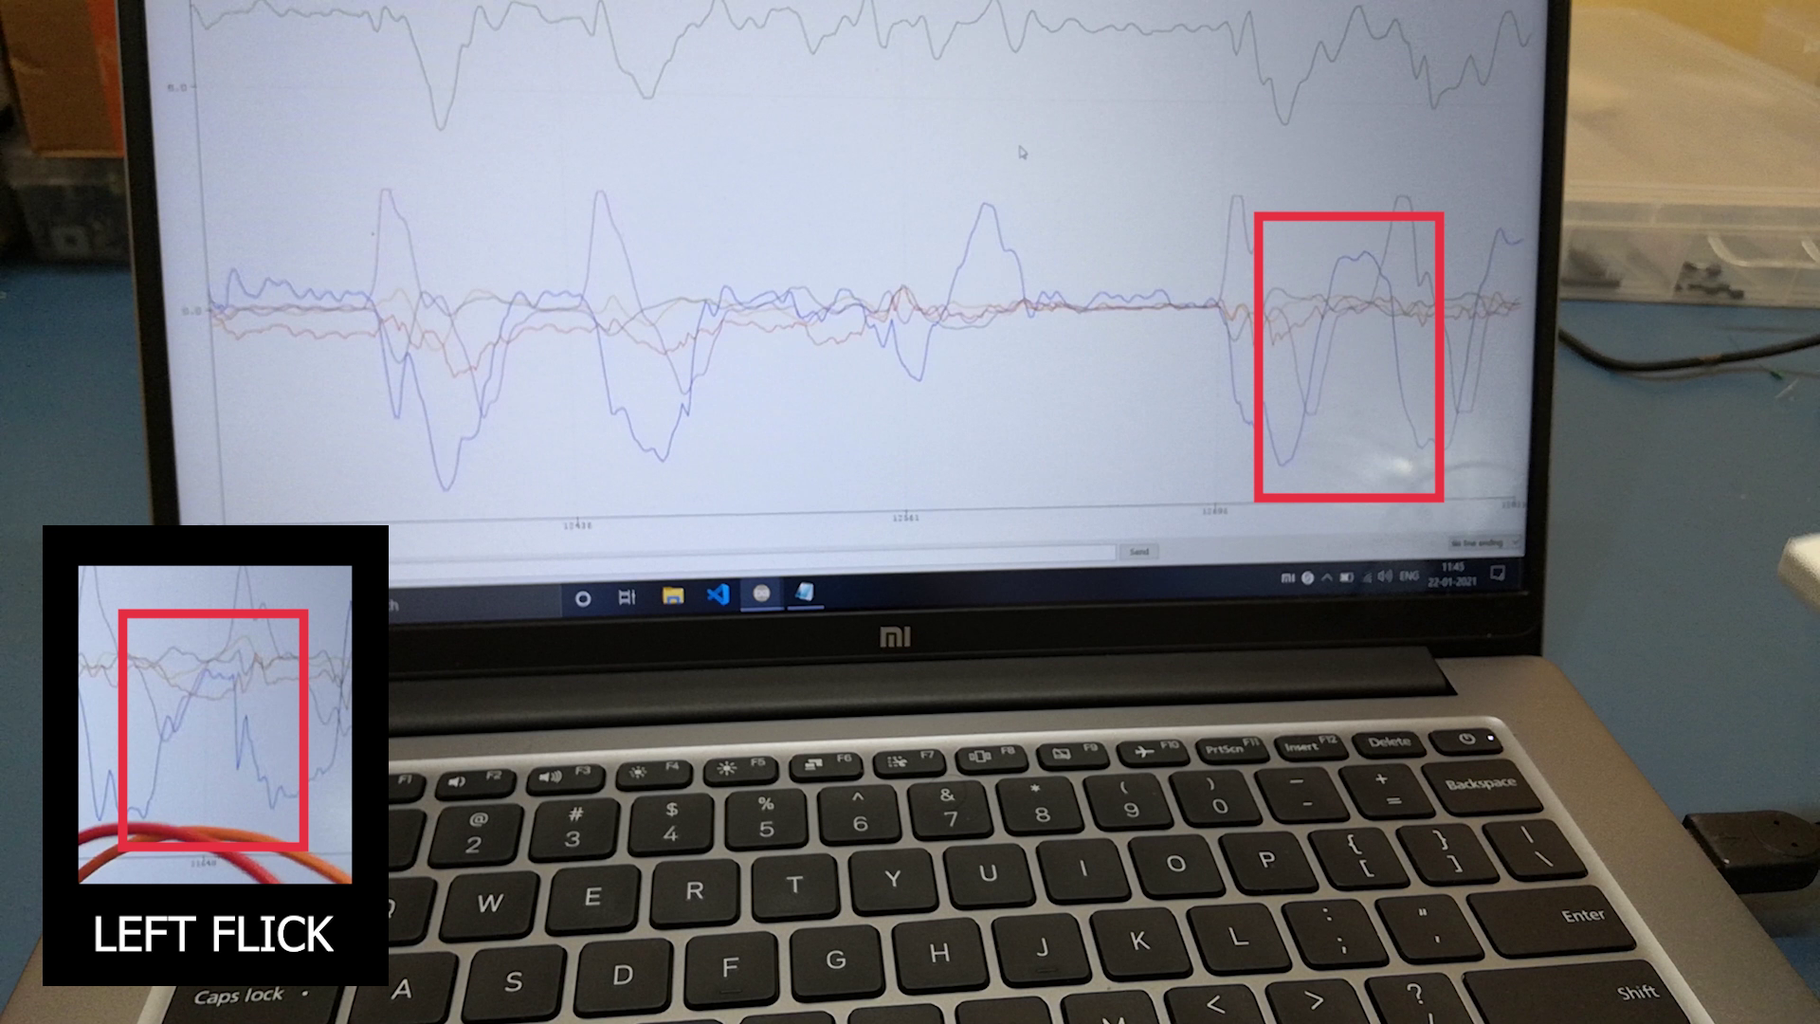
See the picture above to see the accelerometer and gyroscope data in the serial plotter. The data seems predictable by human eyes after the motion is repeated for quite a while. Now if I do the same motion off the screen you can still guess what motion it is by just looking at the graph and the best part is you can even do this for the other gestures and motion. That's because our brain assigns different names to different patterns.
Similarly if we can show this data pattern to the ML algorithm multiple times, then it tries to understand these data and puts them in different groups or to be fancy you can say the algorithm classifies the data sample into different classes. So, next time when it sees a similar pattern in the data, it will figure out what kind of motion or gesture it is. This is the reason why we need to do classification.
I chose random forest algorithm for this classification problem.
Step 8: Collecting Sensor Data for Training


Since we now have basic idea about ML we can first start with collecting the data which we'll be using to train our ML algorithm. The tutorial I was following had a very clumsy way of collecting the data, through the serial monitor, it would be very hard for me to do the same because I had to wear the device on my wrist during the gesture. To solve this problem I made the data collection wireless. I used the on chip flash memory of esp8266 and for more convenience I displayed the status of collection and saving the data in the OLED display. If you want to do the same compile and upload the Data_collection.ino file to your watch.
Once you have uploaded the code, to test it keep your hand still as soon as the device starts, it calibrate the accelerometer and the gyroscope initially. Once that’s done you can start collecting the data! Just press the button which is connected GPIO-0 and the device would create a new feature, then just start moving your hands to record the motion. The effort to make the data collection wireless was definitely worth it! It was so much easier to collect each motion around 25-30 times without a problem (More number of samples you have the better the algorithm will perform).
Attachments

Step 9: Processing the Data


You can now dump the collected data to the serial monitor, just power off the circuit and connect the FTDI and press the program button again while the serial monitor is opened in your PC. This will dump all the data to the serial monitor. Then just copy paste this into a txt file. Each motion will be divided by a phrase "New feature", so you will know which data is related to which motion.
Then divide the text file into 3 csv files using excel for left swipe gesture , right swipe gesture and slam gesture. This completes the data collection part.
This data shouldn’t be used directly; it has to be processed to remove noise so the algorithm can predict more accurately. But I'm not doing any of that makes the whole project more complicated so, I'm just skipping all this and jumping straight into the training part.
Step 10: Training the Model


This is part where you teach your ML algorithm to detect the gesture.
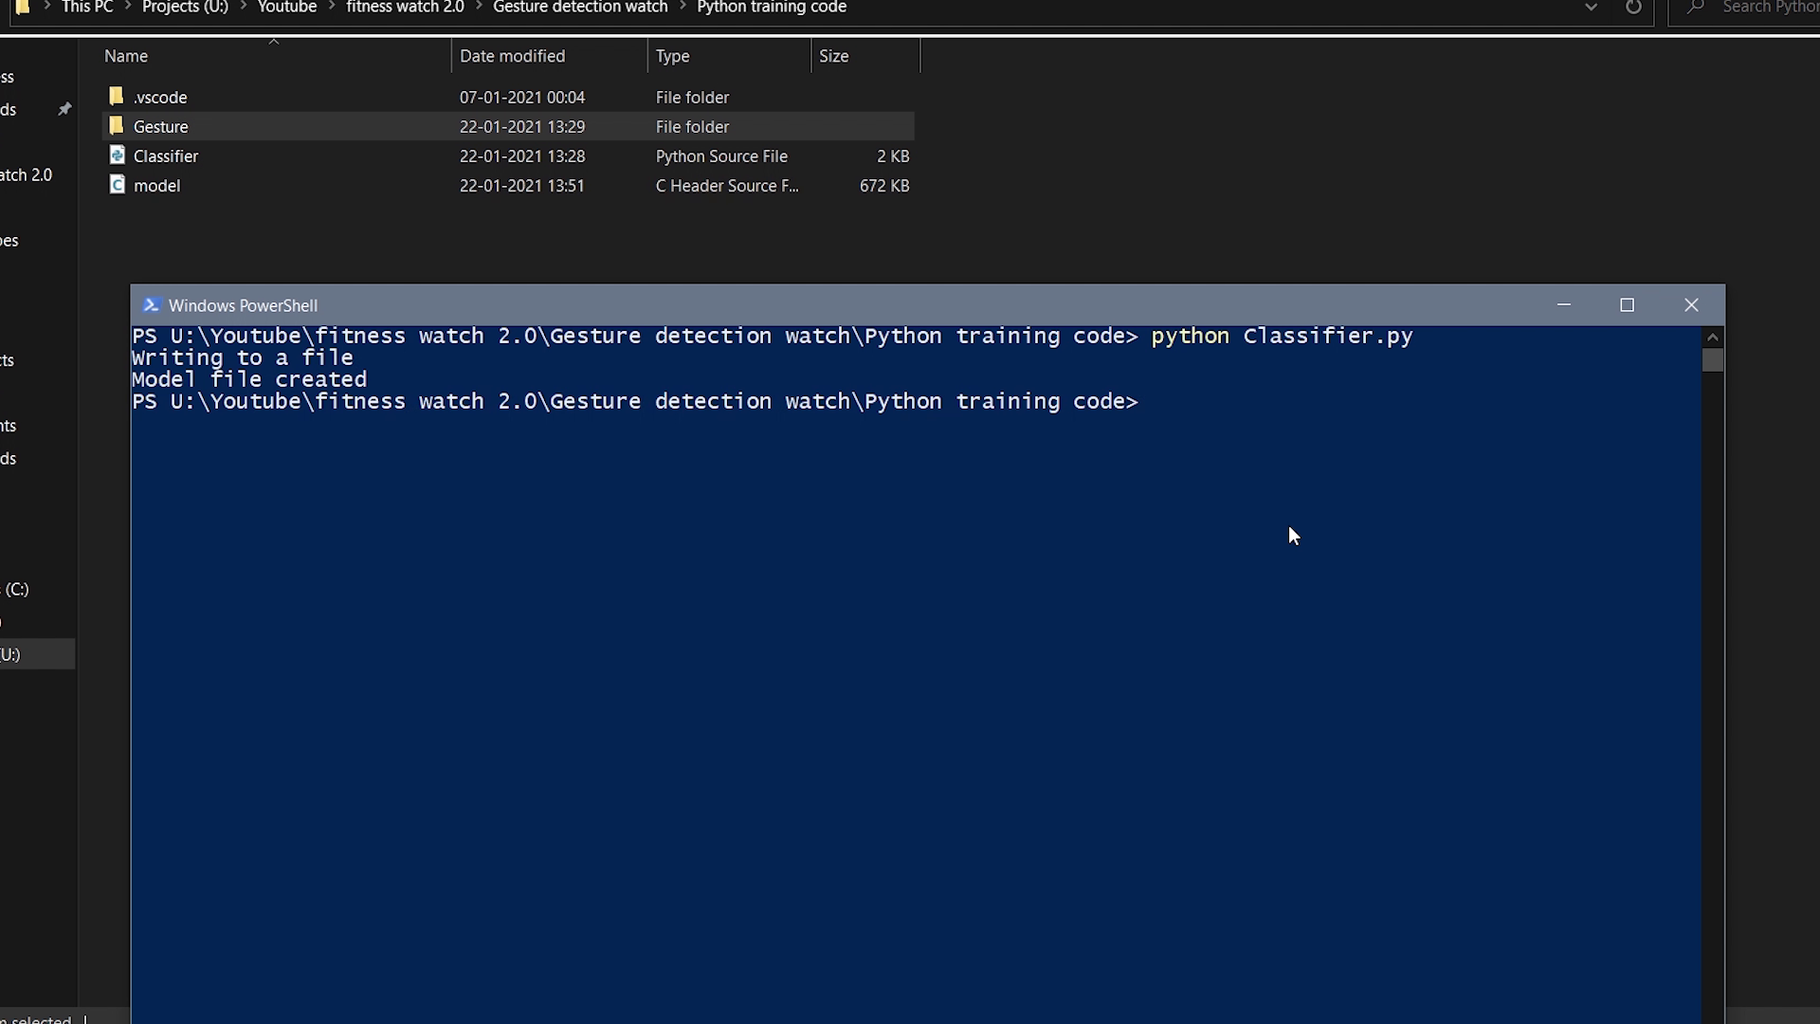
To train the data I'm using a python which trains the model and convert it to a C file which we can use with arduino IDE. You can get this file from my github repo and open the file 'Classifier.py' inside 'Python training code' folder, this code we’ll read the csv files and train the model to learn the gesture we recorded before. if you have different file names, just change the python list called fileName so it will train the model from your collected data.
After running this code a 'model.h' file we’ll be created. This file contains the trained model to identify the 3 gestures that we captured. If you would like to just test the model, paste your 'model.h' file inside the 'Testing gesture detection' folder and open the arduino file inside the folder. Then just compile and upload the code to your watch.
Attachments
Step 11: Inferring the Model


Our ML algorithm doesn't learn anymore once the code is uploaded to the microcontroller, it just used the pre-trained model that we created earlier and this is called inferring the model.
Once the code is uploaded successfully make any gesture, the oled display should say what gesture you are performing. In my case the model worked 95% of the time, it just sometimes it suffers to find the right swipe gesture. Probably, the data I collected was noisy or maybe I wasn’t doing the motion right while collecting the data.
Anyhow 95% is still good for me, we can do so much with this gesture detection!
Step 12: Final Thoughts!


There are so many things that you could do to improve if you want to implement this in a product or for a higher level project, like increase the sample rate while data collection, increase the number of sample that you collect, cleaning up the data after collection, use signal processing to remove noise, etc... But for beginner hobbyist point of view implementing a machine learning model in a microcontroller is still a big deal! So, in the next instructable we'll use this gesture detection to turn ON and turn OFF some home appliance or you can even send email like we did in the previous instructable.

First Prize in the
PCB Challenge


