In the world of iOS app development, app performance refers to the speed, responsiveness, and efficiency of an application running on iOS devices, such as iPhones and iPads. It encompasses various aspects of an app’s behavior, including:
- Its startup time
- Responsiveness to user interactions
- Smoothness of animations and transitions
- Memory usage
- Battery consumption
Why we need to improve app performance?
Improving app performance is crucial to deliver a positive user experience, retain and attract users, stay competitive, and optimize resource utilization. By investing in performance improvements, you can enhance the overall quality of your app.
You can also increase user satisfaction and achieve better business outcomes.

Discover how we revamped a client’s product with a mobile-first approach, ensuring uninterrupted business.
In this blog, we’ll discuss some techniques to boost the performance of your app!
Fig 1: Techniques to boost the performance of your app
Fig 2: Memory analysis
1) Use ARC to manage memory
The most prevalent type of memory leak, forgetful ones, are eliminated by ARC, which was introduced with iOS 5.
You don’t have to manually handle the retain and release cycles in your code because ARC, which stands for “Automatic Reference Counting,” does it for you.
The code block below illustrates some standard code for creating a view:
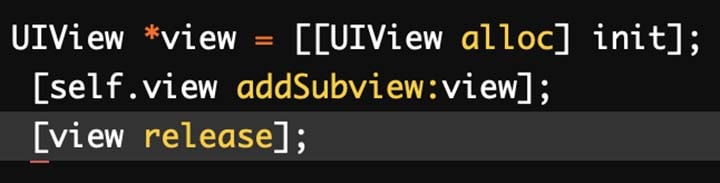
Fig 3: Standard code for creating a view
It’s quite simple to overlook the release call at the end of this code block. ARC performs it for you automatically and behind the scenes.
ARC can help you minimise memory leaks while also improving performance by ensuring that objects are deallocated as soon as they are no longer needed. You should always use ARC in your projects these days.
2) Use a reuseIdentifier where appropriate
A typical error in app development is failing to set the correct reuseIdentifier for UITableViewCells, UICollectionViewCells, or even UITableViewHeaderFooterViews.
When assigning cells to rows in tableView:cellForRowAtIndexPath:, the data source of a table view should generally reuse UITableViewCell instances for best speed. A table view keeps a queue or list of UITableViewCell objects that the data source has designated for reuse.
What happens if no reuseIdentifier is used?
In case you don’t, the table view will generate a new cell every time a row is displayed. This is an expensive procedure that will undoubtedly influence the scrolling performance of your app.
Since the release of iOS 6, you’ve been expected to use reuseIdentifiers for header and footer views, as well as UICollectionView cells and supplementary views.
To use reuseIdentifiers, call this method from your data source object when requested to give a new cell for the table view:

Fig 4: Using reuseIdentifiers: A method from your data source object when requested to give a new cell for the table view
If an existing cell is available, this method dequeues it, otherwise it generates a new one using the previously registered nib file or class. If no cell is available for reuse and no class or nib file was registered, this method returns nil.
3) Avoid fat XIBs
You can’t really avoid them if you need to target pre-iOS 5 devices or have a custom reusable view.
If you’re obliged to use XIBs, keep them as simple as possible. Try to build one XIB per view controller, and if possible, segregate the view hierarchy of each view controller into different XIBs.
It is important to note that when you load an XIB into memory, it loads all of its contents, including any images. If you have a view that you aren’t using right away, you’re wasting memory. This will not happen with storyboards since a storyboard will only instantiate a view controller when it is required.
When you load an XIB, any picture files, as well as sound files if you’re building for OS X, are cached. According to Apple’s documentation:
4) Set views as opaque when possible
When possible, set views to be opaque. If you have opaque views (views with no transparency defined), set their opaque value to YES. Why? This will allow the system to draw your views as efficiently as possible. It’s a simple property that may be set in both the interface builder and the code.
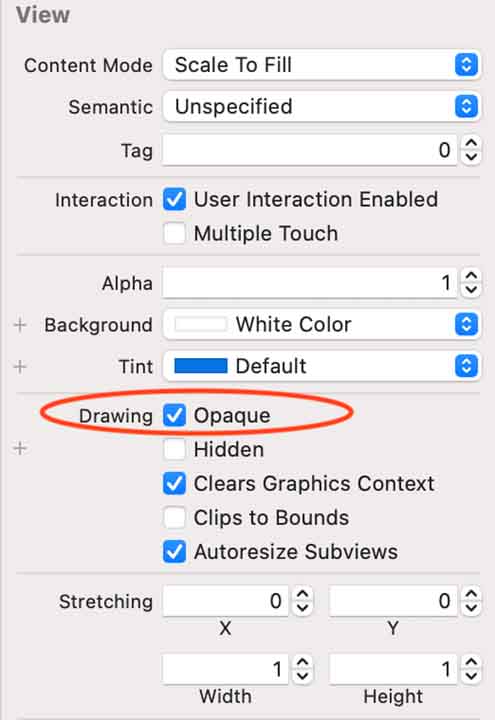
Fig 5: Setting views as opaque
5) Don’t block the main thread
You should never undertake any heavy lifting on the main thread. This is because UIKit handles all its own work on the main thread, including as drawing, handling touches, and responding to input.
The risk of executing all your app’s work on the main thread is that your code may block this thread, rendering your app unusable. That’s a certain way to get one-star ratings on the App Store!
The main thread is usually blocked while your software is conducting an I/O operation, which is any job that requires reading or writing from an external source, such as the disc or the network.
Using this method on NSURLConnection, you can perform network tasks asynchronously:
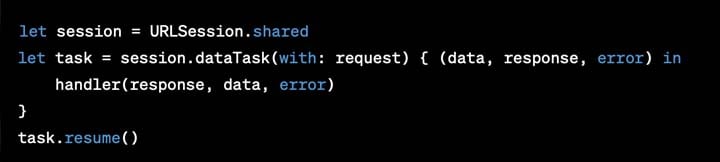
Fig 6: Using a method on NSURLConnection: Performing network tasks asynchronously
Or you can do this by using a third-party framework such as AFNetworking.
If you need to perform an expensive operation (such as a time-consuming computation or disc reading/writing), use Grand Central Dispatch, or NSOperations and NSOperationQueues.
The template for utilising GCD looks like this:
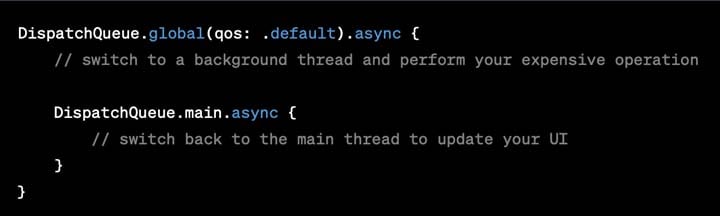
Fig 7: The template for utilising GCD
Notice how the first dispatch_async is nested within the first? This is because any UIKit-related code must be performed on the main thread.
6) Size images to Image Views
If you’re using a UIImageView to display a picture from the app’s bundle, ensure sure the image and the UIImageView are the same size. Image scaling on the fly might be costly, particularly if your UIImageView is placed in a UIScrollView.
When you download an image from a remote service, you may not have control over the size, or you may not be able to scale it on the server prior to downloading.
In these circumstances, you may manually scale the picture after downloading it ideally on a background thread and then utilise the scaled image in your UIImageView.
7) Choose the correct collection
Learning to use the best class or object for the job at hand is essential for producing efficient code. It is especially true regarding collections.
Fortunately, there is a document on Apple’s Developer Library called Collections Programming Topics that describes the distinctions between the different classes as well as which circumstances fit each class. It’s a must-read for anybody interested in working with collections.
Here’s a short rundown of the most frequent sorts of collections:
- Arrays: an ordered list of values Quick lookup by index, slow lookup by value, slow insert/delete.
- Dictionaries: Store key-value pairs. Quick lookups by key
- Sets: an unordered list of values Quick lookup by value, quick to insert or delete
8) Reuse and Lazy Load Views
More views equal more drawing, which equals greater CPU and memory overhead. This is especially true if your app contains many views within a UIScrollView.
The idea is to emulate the behaviours of UITableView and UICollectionView by not creating all subviews at once. Instead, build your views as you need them, then add them to a reuse queue when you’re done.
This manner, you only must set your views when a scroll occurs, eliminating the allocation cost, which might be costly.
The issue of timing view development extends to other aspects of your software as well.
Consider the case where you need to show a view when the user hits a button. There are at least two approaches to this:
- Create the view when the screen is initially loaded. What’s more, hide it. Then, in the event you need it, show it.
- Do nothing until you need to show the view. Then, create the view and show it, all at once.
Each method has advantages and disadvantages.
The first technique uses more memory since you instantly build the view, which retains that memory until it is released. When the user does press the button, your app will look more responsive since it merely needs to modify the visibility of the view.
The second option has the opposite impact by only producing the view when it is needed, you spend less memory. Nevertheless, the app will not look as responsive when the button is touched.
9) Cache what matters
When developing your app, a good rule of thumb is to “cache what matters”. That is, things that are unlikely to change but are frequently accessed.
What exactly can you cache? Remote server answers, pictures, and even computed variables like UITableView row heights are suitable for caching.
According to the HTTP headers it examines, NSURLConnection already caches resources on disc or in memory. You can also manually design an NSURLRequest that only loads cached information.
Here’s a wonderful snippet to use whenever you need to construct an NSURLRequest for a static image:
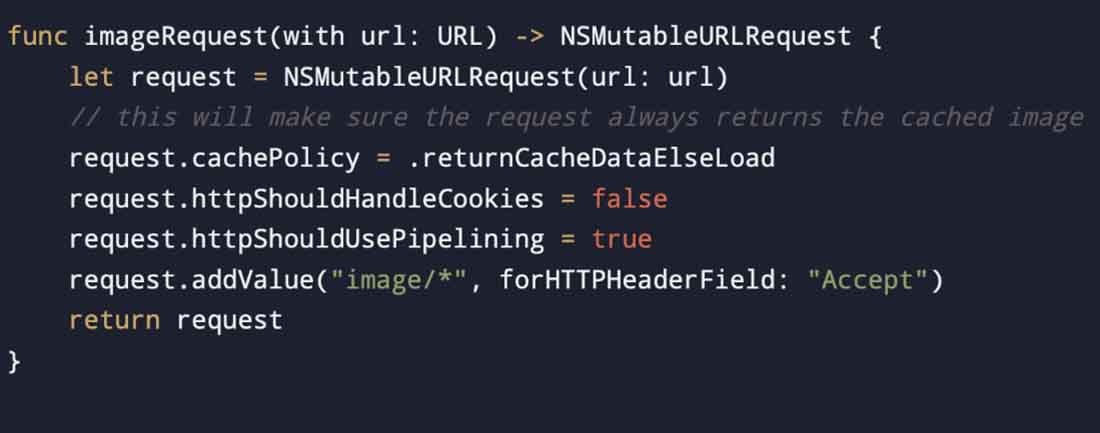
Fig 8: A snippet to use whenever you need to construct an NSURLRequest for a static image
10) Handle memory warnings
Fortunately, UIKit has many methods for receiving low-memory alerts, including the following:
- Implement the application. DidReceiveMemoryWarning method of your app delegate.
- Override didReceiveMemoryWarning in your custom UIViewController subclass.
- Register to receive the UIApplicationDidReceiveMemoryWarningNotification notification.
When you receive any of these warnings, your handler function should promptly clear up any superfluous memory.
For example, the normal action of UIViewController is to purge its view if it is not currently visible subclasses can augment the typical behaviour of their parent class by purging extra data structures. An app that keeps a cache of photos may respond by releasing any images that are not currently on screen.
When you receive a memory warning, you must release as much memory as possible. Otherwise, you risk having your app killed by the system.
However, when you start culling objects to free up memory, make sure they can be recreated later. Make advantage of the iOS simulator’s Simulate Memory Warning tool to test this circumstance while creating your app.
11) Choose the right data format
There are other methods for transferring data from a web service to your app, but the most prevalent two are JSON and XML. You want to make certain that you select the best one for your app.
JSON is easier to interpret and often smaller than XML, requiring less data to be sent. And since iOS 5, there is built-in JSON deserialization, making it simple to use.
However, one advantage of XML is that if you use the SAX parsing method, you can work with XML data as you read it off the wire, unlike JSON, which requires you to wait for the entire data set to arrive before parsing it. When dealing with very big data sets, this can result in improved speed and lower memory use.
12) Choose correct data storage option
What choices do you have for storing and accessing massive data sets?
You have various possibilities, which include:
- Store them using NSUserDefaults.
- Save them to a structured file in XML, JSON, or Plist formats.
- Archive using NSCoding
- Save to a local SQL database, such as SQLite.
- Use core data.
13) Speed up launch time
It is critical to open your app promptly, especially when the user is doing so for the first time. For an app, first impressions are extremely important.
The most important thing you can do to guarantee your app begins quickly is to do as many asynchronous operations as possible, such as network queries, database access, or data processing. Also, avoid fat XIBs because they are loaded on the main thread. However, keep in mind that storyboards do not have this issue, so use them if possible.
14) Cache images or not
There are two methods for loading a UIImage from an app bundle. The first and most usual method is to use imageNamed. The second and less popular method is to use imageWithContentsOfFile.
Why are there two approaches that do the same thing?
The benefit of imageNamed is that it caches the image as it is loaded. The documentation for imageNamed explains it this way.
15) Optimize your table views
Table views need to scroll fast. If they don’t, users could detect the latency.
To keep your table views moving smoothly, make sure you’ve followed all the recommendations below:
- Reuse cells by specifying the appropriate reuseIdentifier.
- Make as many views as possible opaque, including the cell itself.
- Stay away from gradients, picture scaling, and offscreen drawing.
- If the height of any rows isn’t always the same, cache it.
- If the cell displays web content, make sure to perform those calls asynchronously and cache the replies.
- To create shadows, use shadowPath.
- Limit the number of subviews.
- In cellForRowAtIndexPath:, do as little work as feasible. If you must do some tasks, do so just once and store the results.
- Use the proper data structure to store the information you require. Different structures have varying costs for certain operations.
- Rather than asking the delegate, make use of rowHeight, sectionFooterHeight, and sectionHeaderHeight to specify steady heights.
Now, let’s focus on a case study to understand all this better.
Case study: Performance improvement techniques
A popular social media platform initially faced performance issues on its iOS app. Users experienced slow loading times, delays in image rendering, and overall sluggishness. To address these problems, the platform invested in performance improvement techniques. Here’s what they did:
Image Optimization: They implemented advanced image compression techniques to reduce file sizes without sacrificing quality. This resulted in faster image loading times and improved overall app responsiveness.
Caching Mechanism: The app incorporated a smart caching mechanism that stored frequently accessed data locally. This reduced the need for frequent network requests, leading to faster data retrieval and a smoother user experience.
Code Optimization: They conducted a thorough code review and refactored critical sections to eliminate performance bottlenecks. They optimized algorithms, reduced unnecessary computations, and eliminated redundant code, resulting in improved app responsiveness.
Asynchronous Loading: To enhance user experience, they implemented asynchronous loading techniques. This allowed the app to load content in the background while providing users with a smooth browsing experience, minimizing waiting times.
The Results
Faster Loading Times: The optimizations significantly reduced loading times for images and content, enhancing user satisfaction.
Improved User Engagement: The app’s improved performance led to increased user engagement, longer session durations, and higher user retention rates.
Higher Ratings and Reviews: Users appreciated the enhanced performance, resulting in positive ratings and reviews on the App Store.
Increased User Acquisition: The improved performance attracted new users who were previously deterred by the app’s performance issues.
There are some third-party tools available that can help improve the performance of iOS apps…
Third-party tools that can help improve the performance of iOS apps
These tools provide various features and functionalities to identify performance bottlenecks, optimize code, analyze network requests, and enhance overall app responsiveness. Here are a few popular ones:
- Firebase Performance Monitoring
- New Relic Mobile
- Instabug
- Apteligent (formerly Crittercism)
- Charles Proxy
These tools provide valuable insights and capabilities to optimize the performance of iOS apps by identifying and resolving performance bottlenecks, monitoring network requests, and improving user experience.
Each tool has its own set of features and strengths, so it’s worth exploring and evaluating them based on your specific requirements and preferences.
Here is a summary of performance improvement at a glance:
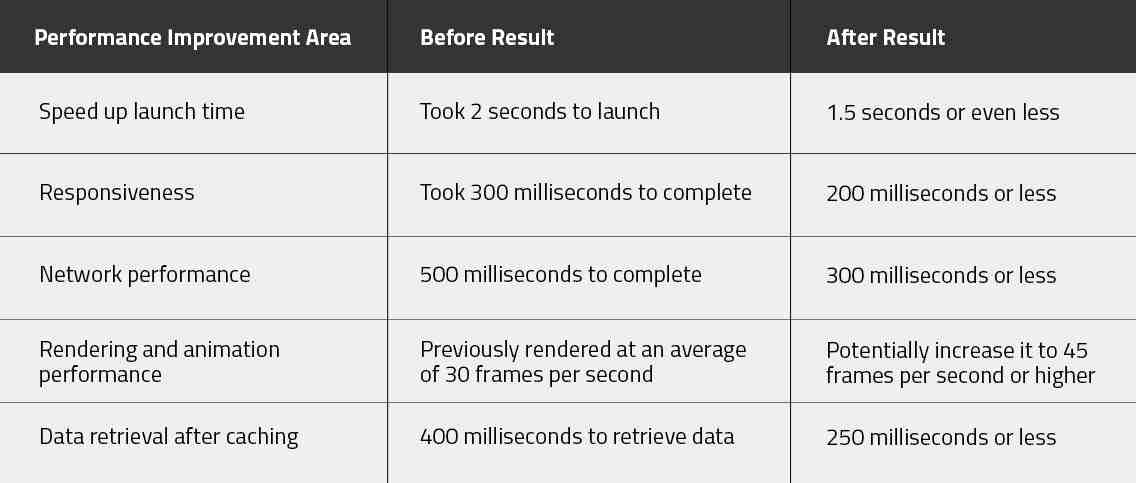
Fig 9: A summary of performance improvement
Well, it’s time for me to wrap up my ideas…
By implementing these performance improvement techniques, iOS developers can build high-performing apps that stand out in a crowded marketplace and deliver an exceptional user experience.
Send us a mail with your thoughts about this blog. Also visit us at Nitor Infotech to know about the magic we weave with mobile app development!