
Hackers rely on good data to be able to pull off an attack, and reconnaissance is the stage of the hack in which they must learn as much as they can to devise a plan of action. Technical details are a critical component of this picture, and with OSINT tools like Maltego, a single domain name is everything you need to fingerprint the tech details of an organization from IP address to AS number.
While Maltego is excellent for examining people, it shines when you're researching hard details about an organization's technical setup.
Technical research is different from interpersonal research in that, in many cases, the information is readily available with minimal interaction needed from the researcher.
Technical Data Targets
When conducting technical recon, tools like Maltego make the research a matter of clicks to find hard details about your target. Starting from the web domain, links to other websites or technologies become apparent. While some of the information may seem like magic to discover to the average user, OSINT research can stitch these far-flung technical details into a rich contextual map of how the target network is structured and how it interacts with the world around it.

The details we're looking for when profiling an organization's network are anything that gives us more context and information for follow-up exploitation. This can mean anything from an IP address to the MX server a company is using. So why is this important? The more we know about the target, the more targets we can train various cyber-weapons on in the next phase of our plan.
Also, merely knowing details like the MX server allows us to know which email provider a company uses, giving a hacker an advantage in a phishing attack. Any of these details can be useful depending on your objective and what you plan to do with the information, so let's outline the chain we'll be creating to understand our target's network infrastructure better.
Attributable Network Chain
The chain of network details we will build all starts from the domain name and proceeds in an ordered sequence to derive more abstract information that can show other assets under control of the target. In addition to giving us what we need to expand our investigation, we can start to tie our mark to third-party services they use. This allows a hacker to learn what they do in-house and what they outsource, providing context for other more specific tactics.
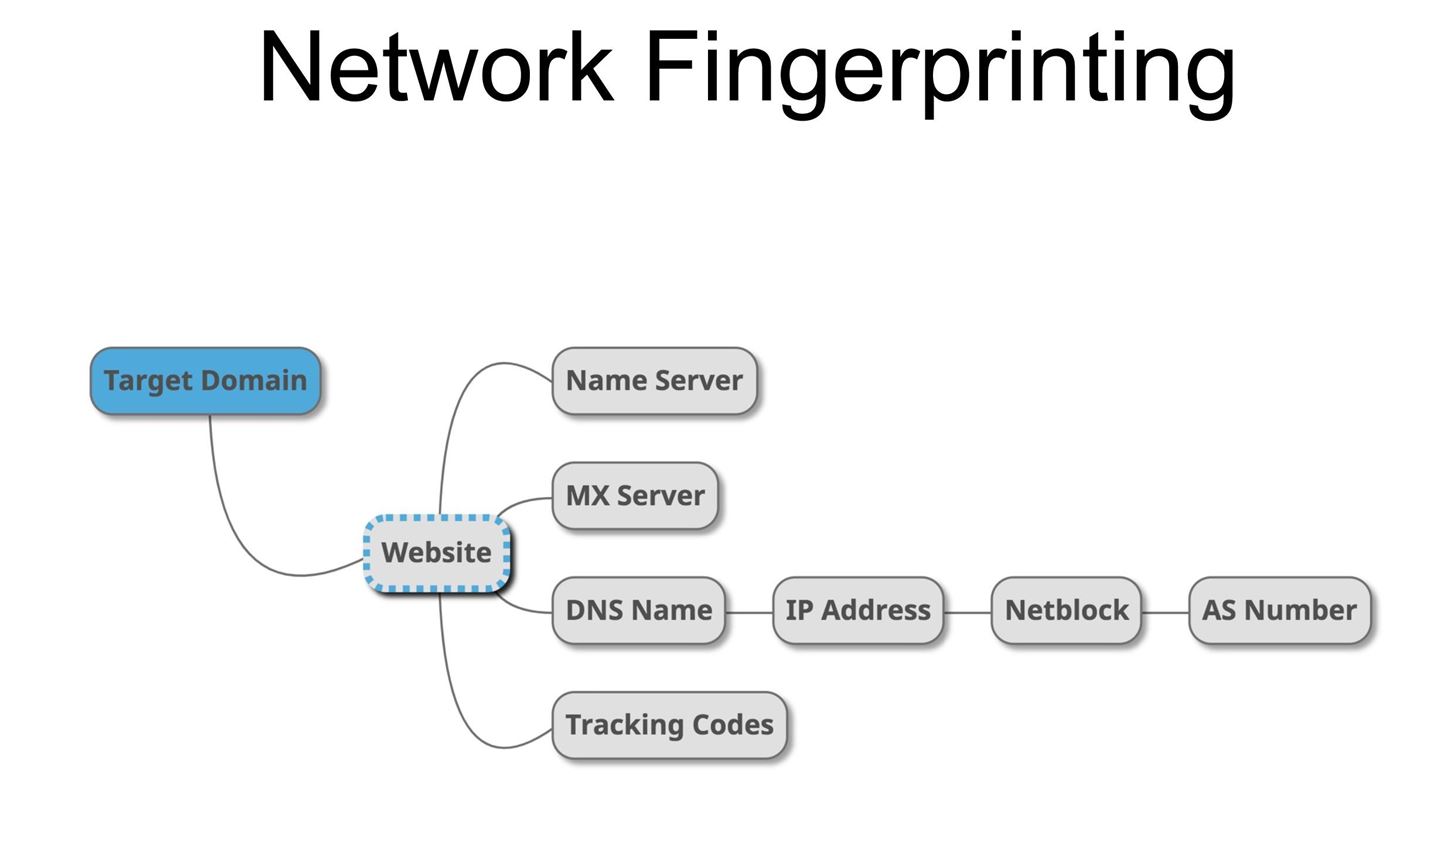
Starting with the target domain, we can locate the website hosted on port 80 and find any other sites using the same tracking code to discover web real estate owned by the same organization. Next, we can see the MX (mail exchanger) and NS (name server) associated with the domain, revealing the email address and hosting services the organization utilizes. From here, we can locate the DNS server that points to the website in question, revealing any other domains that use the same DNS server. This shows us other sites the same organization may own or operate or other domains hosted by the provider that they outsource web hosting to.
Larger organizations may have a netblock assigned to the various webpages and services they offer online, which is a range of IP addresses all dedicated to the same organization. Further up, the AS number (autonomous system number) can be discovered, which is a collection of netblocks all operating with the same external routing policies. This usually belongs to the internet service provider or a larger company and can be used to find other netblocks owned by the same business.
Down the Chain & Back Up Again
Establishing the chain from domain to AS number is helpful for keeping our investigation organized by giving us a "spine" to build out our reconnaissance data from. When we're all the way to the AS number, we can start to look back up the chain and begin to expand on what we initially found. This means starting with the AS number, identifying more netblocks in the AS, finding IP addresses in the netblock, and mining those IP addresses for connected websites or services online.
What You'll Need
The community edition of Maltego is free, and it's also installed by default on Kali Linux. If you already have Kali Linux, you can check it out immediately, or you can download it on Kali by typing apt-get install Maltego into the terminal window. You can also download it for any operating system from the website, and after the free registration process, you can run it on whatever computer you have handy, provided you have Java installed.
- Don't Miss: How to Run Kali Linux as a Windows Subsystem
Step 1: Selecting the Target & Identifying the Website
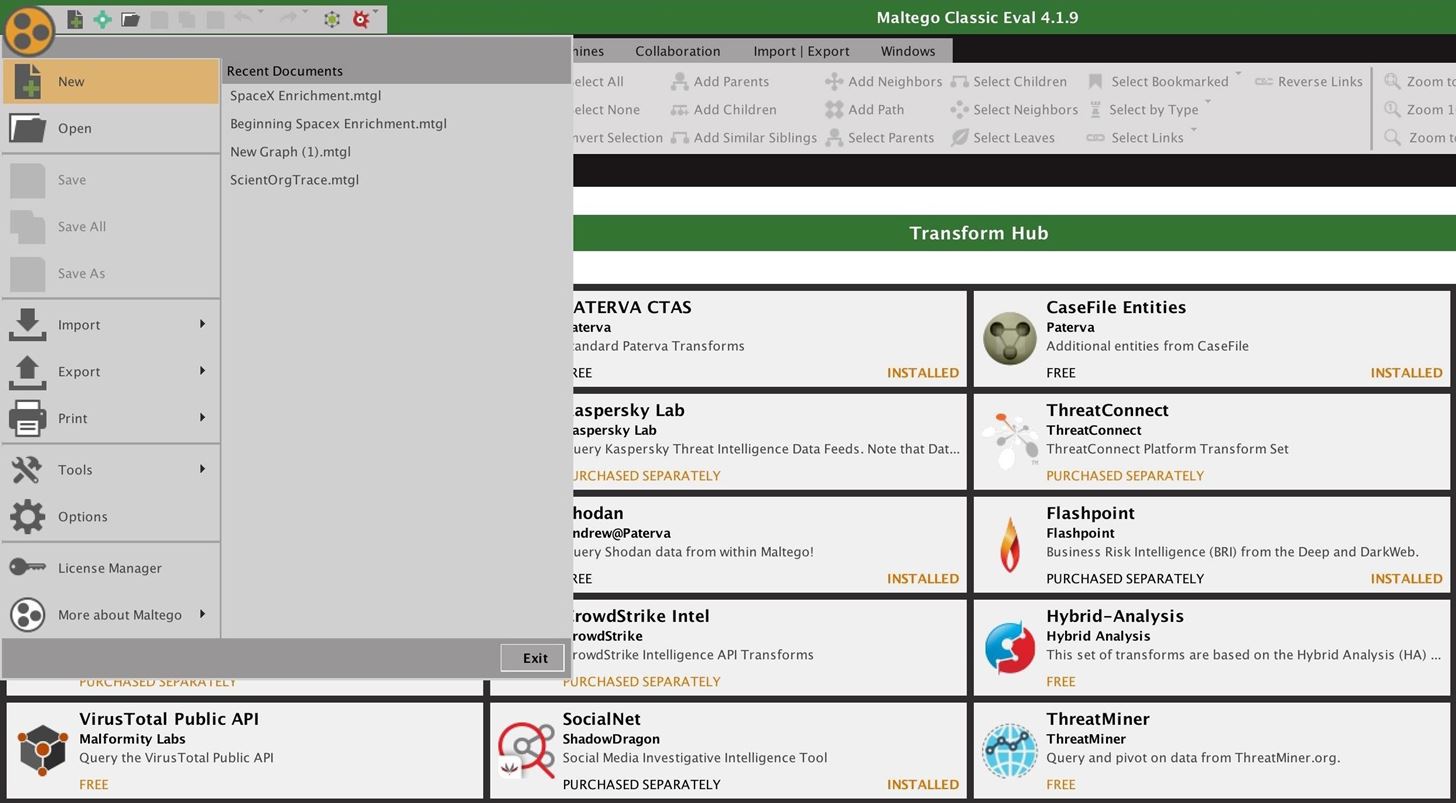
In this example, we'll use the Gap website, which is, from a quick Google search, located at the domain gap.com. Start Maltego and wait for the main window to open, then click the logo icon in the top-left corner, and select "New."
This will open a blank canvas and allow us to add our first entity. To do this, we can refer to the Entity Palette on the left side, and type "domain" into the search bar to bring up the domain entity. Once we see the icon, we can drag and drop it onto the canvas to begin the investigation.
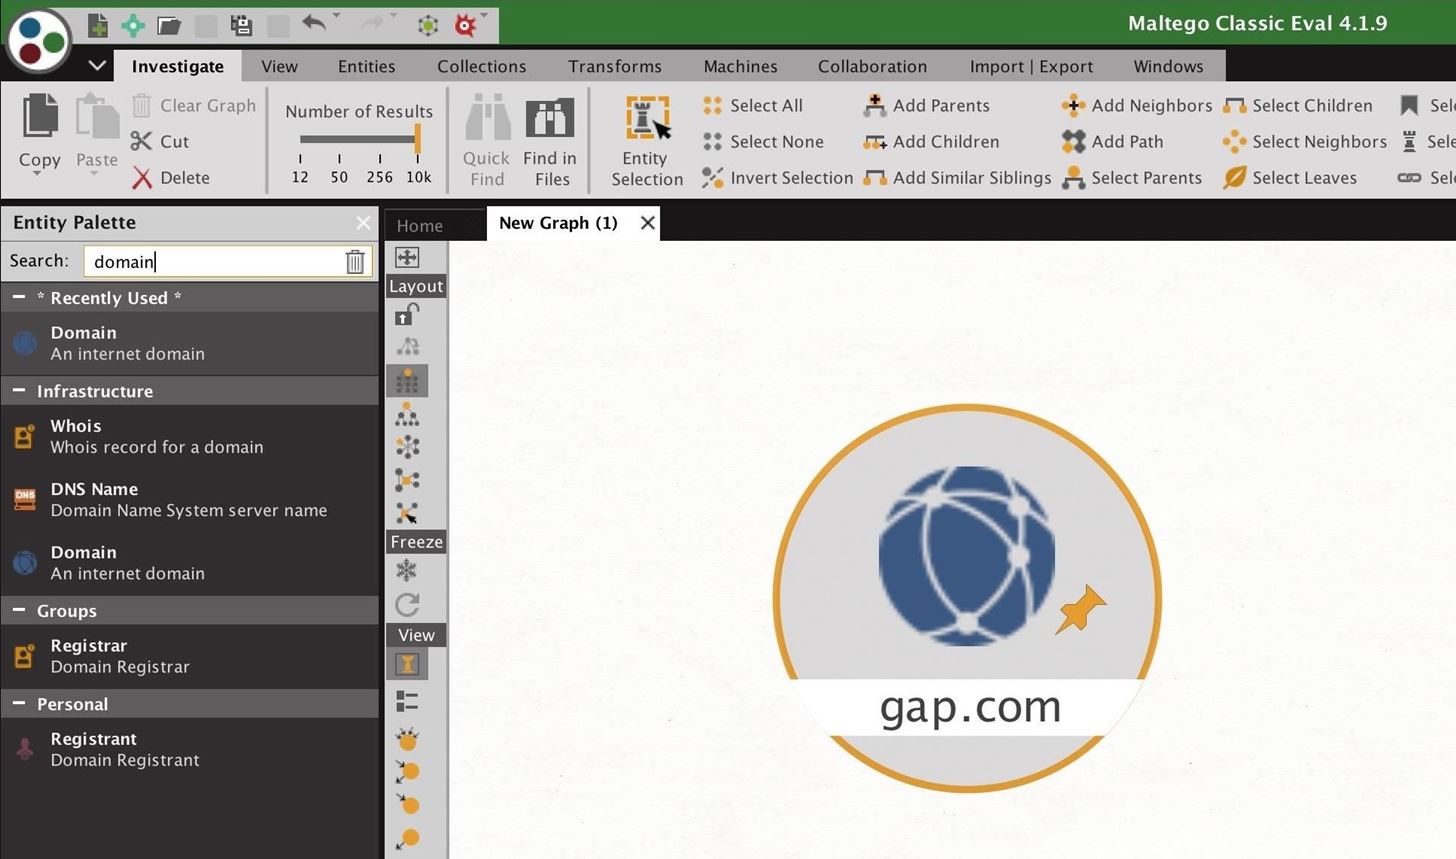
Once the icon is on the canvas, double-click the text portion of the icon to type the domain name of your target. In this case, we'll put "gap.com" to begin our survey of Gap's network.
Step 2: Finding More Sites with Tracking Codes
The first layer of tracking we'll explore is the tracking codes an organization uses to provide analytics for its web domains. Frequently, we'll be able to tie together disparate domains by virtue of the fact that they share a common tracking code. The tracking codes can vary from Google Analytics codes to Amazon Affiliates codes and can be used to identify anything an organization wishes to monetize or track.
To find the tracking codes associated with a website, we need first to convert it into a web domain. We can do this by right-clicking the domain entity and typing "website" in the search bar to show all domains that reference resolving a website. You can run any of the three, but a simple "Quick Lookup" should do just fine. This should resolve our domain to a website, and from here, we can right-click and type "To Tracking Codes" to run the tracking code transform.
- Don't Miss: Scrape Target Email Addresses with TheHarvester
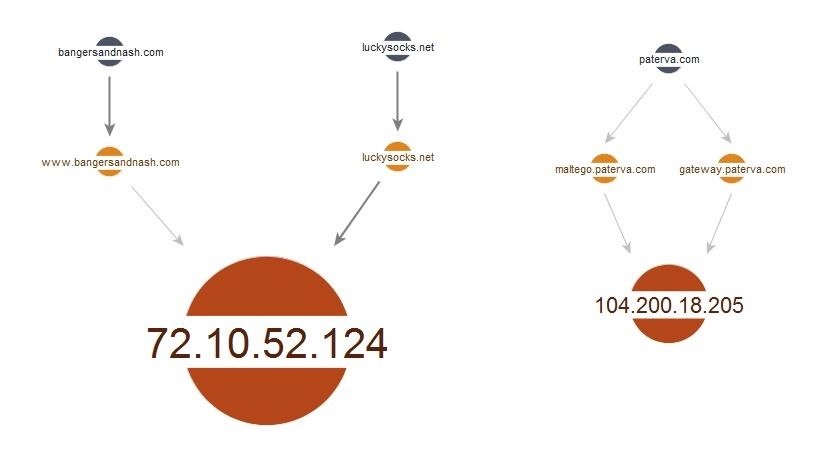
While our Gap example didn't return any results, running it against Tesla's site (tesla.com) does. Below, we see the result of the transform, showing two other associated domains. To reveal these domains from the tracking code we found, we can right-click the tracking code, then click "To Other Sites With Same Code" to search for other websites which have the same tracking code.

These links can be invaluable for finding other domains owned by the same party, in some cases, domains which may not be officially acknowledged. This allows an attacker to begin discovering linked parts of an organization by ironically tracking the way these organizations track users and the fact that most organizations will use a single tracking code to make analytics across an organization more easy to understand.
Step 3: Revealing Name & MX Servers
The NS and MX server of a domain can begin pointing us to information about what mail service an organization uses, as well as where their services are hosted. Some organizations will host these servers in-house, but the majority don't bother to do so and use a third-party service. For a hacker, this information is useful because it can reveal valuable pretexts like calling the business from the specific service provider they use for internet or web hosting.
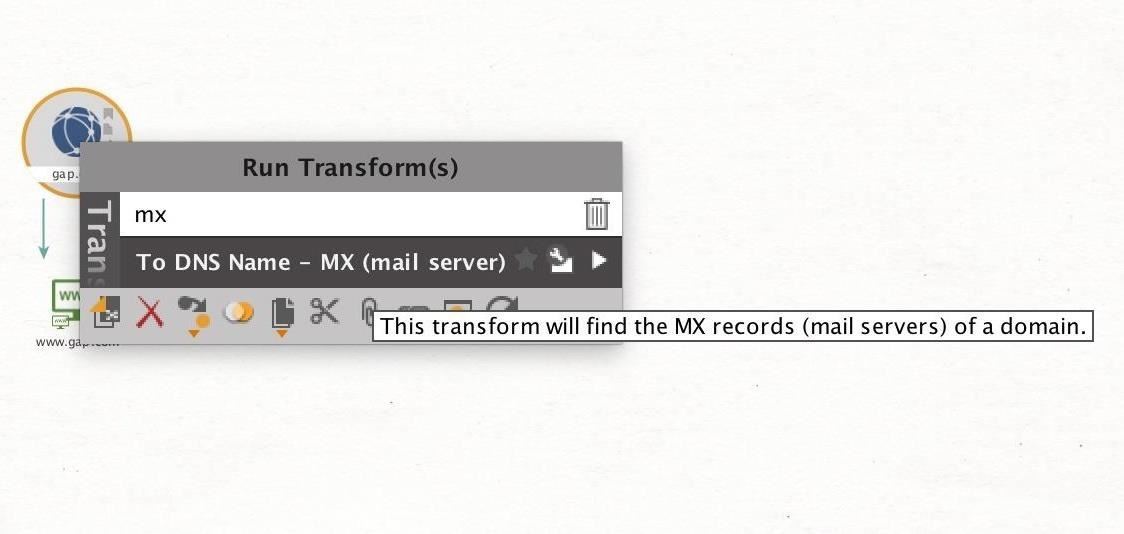
Finding this information is straightforward. To begin, right click on the domain entity we created earlier, and type "mx" into the search bar to reveal the transforms that will resolve the MX server. Click on this to show the MX information, which will often reveal which provider the organization uses.
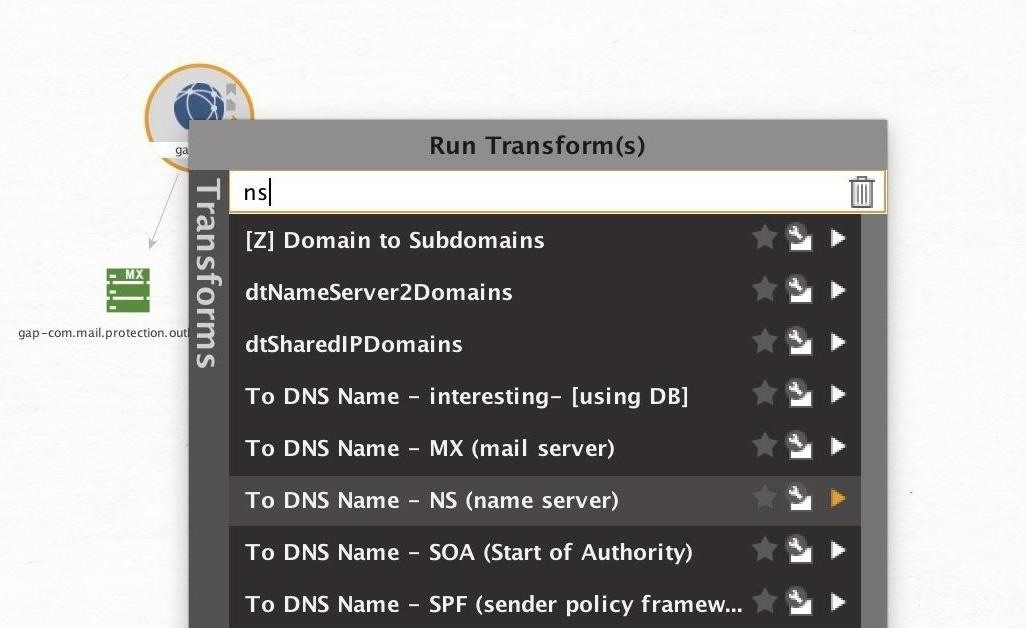
To reveal the NS records of the website, we can right-click the domain and type "ns" to reveal transforms that deal with name servers. From here, select "To DNS Name – NS (name server)" to get the name server information. This can reveal information about whether the organization uses a third-party service to host their domain.
Step 4: Discovering DNS Servers
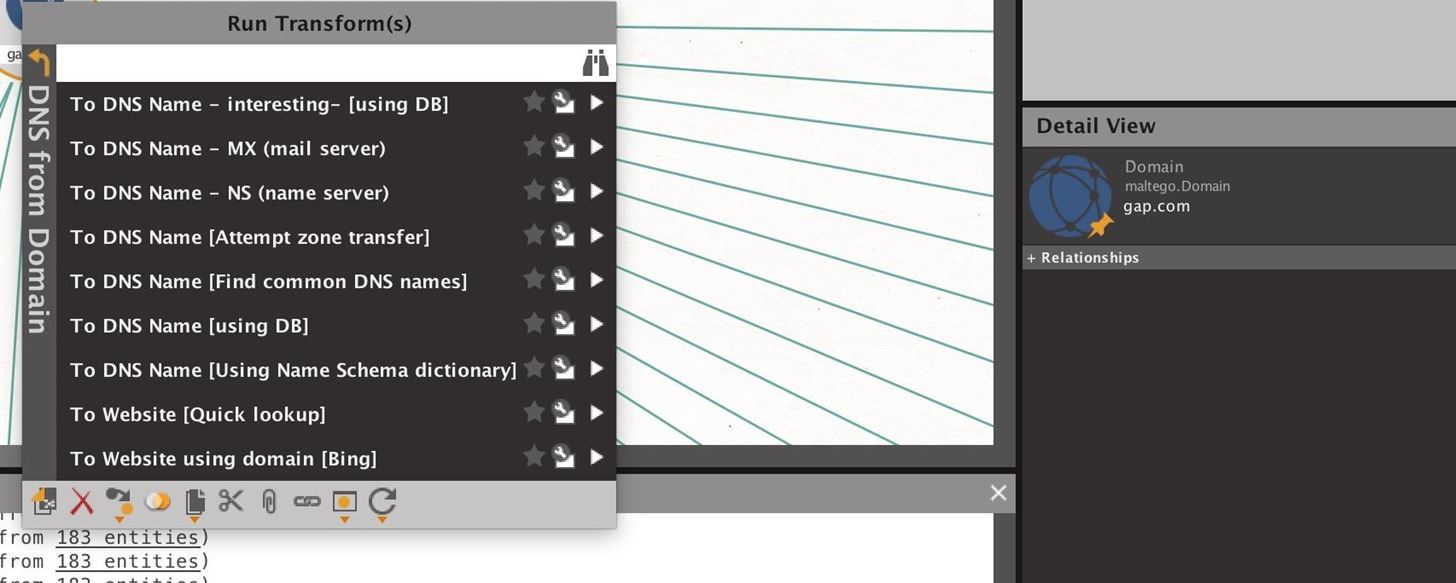
To learn about the DNS servers an organization uses (including the previously mentioned MX and NS), we can take advantage of a cluster of transforms designed to accomplish this. This transform set will run ten different transforms, all pulling in more information about the DNS details of the domain. Below, you can see the specific transforms that are run in the set.
To run the entire set, right-click on the domain entity we added before, and then select "PATERVA CTAS" to show the different groups of transforms. You can select the "Run All" icon next to the "DNS from Domain" transform set to run all of the transforms contained within.
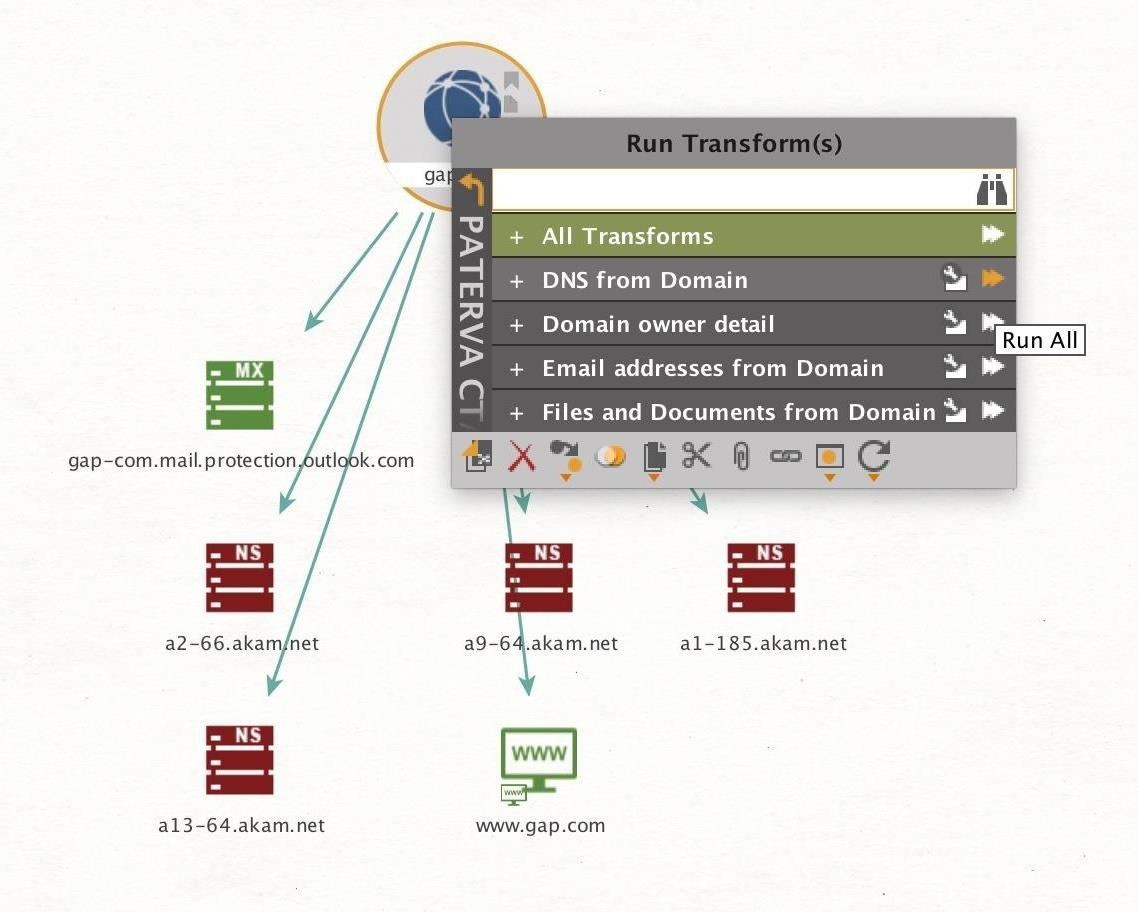
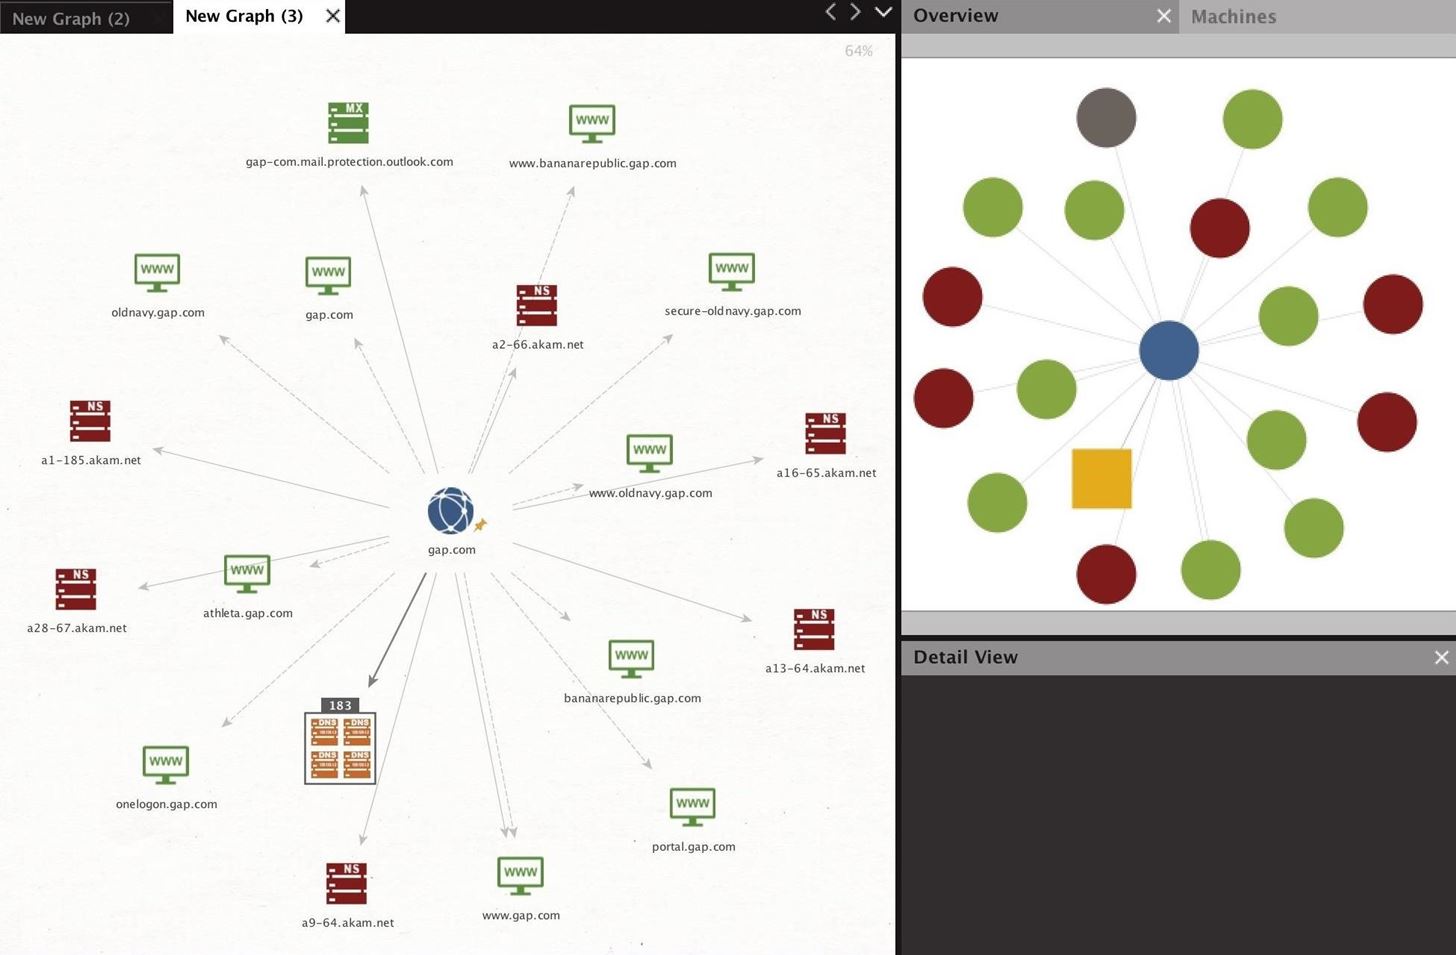
Once these transforms are complete, the results can be quite dramatic. Below you can see the outcome of this domain set on a single domain, gap.com. With these pulls, we found 183 DNS records alone, with additional NS and MX records displayed as well. We can also see other websites which are associated with the domain.
Once we have all the DNS addresses we can gather, we can move to the next step of discovering IP addresses associated with the target.
Step 5: Figuring Out the IP Addresses
Now that we have a range of DNS entries, we can resolve these to the IP addresses they point to in order to learn more about the services the organization uses. Many larger organizations will host their own services, and this is an opportunity during recon where we can start to probe and find which parts are hosted internally versus externally.
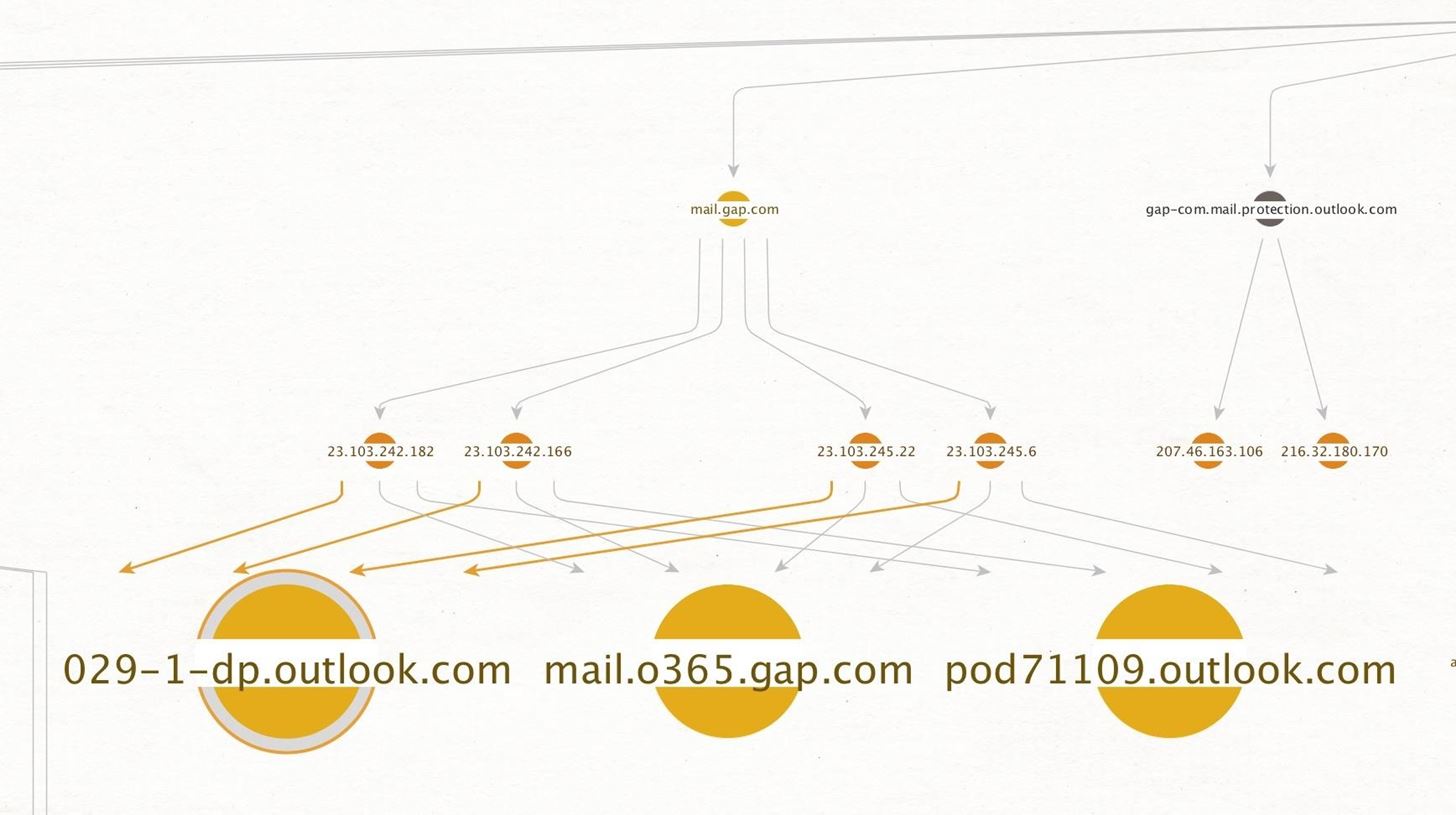
We can do this by selecting the DNS records we've located, then right-clicking them to reveal the "Resolve to IP" transform set. It only contains one transform, so we can select "run all" to associate all of the DNS entries we've found with IP addresses. This provides a wealth of information on more extensive networks, revealing interconnected infrastructure
Step 6: Finding IP Netblocks
Netblocks are large blocks of IP addresses which are typically assigned to a single entity. If we can identify a netblock that belongs to our target organization, we can scan all the IP addresses inside the range to find services we haven't previously discovered.
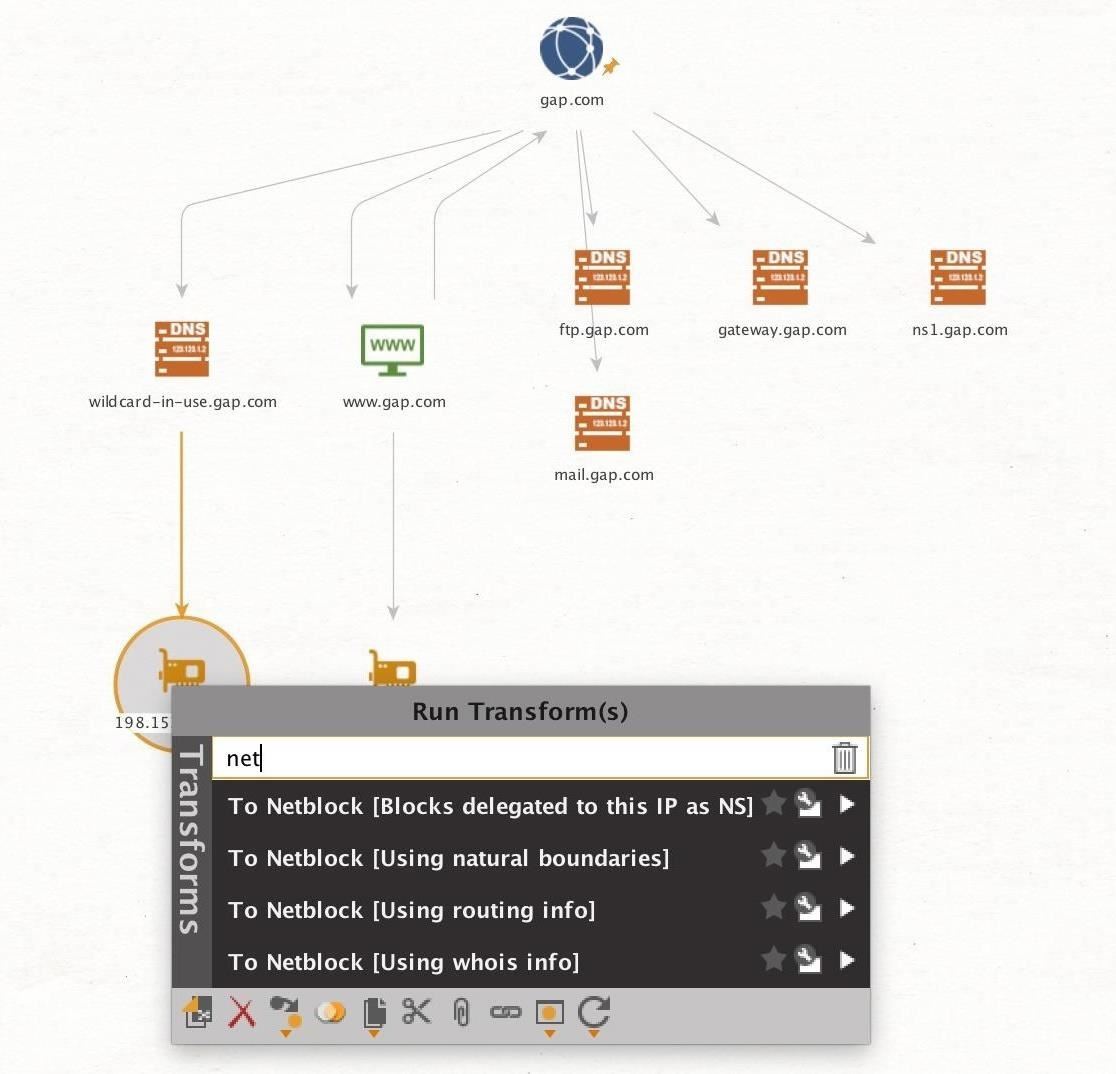
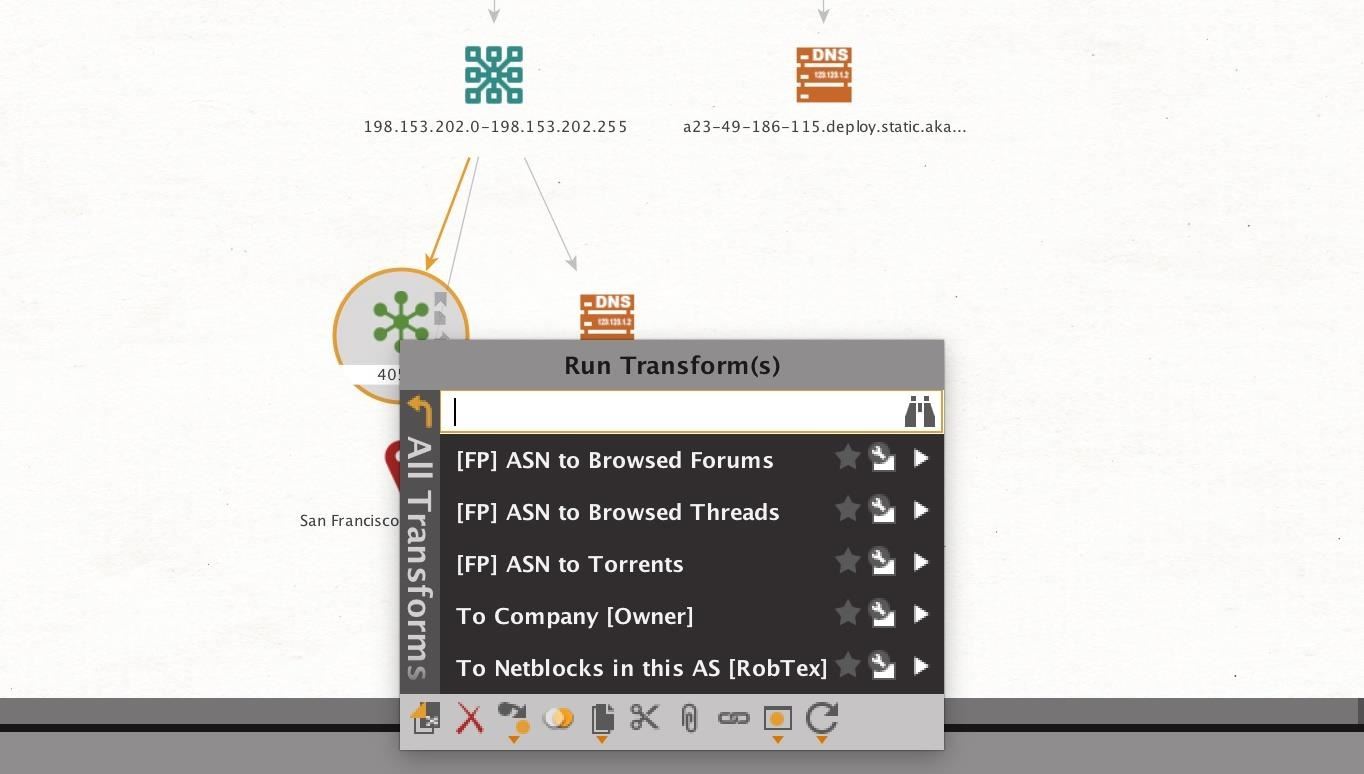
To discover netblocks the target organization may own, you can select a previously discovered IP address, and right-click on it to select one of the three Maltego transforms for finding netblocks by typing "netblocks" into the search bar. You can use the "To Netblocks [Using routing info]," which finds the netblock that an IP address belongs to by looking up the IP's routing table information.
When we've located a netblock, we can expand our search by finding other DNS names within the netblock. This is quickly done by right-clicking on the netblock entity and then selecting the "To DNS Names in netblock" transform.

This should return a list of DNS names, which will point to various services belonging to the owner of the netblock. You can tell if a company is using shared hosting or some other type of shared setup if the DNS entities found from the netblock range belong to other organizations.
Step 7: Identifying the AS Number
Once we've identified a netblock belonging to our target organization, we can proceed to our final layer, which is identifying the AS number. An AS number is used by large organizations like internet service providers or major corporations to identify ranges of netblocks with similar routing protocols.
If we can identify an AS number belonging to our target, we can find all the netblocks in it knowing that they belong to our target too. Then, we can discover all the DNS names in each of those netblocks, allowing us to resolve those DNS names to IP addresses of other services belonging to the target.
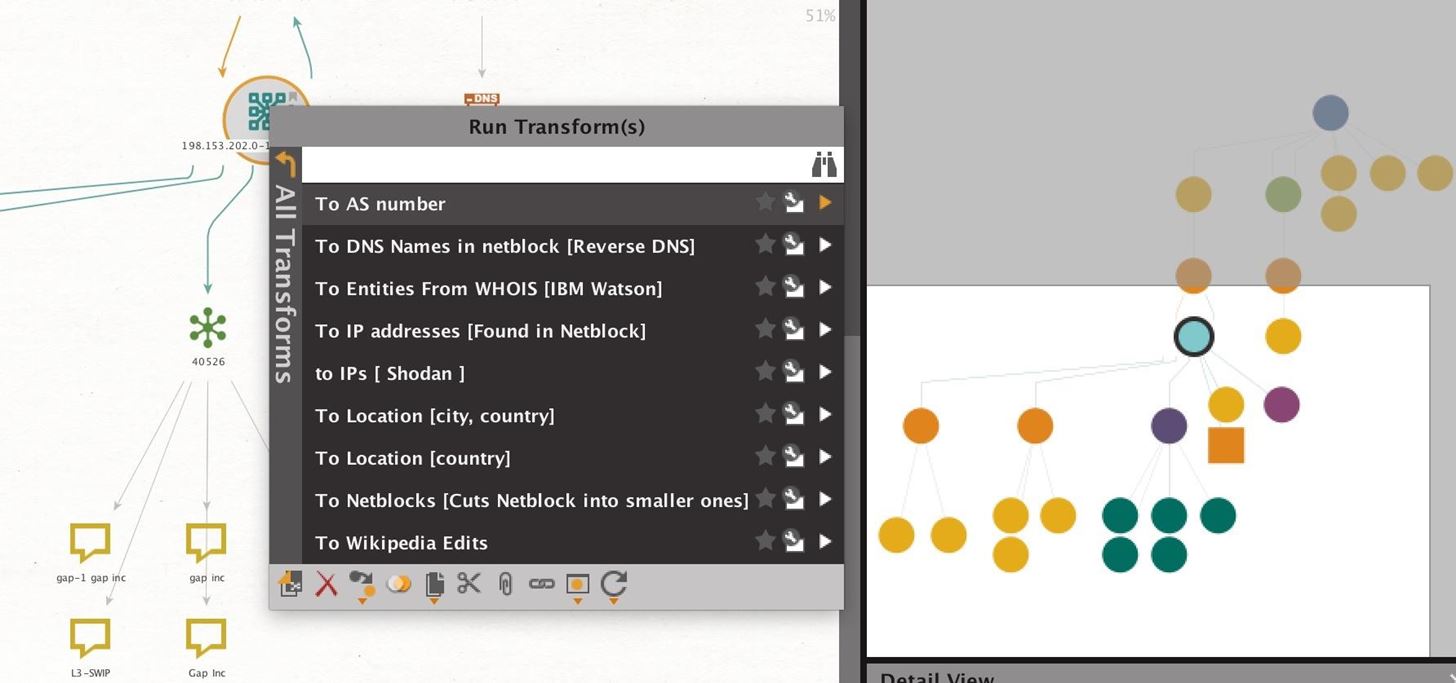
Right-click on the netblock identified as belonging to the target, and click on "To AS number" to show the AS number associated with the netblock.
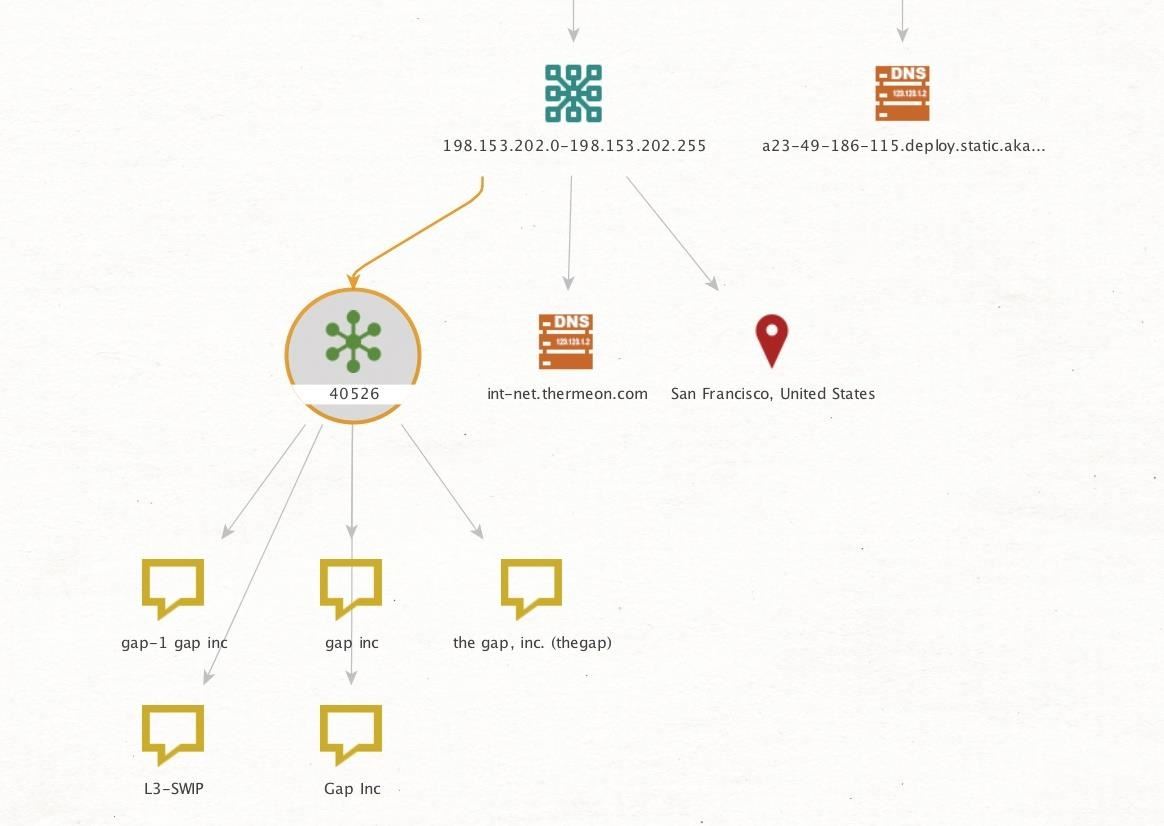
Next, you can reveal the owner of the AS number by right-clicking the AS number and selecting "To Company" to get the name of the organization that owns the AS number. This may be the internet service provider the company uses or, in large organizations, the company itself.
In our example, we took a netblock found from a DNS name at gap.com and identified that it belonged to AS number 40526. We can see from selecting the company owner information that this AS number is registered to Gap, Inc., so we can assume any netblocks inside it, and any IP addresses within those ranges, are also owned by our target and not a third party.
Step 8: Backing Up the Chain
To take advantage of what we've found in Maltego, we can go back up the chain to enrich the data we discover. Once we reach the AS number, we can find all of the netblocks in the AS number to reveal DNS names and IP addresses inside those ranges. Going further up the chain, we can take the IP addresses and resolve them to web domains, allowing us to start all the way back at the top again with a fresh set of targets.
- Don't Miss: How to Use SpiderFoot for OSINT Gathering
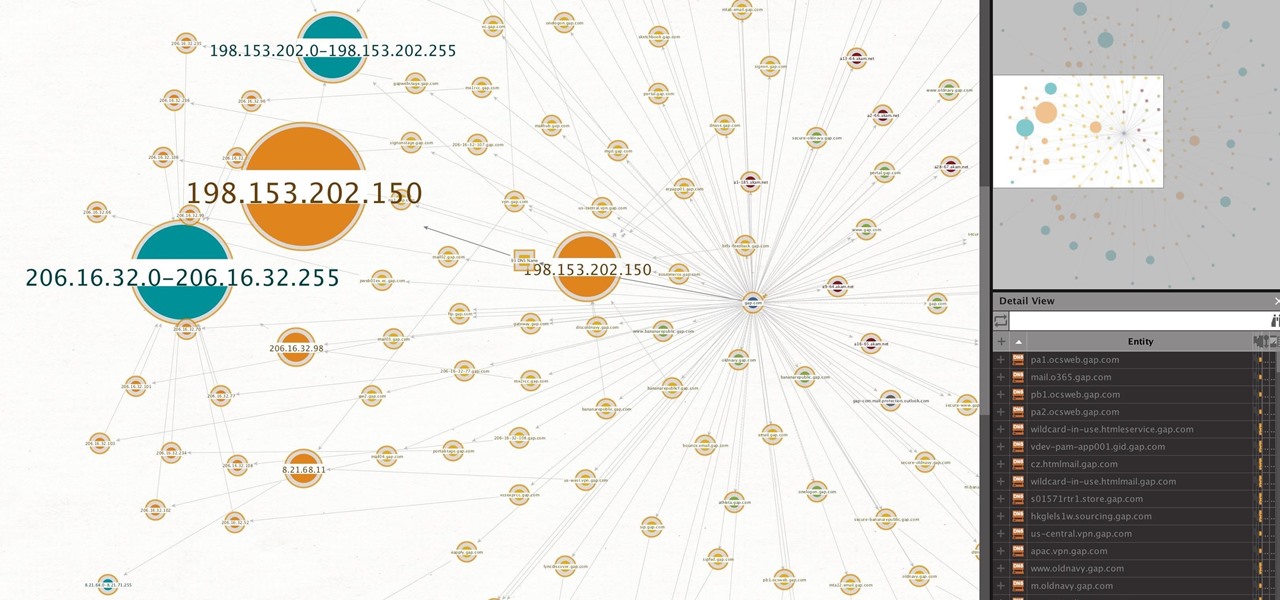
The purpose of this process is to follow a cycle, following targets from the top to the bottom of the chain while adding new DNS names, IP addresses, netblocks, AS numbers, web domains, and websites as you discover them. After a few rounds of discovery, your results can get pretty crowded, and you may have a hard time being able to see relationships within the data. Below, you can see the result of tracing our DNS servers down to the netblock level, and already things look confusing.
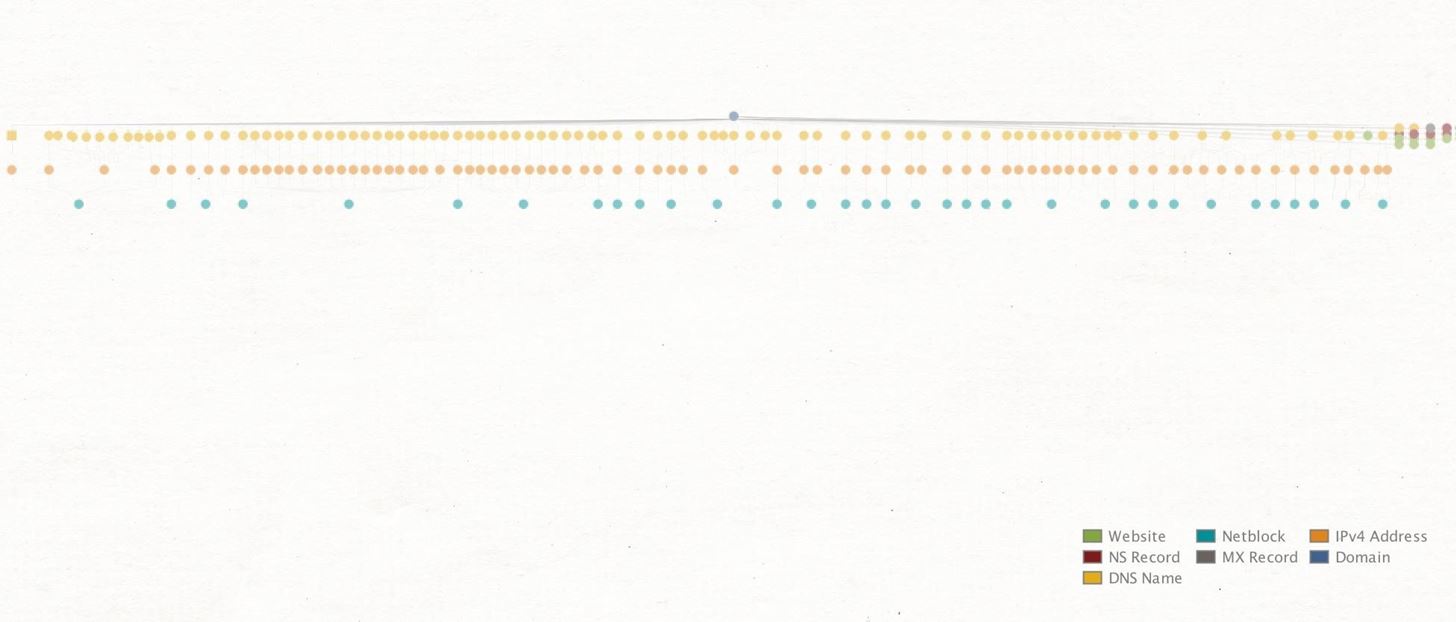
This standard view isn't beneficial from far out, so we can do a few things with the data to show relationships more obvious. First, we can change the view to something more compact by selecting the "Organic" view from the pane on the upper left side. This will arrange the graph in a way that saves space and shows relationships visually by spacing entities that are strongly related closer together.
This view should be more compact, but we can make relationships even more apparent by selecting the downward arrow in the "Manage View" icon in the top left. This allows us to change the view to "Ball Size by Diverse Descent."
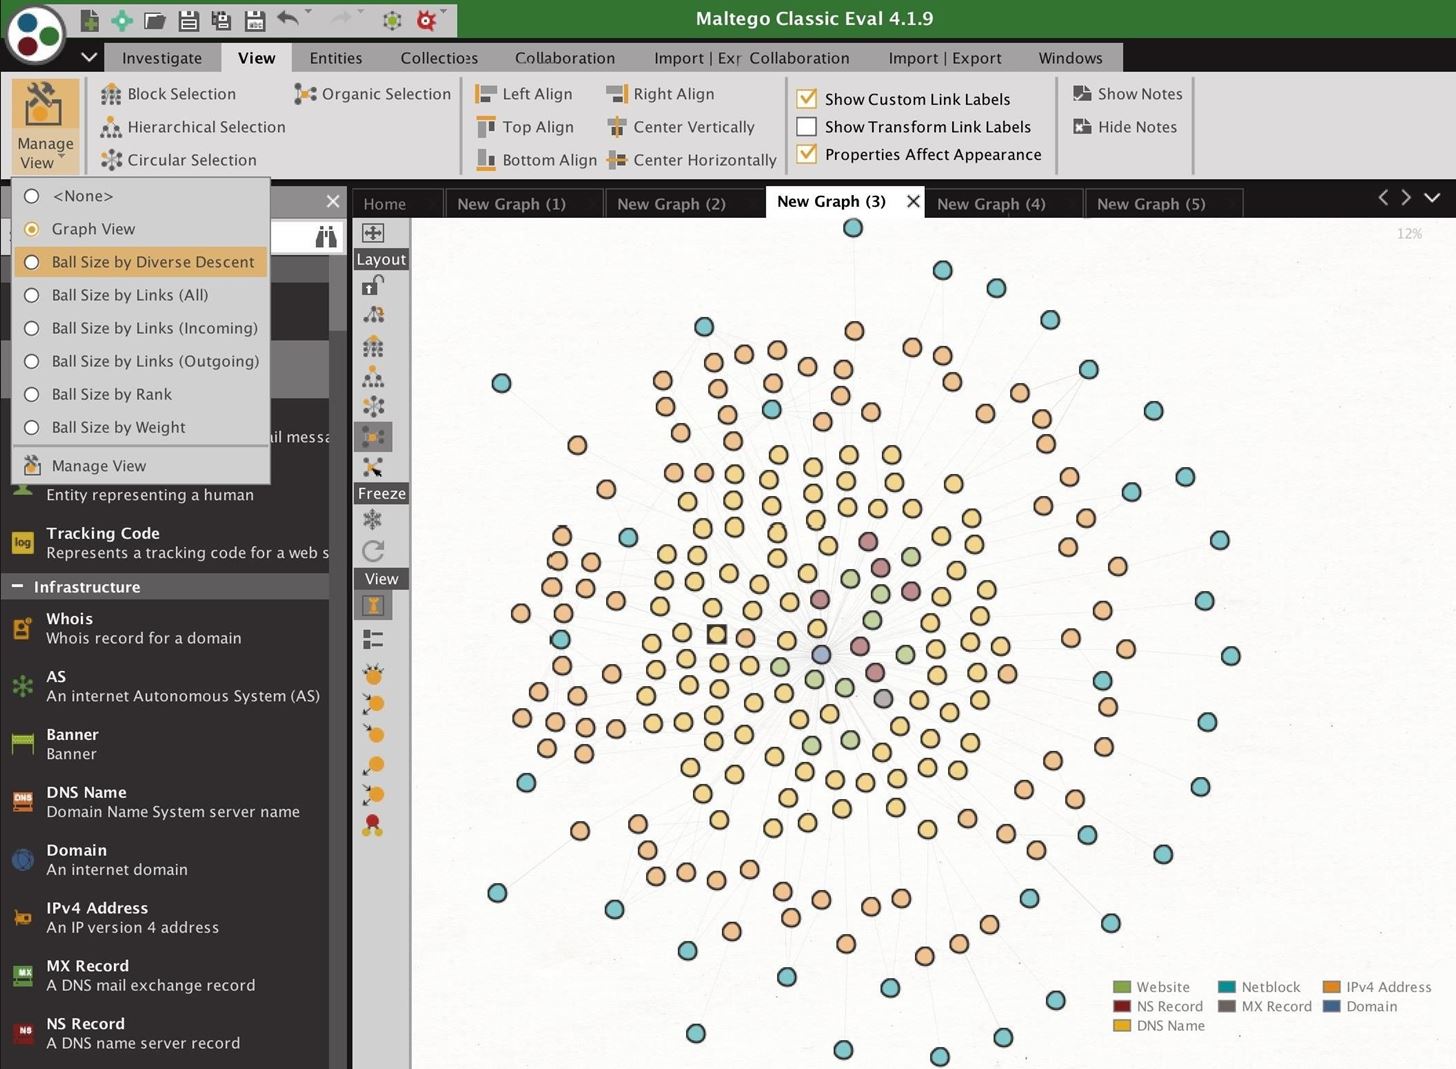
According to Maltego, "With diverse decent, entities are sized according to the number of incoming links the entity has. However, incoming links with different grandparent entities are weighted higher." This is explained in the image below from the Maltego user guide.
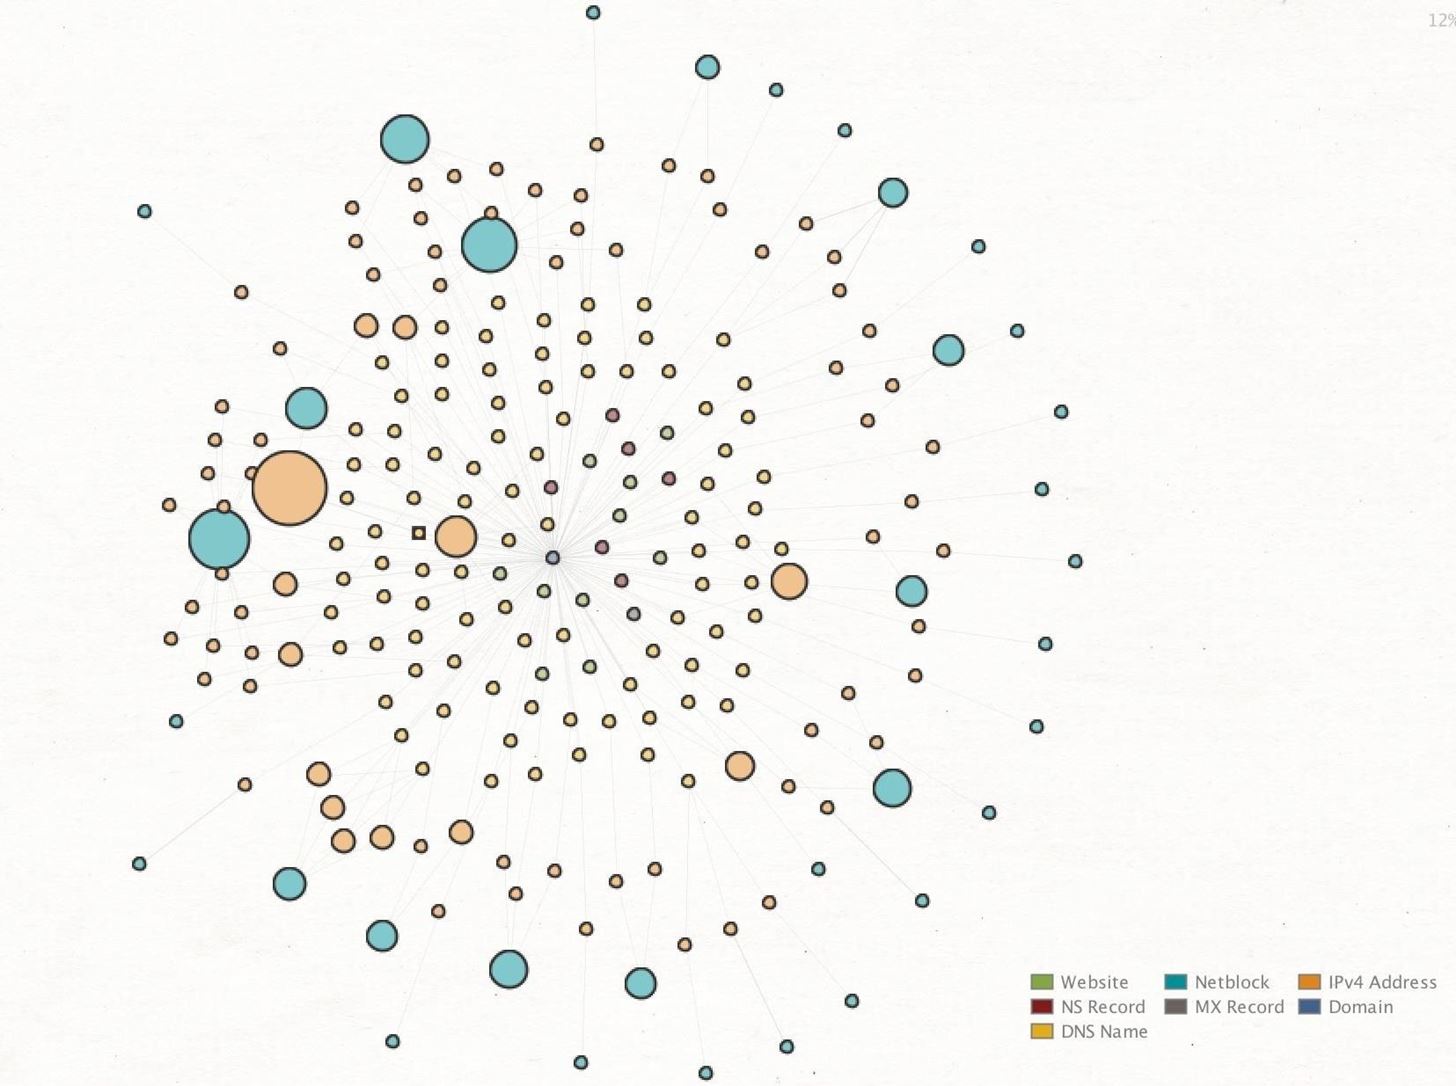
Once this has been applied to our graph in organic view, it suddenly becomes much more obvious when an entity is heavily linked to and is likely to be something of interest. Now, we can focus our attention on the larger entities and explore the connections between them.
Setting the Stage for Automated Attacks
Through conducting network fingerprinting with Maltego, an attacker can learn in minutes intimate details about the network of a target. Everything from the email service and hosting provider to a complete list of all IP addresses assigned to the company's AS number can be found quickly and easily with a few clicks. With this information, a hacker can switch to active methods of recon, loading the discovered IP addresses into automated vulnerability scanners to discover, and exploit any susceptible devices.
Hackers know that by building a map of the technical details, attacking a network becomes as simple as identifying the weakest link and exploiting it. Knowing where to start an attack is nearly impossible without recon, and Maltego can allow anyone to pull together the information needed to choose the most efficient target, rather than grasping around in the dark.
I hope you enjoyed this guide to OSINT network fingerprinting using Maltego! If you have any questions about this tutorial or using Maltego for OSINT research, feel free to leave a comment or reach me on Twitter @KodyKinzie.
Just updated your iPhone? You'll find new emoji, enhanced security, podcast transcripts, Apple Cash virtual numbers, and other useful features. There are even new additions hidden within Safari. Find out what's new and changed on your iPhone with the iOS 17.4 update.


Be the First to Comment
Share Your Thoughts