A hoop house is a small greenhouse, and if you’d like to build one ourself, you’ve come to the right place. They’re simple, inexpensive, portable, solar heated greenhouse-type garden structures that turns a little bit of hands-on effort and simple materials into a lot more growing season. That’s why hoop houses make so much sense and that’s what these hoop house plans deliver Although hoop houses are smaller and simpler than greenhouses, a successful layout still requires planning and care. Building a hoop house that ages gracefully also demands construction details that aren’t immediately obvious. This is where the tried and true design features you’ll learn about here can help.
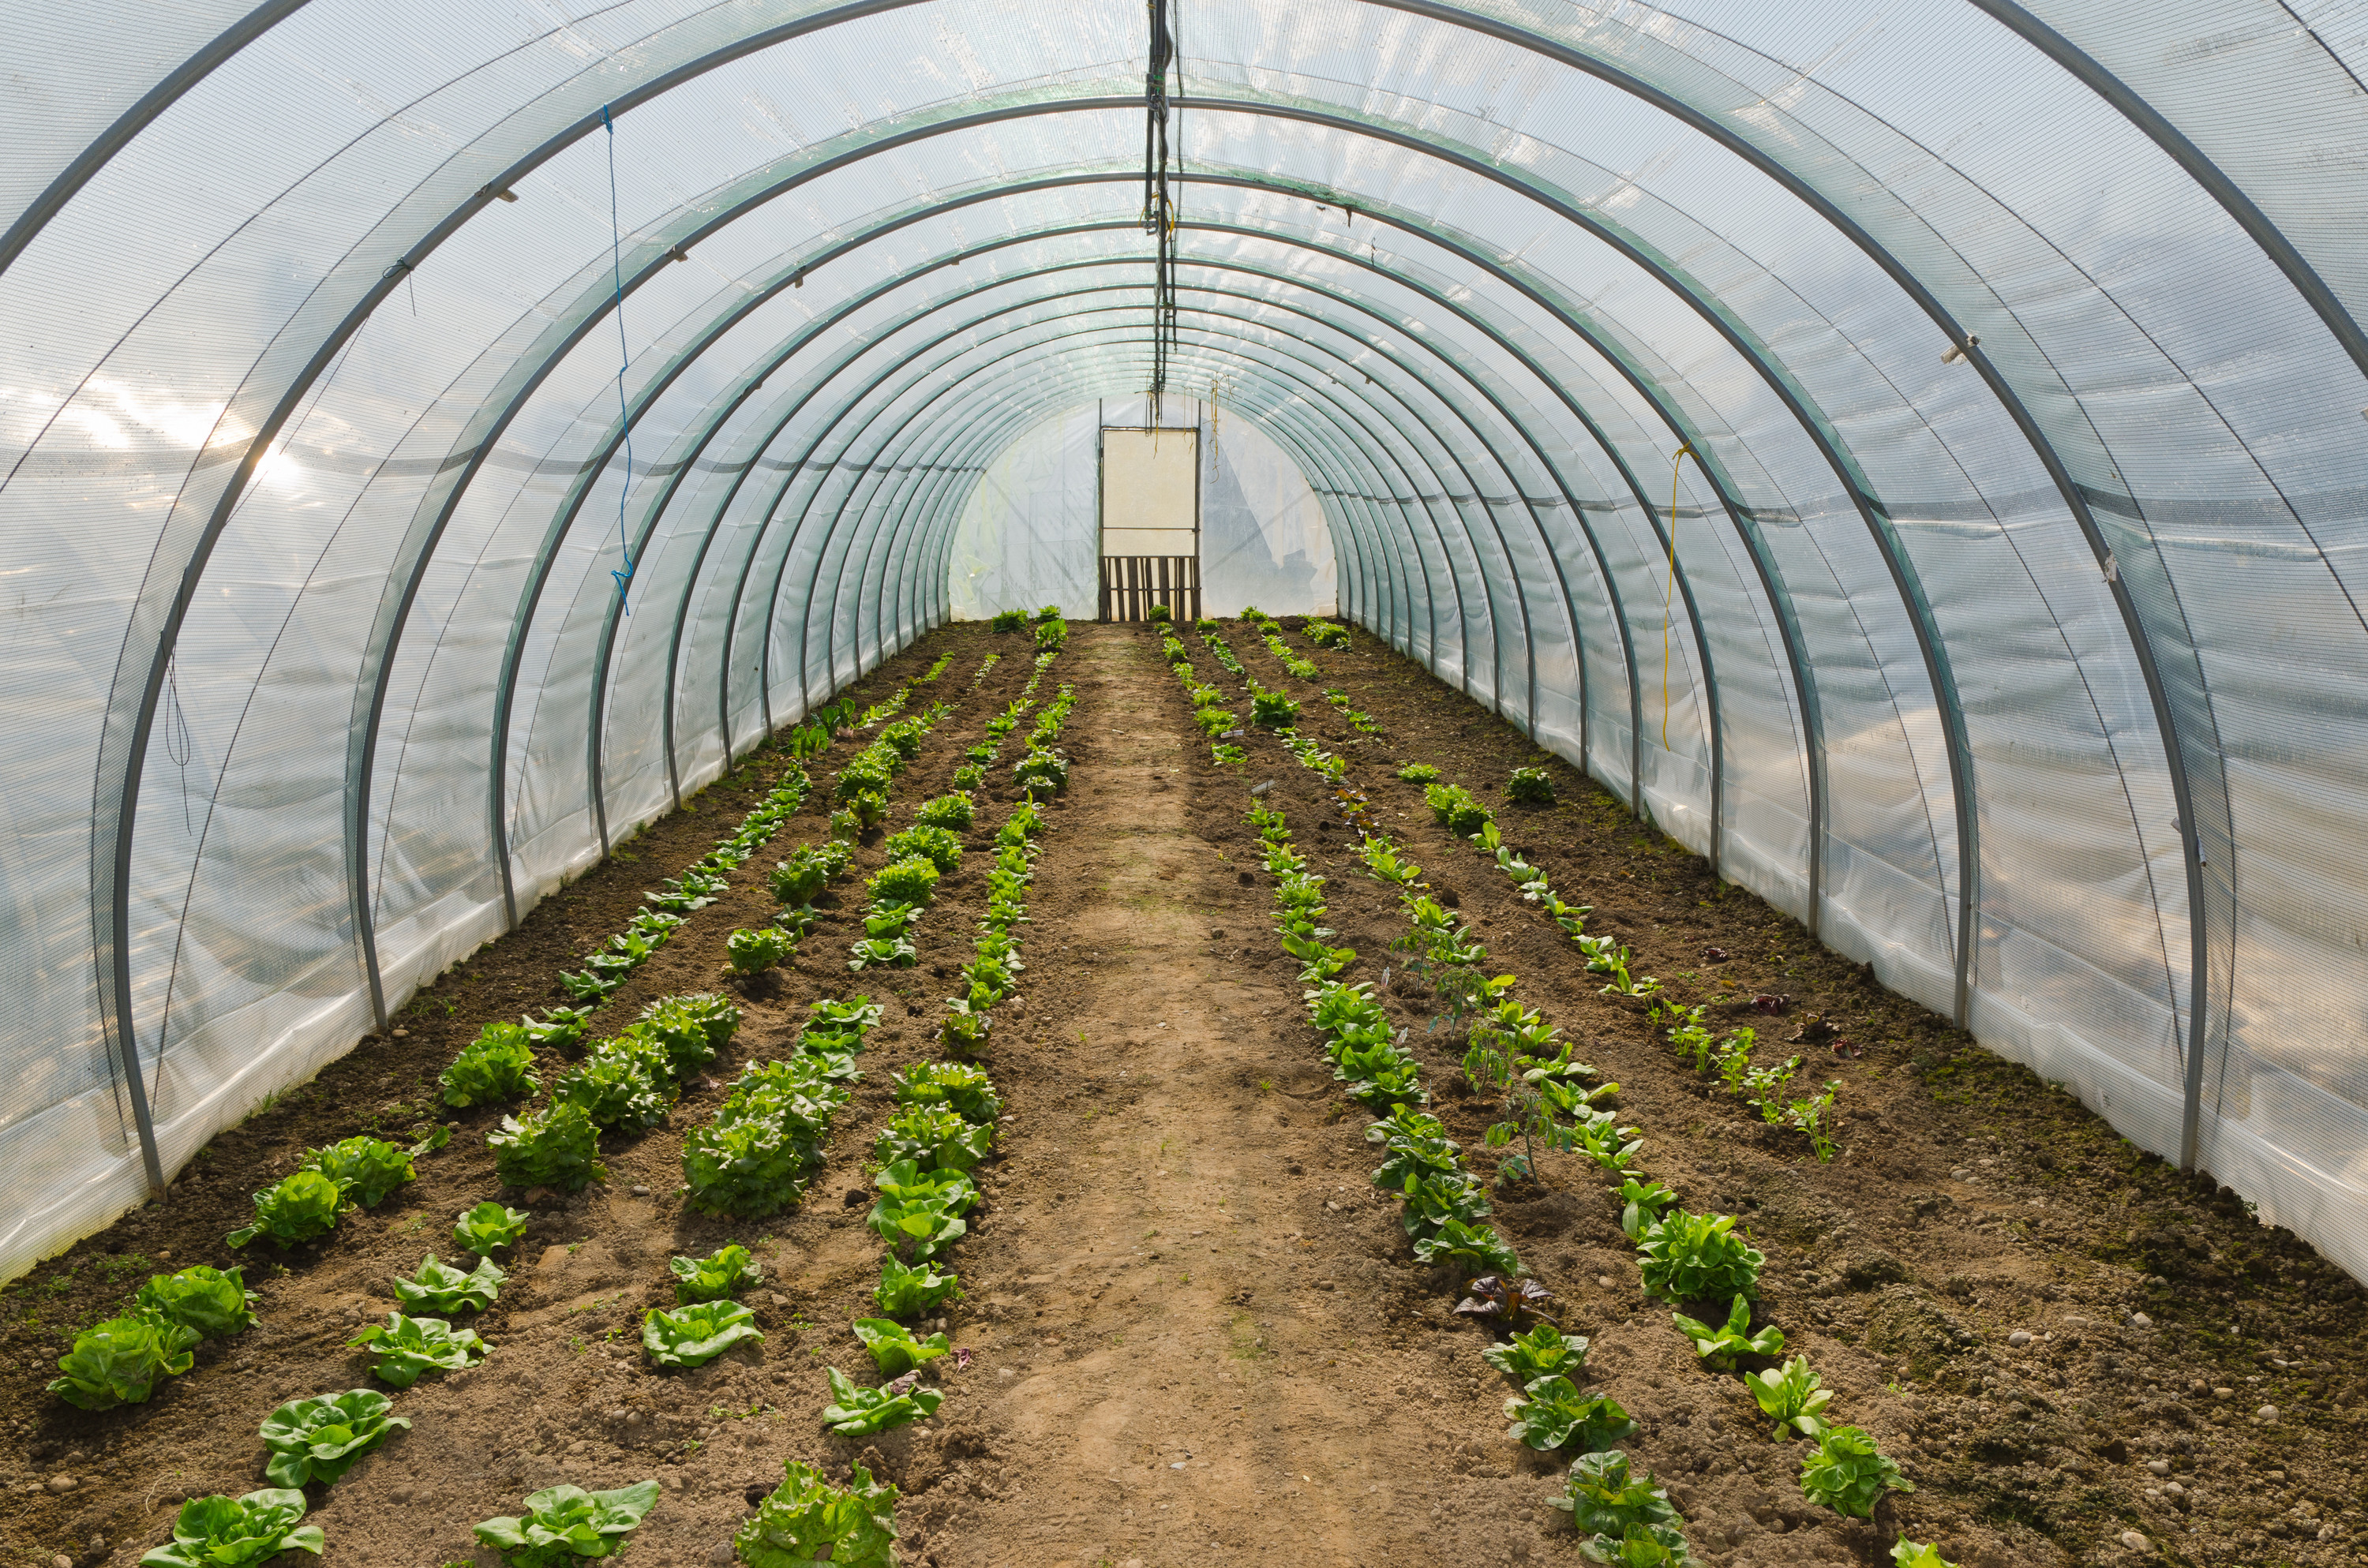
Hoop houses deliver benefits throughout your growing season, and not just the obvious advantages of protection from frost. Decreased wind pressure on seedlings, more humid growing conditions and higher internal concentrations of CO2 during the main part of the season are reasons why hoop houses deliver better food and more of it. For northern gardeners hoop houses also bring the reality of spring planting and nurturing closer to the time when your post-winter enthusiasm naturally kicks in. The warmth and serenity of a hoophouse offers a pleasant space to work, sit and recharge yourself, too. Hoop houses even deliver benefits in hot climates by providing variable amounts of protection when used with roll up sides and shade cloth.
Before you begin, get specific about what you want to accomplish. Are you looking for a small space for nurturing seedlings? Do you envision a hoop house you can walk into? Do you plan to make roll up sides to control excess heat? All of these features can be incorporated into the build-it-yourself design here.
DIY Hoop House Location and Orientation
Flat, level, well-drained conditions are required for any hoop house, but shelter is also worth considering. Even moderate winds exert a lot of force on a hoop house, so choose a location that gains shelter from tree cover or other buildings if possible. Also, since excess heat within the hoop house during summer will be an issue even in northern regions, orient your hoop house so the ends are aligned with prevailing winds for maximum ventilation. A location with deep, stone-free soil makes anchoring the structure much easier.
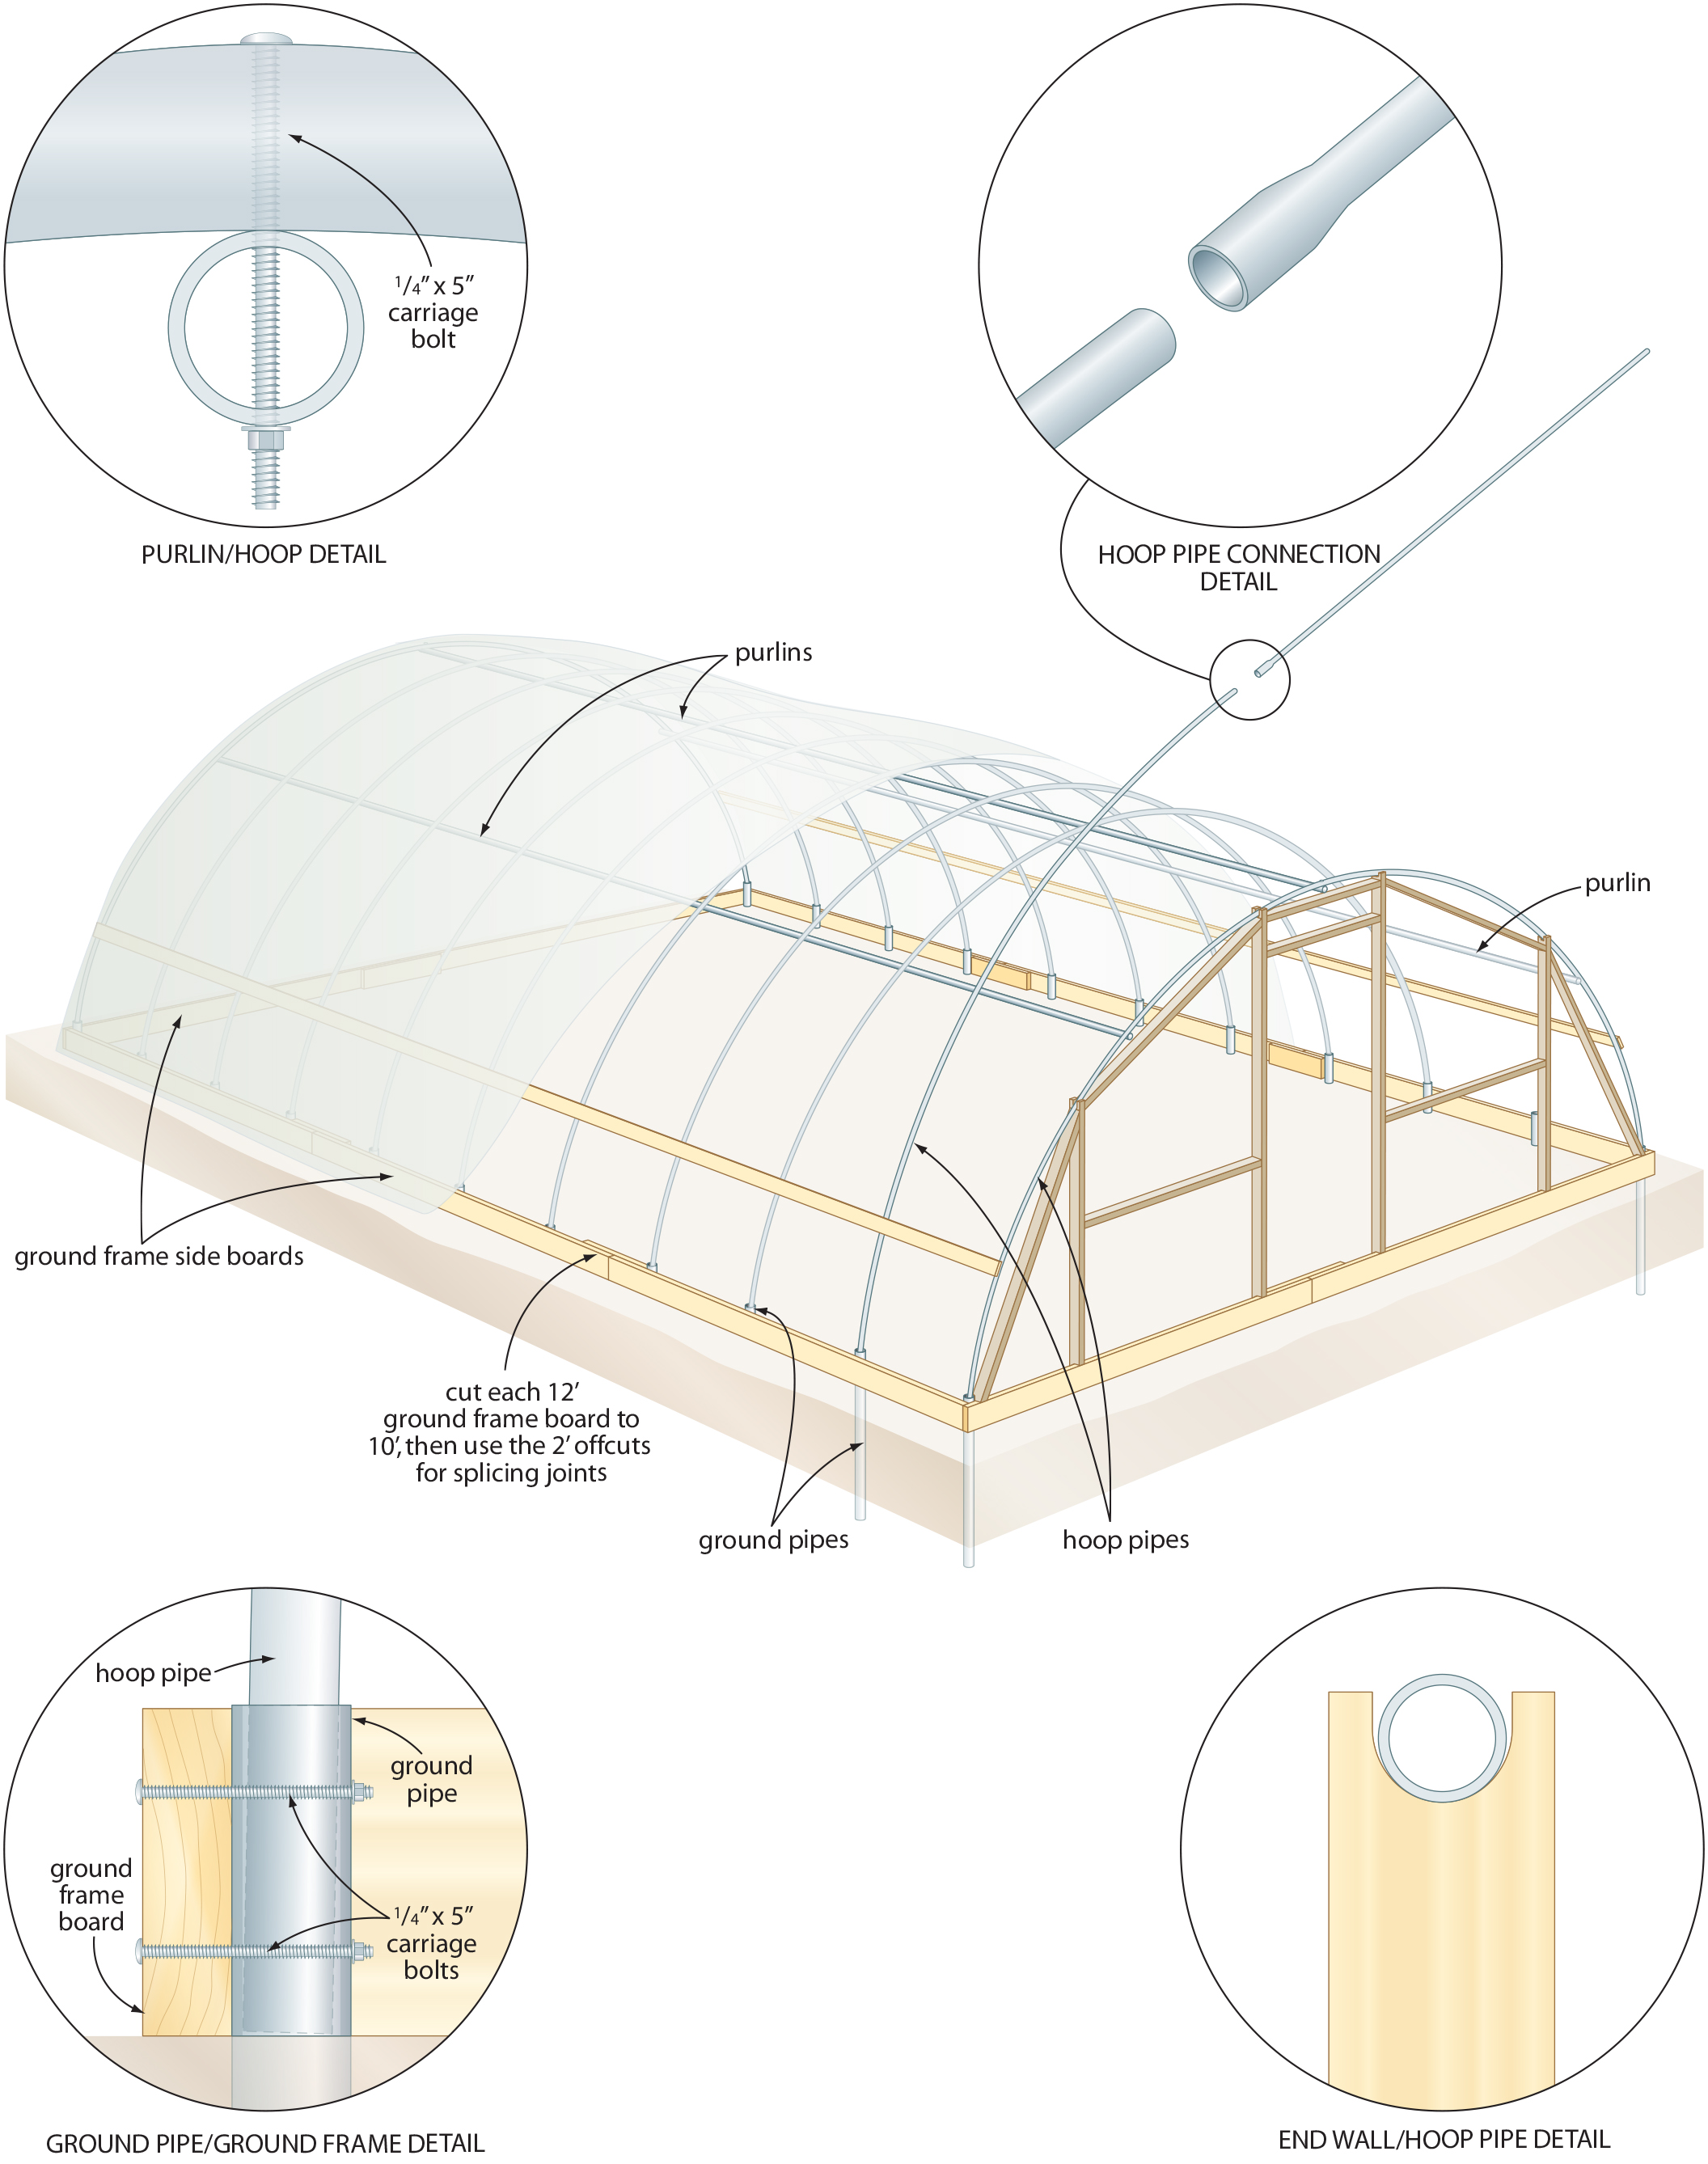
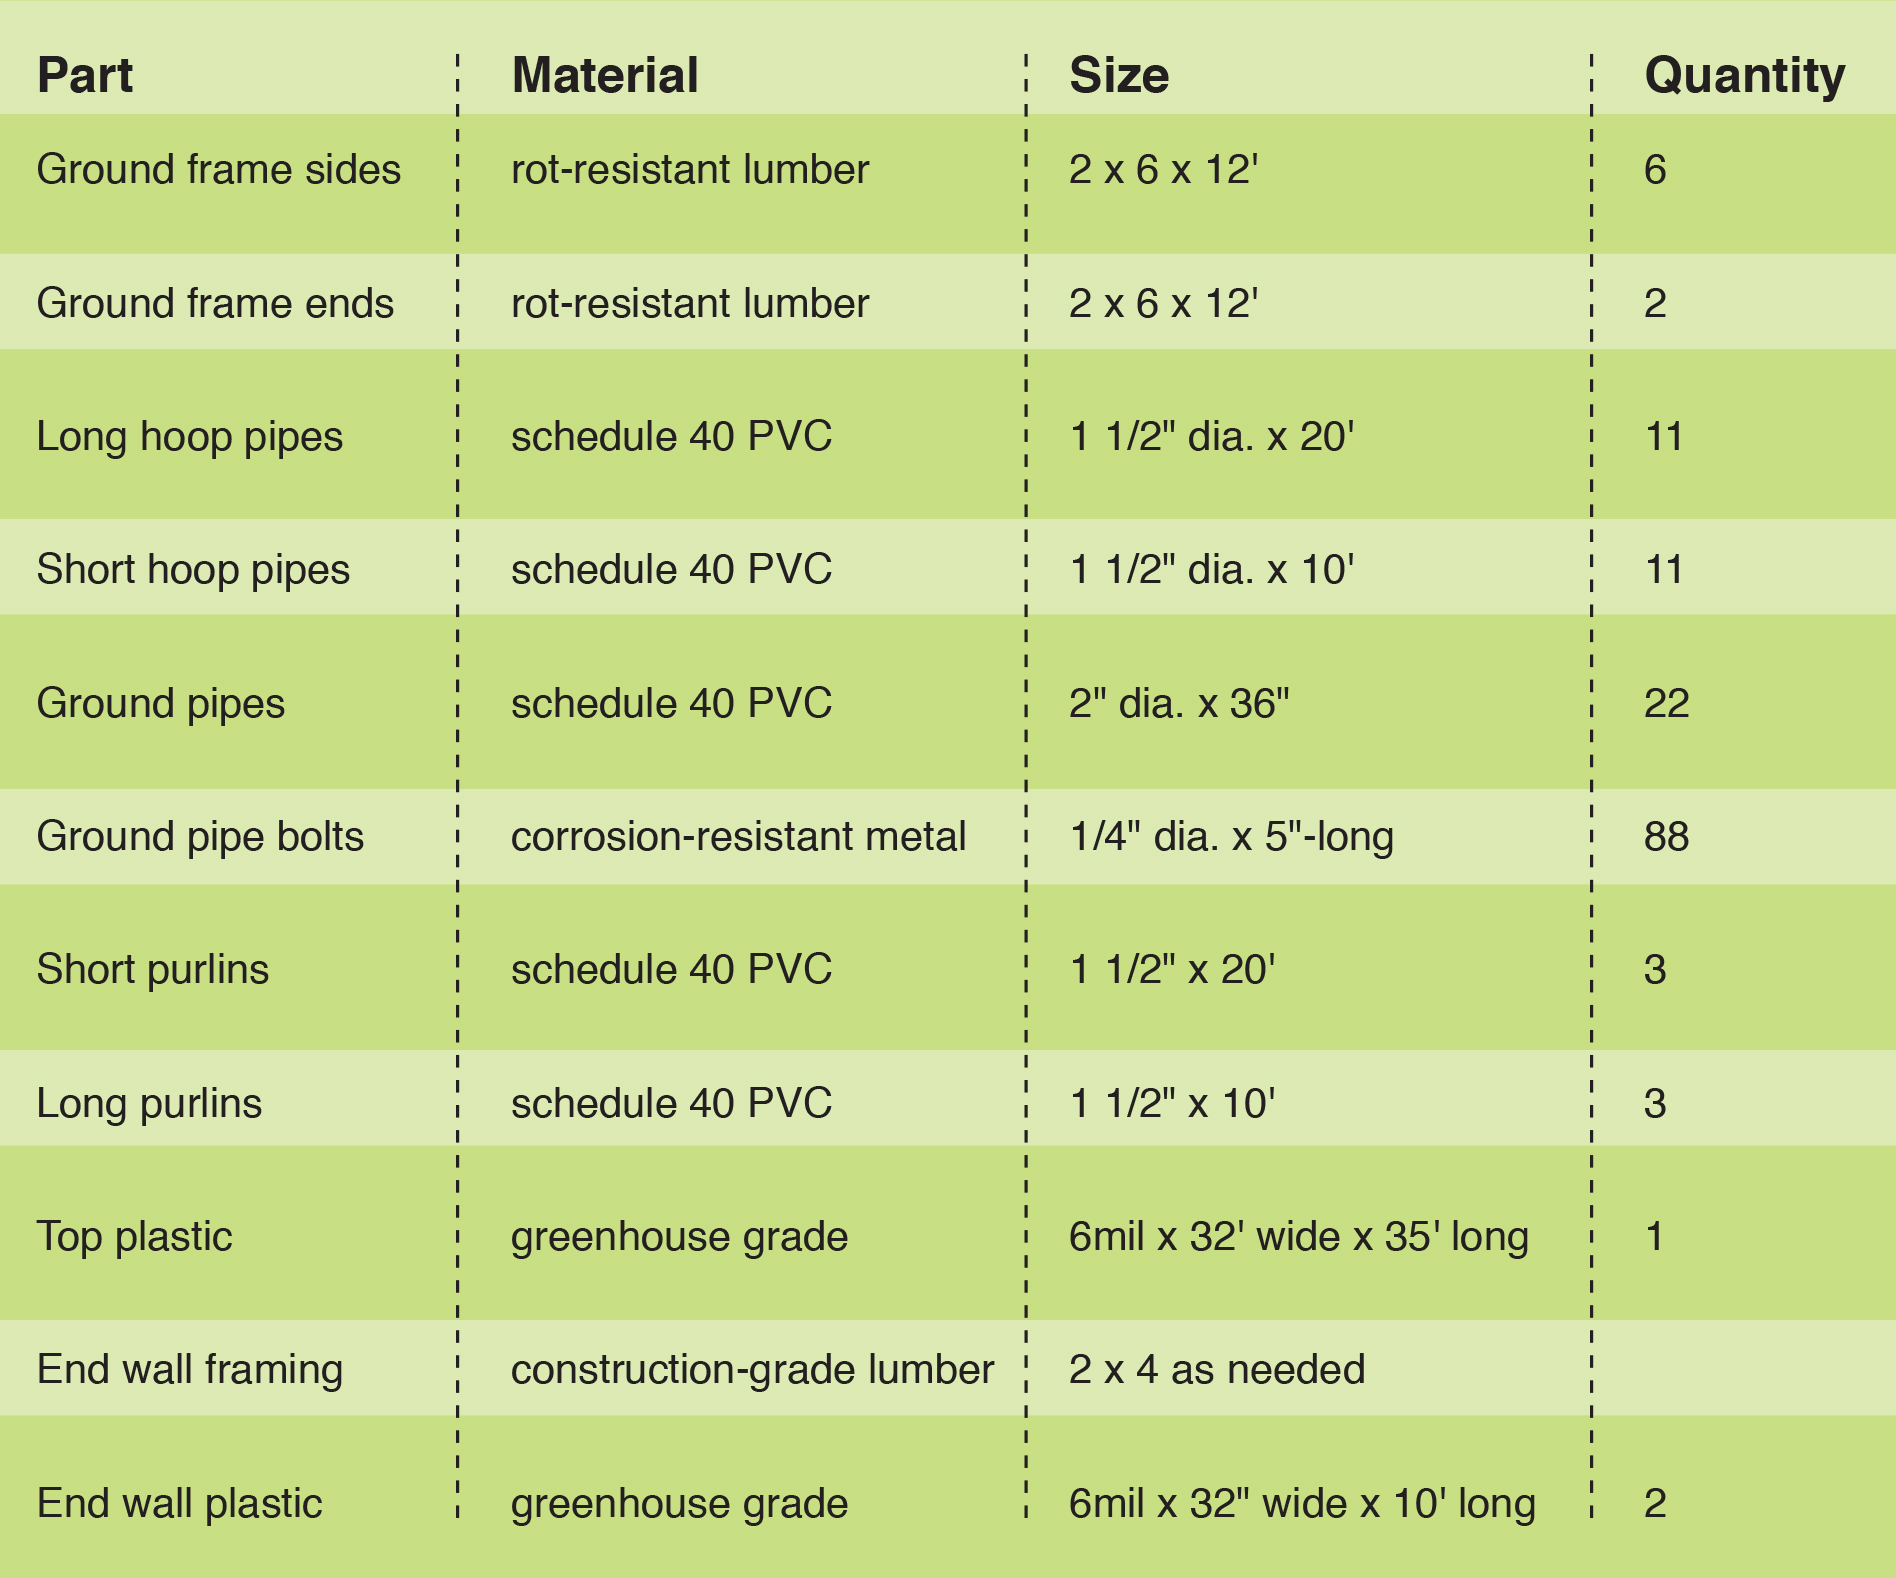
Start by clicking on the hoop house plans to the left. You’ll get a printable set of drawings opening up on an a new browser window. As you can see, the PVC pipes arch over a wooden ground frame, holding up polyethylene plastic that creates shelter. This is the DIY hoop house plans recipe in a nutshell, and it works for structures up to about 18 feet wide. You can also make hoop houses smaller, too. See “Hoop Pipe Guidelines” for recommended pipe diameters and hoop pipe lengths. We used 1 1/2-inch diameter, schedule 40 PVC pipe for the hoops, and 2-inch diameter PVC for the ground pipes on this design. Study all the instructions and the hoop house plans until you fully understand construction steps before buying materials.
Hoop House Plans Step#1: Build the Ground Frame
Regardless of the size of your hoop house, begin by creating a four-sided ground frame from rot-resistant lumber. 2x6s placed on their edge work well for houses from 14- to 18-feet wide. Use 2x4s for the ground frame on smaller hoop houses. These days pressure treated lumber no longer contains arsenic, so it’s safe to use to form the perimeter of your hoop house. You could also use a rot-resistant wood such as cedar, but it won’t last as long as pressure-treated wood made for ground contact applications.
 If the sides of the frame you need are longer than the lumber you’ve got, use 24-inch battens to splice joints. Hot-dipped galvanized #10 x 3-inch wood screws work best here, with #10 4-inch screws used to secure corner joints. Set your frame in place, then measure and equalize diagonal measurements taken from corner to corner. As long as opposite sides of the frame are equal in length, corners will be exactly 90º when diagonal measurements are the same. Drive temporary wooden stakes into the earth on the outside corners of the ground frame to prevent it from moving out of square.
Hoop House Plans Step#2: Drive Ground Pipes
Ground pipes are vertical lengths of 36-inch-long PVC pounded vertically into the ground with a sledge hammer. Drive one ground pipe at each corner of the wooden frame, and another every three feet along the long sides, all tight to the inside face of the ground frame members. Each pair of ground pipes supports one hoop pipe. As you work, have someone hold a piece of scrap wood on top of the stakes as you’re pounding them in, to avoid breaking the PVC. Drive the pipes so they’re flush with the top edge of the ground frame boards.

Hoop House Plans Step#3: Raise the Hoop Pipes
The length of hoop pipes required to create the ideal arch depends on the width of hoop house you’re making. One 10-foot and one 20-foot length of PVC pipe is required for each hoop on this 18-foot-wide design. When you buy pipe, make sure you’ve got a factory-flared end on one of each pair of pipes that’ll come together for each hoop. This flared end slips over the straight end of its partner, creating the total length required to span the width of structure. Although you could probably get by joining these pipes with friction only, use PVC cement as you assemble the joints, just to make sure they stay together.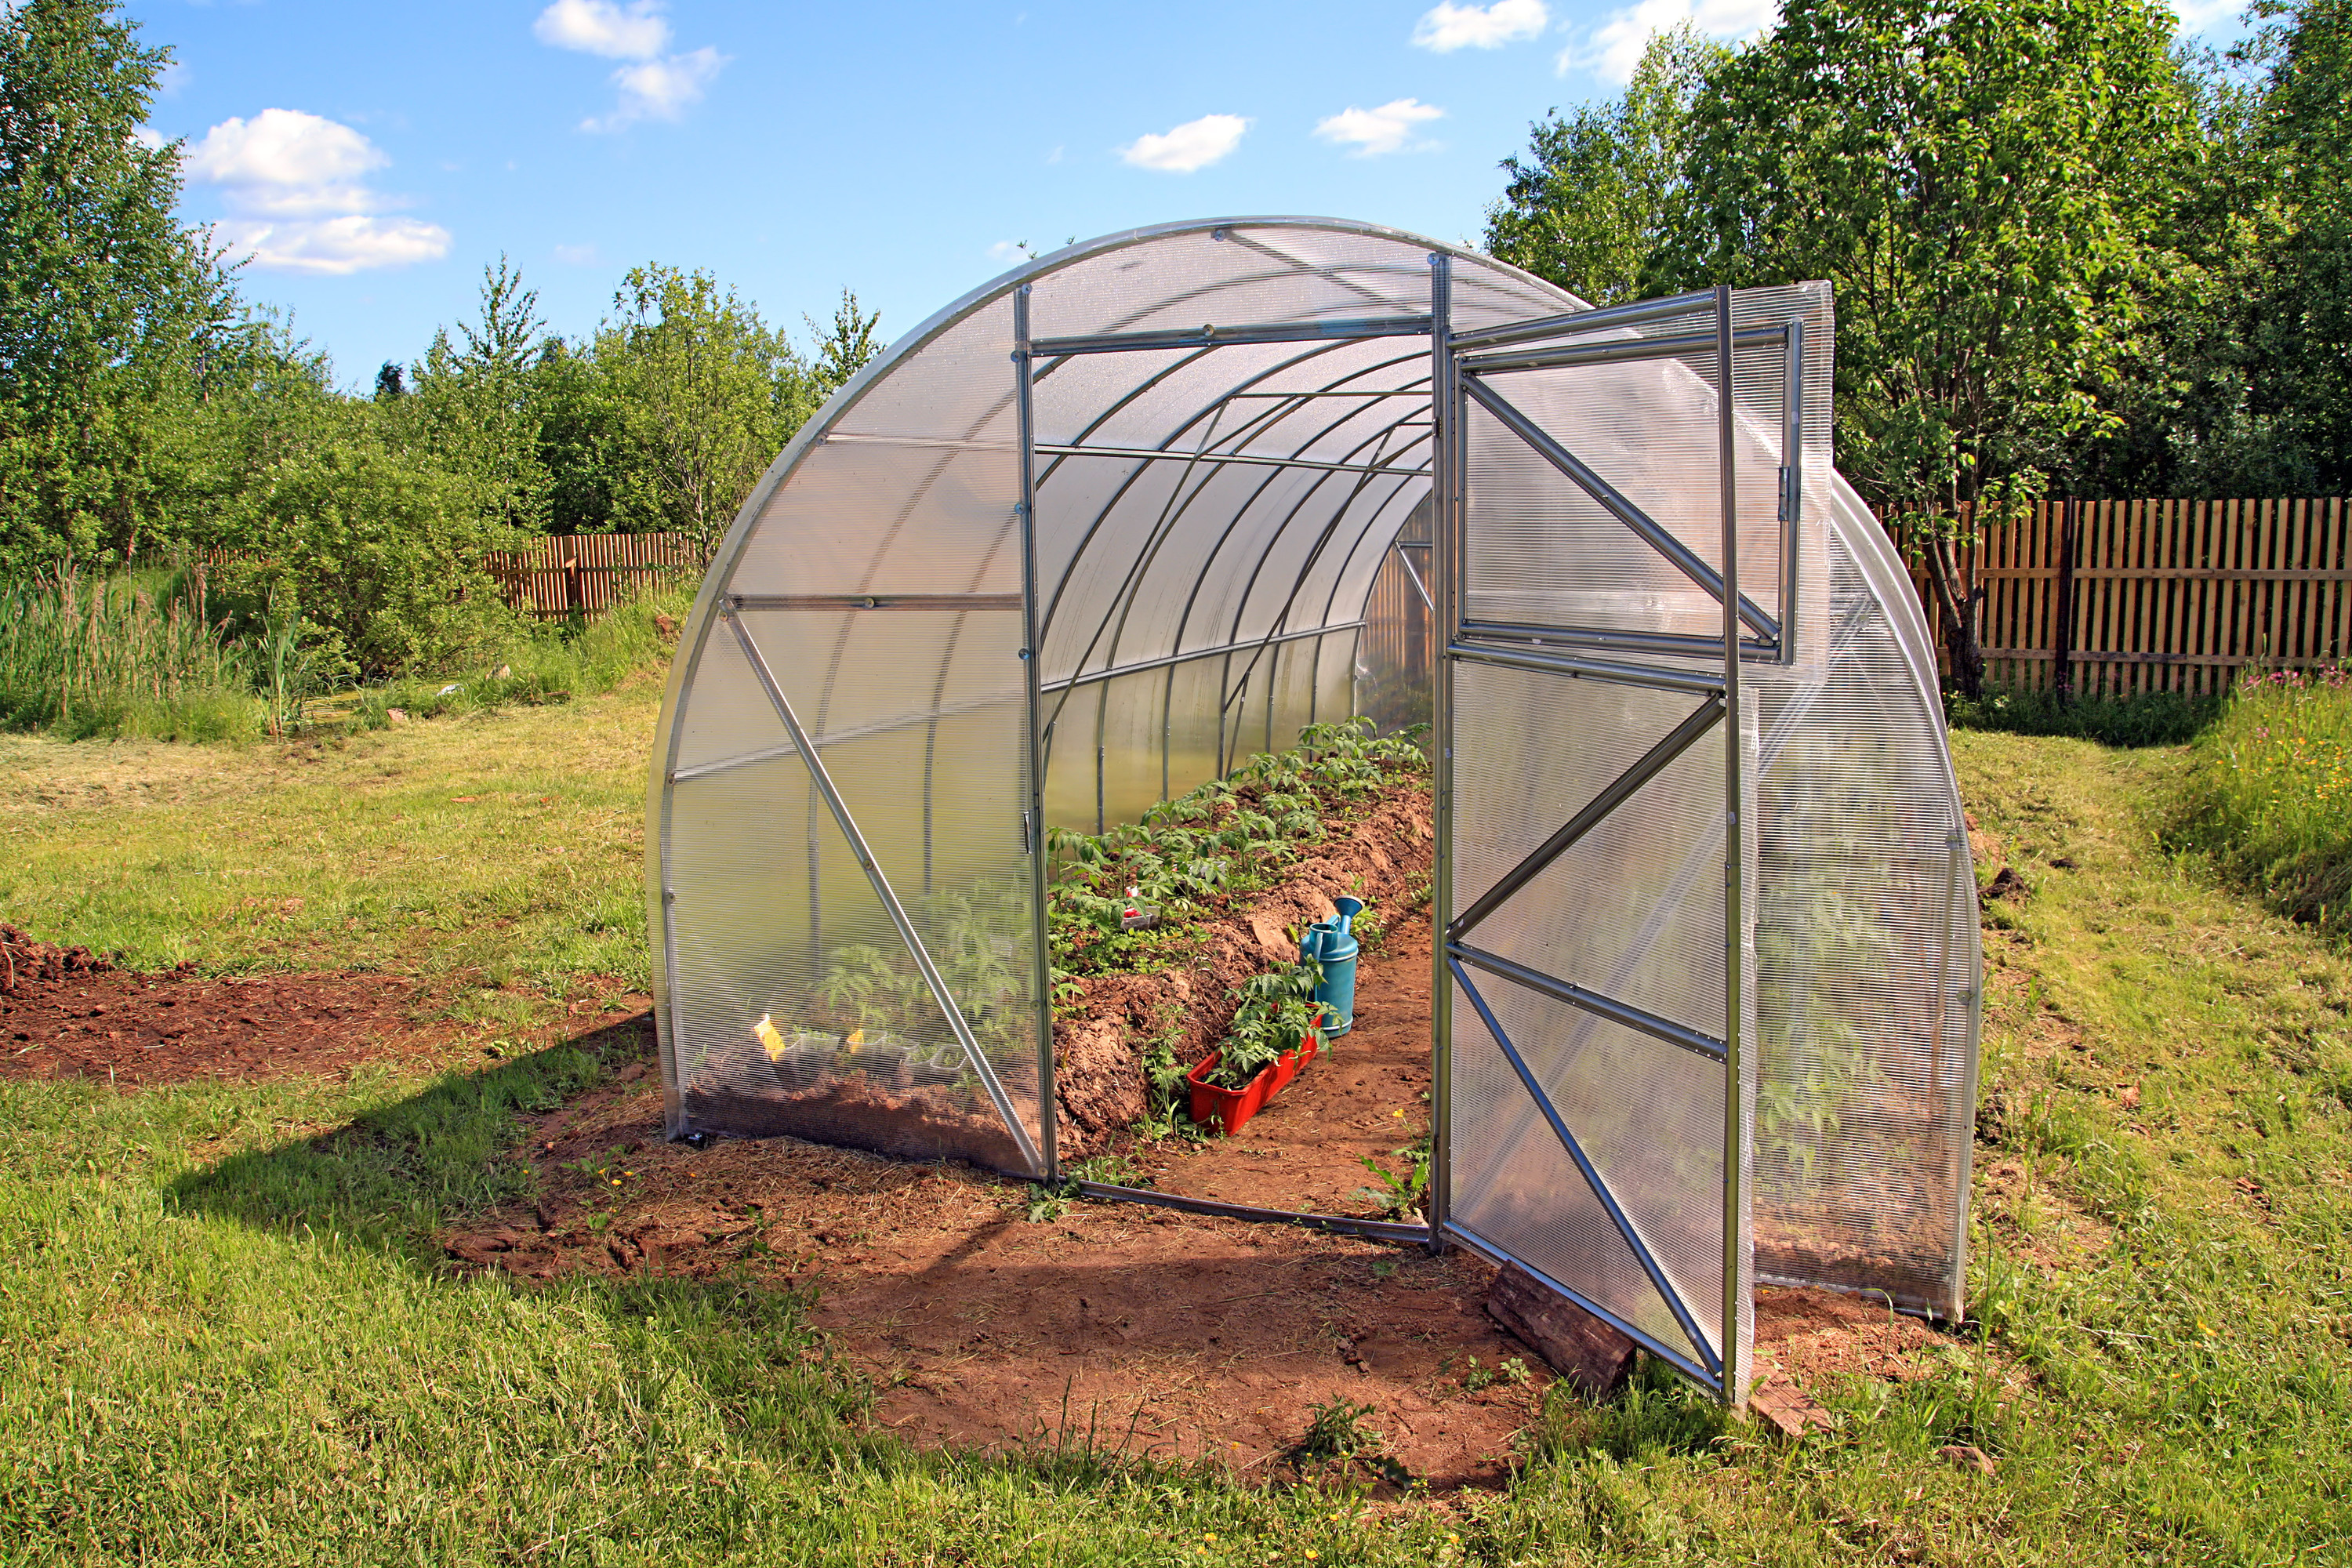
The amount of arch in a hoop house can safely vary, depending on how much headroom you want. If your hoop house width is narrower than the design here, you’ll need to shorten the hoop pipes accordingly. See “Hoop Pipe Guidelines” for suggested diameters and lengths for different hoop house widths.
Lay your hoop pipes in position across the ground frame, next to the ground pipes they’ll fit into, then get help fitting the ends of the hoops into position. First slip the end of one hoop pipe into its ground pipe, then bend this pipe so the other end fits into the opposite ground pipe. Install all hoop pipes like this, then use a drill to bore 1/4” dia. holes for lock bolts through the wooden ground frame, the hoop pipe and the ground pipe for a lock bolt. Do this work while ensuring that the hoop pipe is pushed all the way down, and only on one end of each hoop for now. Install and tighten 1/4” dia. x 4” carriage bolt in each of the holes, then climb a step ladder and take a sighting along the tops of all hoops. The peaks should all be more-or-less the same height, though some adjustment will be required. Have a couple of helpers push and pull the unbolted bottom ends of the hoop pipes, then drill and bolt them when the peaks are aligned.
Hoop House Plans Step#4: Install Purlins
The hoops may be up, but they’re not strong yet because they’re only supported at bottom ends. This is where purlins come in. They’re horizontal pipes that bolt to the hoops, adding strength. You’ll need at least one purling installed along the ridge of the structure, with two more partway down each side in regions that get high winds or lots of snow. Place the purlin pipes on the inside of the hoops, secured with the smooth heads of 1/4” dia. x 4” carriage bolts facing upwards. If you’d like the option of rolling up the lower sides of your hoop house during warm weather, add wooden 1×2 hip boards two or three feet up from the ground, for anchoring the main pieces of hoop house plastic. The roll up sides hang from these wooden strips, available to be raised or lowered as needed to control internal temperatures.
Hoop House Plans Step#5: Adding and Anchoring the Plastic
It makes sense to use the best grade of greenhouse plastic you can for your hoop house, even if it’s small. Hardware store plastic looks good, but it’ll degrade in the sunlight and tear in a year or two. The best hoop house option is 6 mil, UV-protected greenhouse plastic. It’ll easily last four or five years, delivering more peace of mind and better thermal performance while it does. Choose a calm day to unroll all the plastic you need to cover your hoop house, leaving at least 12 inches of extra plastic along the ground edges, and 24” on the ends. Wrap this excess plastic around sponge rubber balls every four or five feet, then tie the balls in place with the end of ropes. Throw the other ends of the ropes over the peak of the hoop house, then get helpers to carefully pull the plastic up and over the structure. You may find it helpful to have extra helpers on step ladders at the peak, to relieve sideways strain on the framework by lifting the plastic by hand as it goes up.
With the plastic draped over the frame, pull it as needed for alignment (fold marks on the plastic usually offer visual guidelines), then get ready to secure it. You could wrap excess plastic up with 1×2 strips of wood, then anchor these strips to the hip boards or ground frame, but there’s a better option. See “Three Details that Make a Big Difference” on page TK for details.
Hoop House Step#6: Build End Walls
You’ll find 2×3 or 2×4 lumber best for framing the end walls of your hoop house. The hoop house plans show how the parts fit together, including notched pipe saddles that secure the end frames to the PVC structure. Although you can use wooden battens to secure the plastic along the edges of the end wall frames, the same kind of wiggle wire channels and spring strips that secure the main edges of the plastic work much better.
Hoop Plans: Pipe Guidelines
The wider your hoop house, the bigger and stronger your pipes need to be. Follow the guidelines to the right if you’re modifying the width of hoop house from the design shown here. Hoop house length doesn’t require changes in hoop size or pipe diameter. Click the box for a larger view of the chart figures.
Note: These pipe sizes assume a hoop spacing of 36”. In areas of high snow load and wind, decrease hoop pipe spacing to 24”. If in doubt, build it stout. That’s the main thing to keep in mind as you work.

Hoop House Plans: Floor Options
Depending on how you use your hoop house, the floor surface may be more important than you think. Foot traffic is the reason why. If you’ll be using your hoop house for seedling flats and pots, the soil is quite likely to turn into a trampled, dusty and muddy mess as you walk in an out for watering, weeding and transplanting. Any kind of pathways you create should be made of light, organic material that doesn’t permanently affect the soil. Clean straw is an excellent pathway option, but it’s not available everywhere. If you live in a forested area, sawdust is a perfect choice for a hoop house pathways.
Hoop House Plans: 3 Details Make a Big Difference
Something called “wiggle wire” is the best option for anchoring plastic along the edges of your hoop house. It works with an aluminum track that fastens to the ends and edges of your hoop house, to make securing plastic fast and absolutely reliable.
You’ll enjoy longer plastic life and much more effective hoop house action with a double layer of inflated plastic. Pull two layers of plastic over your frame and secure them with a little slack. Small, energy efficient electric fans can be installed to continually blow air into the gap between the layers, keeping them taut while also boosting internal hoop house temperatures during cold weather. Inflation also keeps plastic from flapping in the wind, extending plastic life.
If you live in a windy area, consider adding duckbill anchors to secure the ground frame . Pound one just outside each corner, with another one of two along each long edge. Lever the cable of the anchor up to set the duckbill horizontal, then use rope to tie the ground frame down.
Protect Your Poly Plastic
Chemical interaction between PVC and polyethylene hoop house skin can cause premature deterioration of the poly. That’s one reason it makes sense to apply protective tape along all edges of the frame that touches the skin before poly installation. This tape also makes bolt heads less likely to cause physical damage to the skin.
Click the chart below for a larger, printable version of the parts require for the hoop house featured here.
Do you long for more heat and growing power for your garden? A hoop house is like moving a part of your land hundreds of miles south, all for a small investment in materials and time. It’s proof positive that a little bit of simple technology can definitely go a long way.
Suppliers for Hoop House Kits & Hardware
Growers Supply – suppliers of hoop house kits, plastic & tape
1440 Field of Dreams Way
Dyersville, IA 52040
800-476-9715
www.growerssupply.com
Harness Greenhouses – hoop house kits & full size greenhouse
1044 rue Principale
St-Thomas, QC, Canada
JoK 3L0
888-427-6647
www.harnois.com
Hoop House Greenhouse Kits – supplier of hoop house kits, plastic, tape & blower fans
P.O. Box 2430
Mashpee, MA 02649
Phone: 800-760-5192
www.hoophouse.com
Lostcreek Greenhouse Systems – steel hoop house bending tools & plastic
245 C.R. 2651
Mineola, TX 75773
Phone:903-497-1158
www.hoopbenders.net
 Did you find this article useful? I hope so. Please consider helping me cover the cost of creating and publishing content like this. Click the “buy me a coffee” button below for a fast, safe and simple way to make a contribution. Thank you very much for helping to keep this website up and running.
– Steve Maxwell